In the third mission of Desperados III, “Troublemakers in Flagstaff,” it’s never exactly clear who the troublemakers are. It could be the four targets you have to assassinate, but we’re willing to bet the troublemakers are actually Cooper and Hector themselves. You can take out your targets however you please, but there are nifty tricks you can use for each one. Take all four down with “accidents,” and you’ll receive one of this mission’s badges as well.
Jarvis versus cow
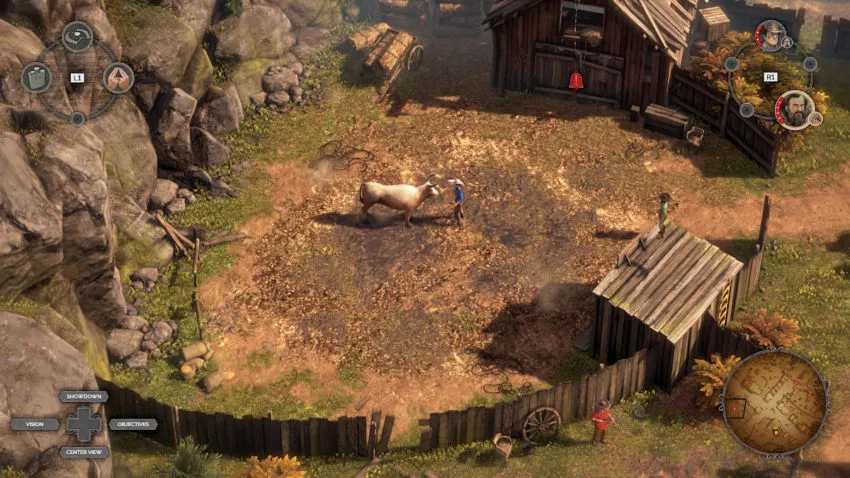
You can tackle your targets in any order you’d like, but Jarvis is the closest and arguably the simplest. To get close to him, just work your way up from the bottom of the map and take out all the enemies you see methodically to not get caught. Once you are close enough to Jarvis and his pasture, wait till he goes to say hello to his cow, and then toss a coin at the animal. The cow will proceed to gouge Jarvis to a quick (but painful) death. Anyone who sees will show some concern for a few seconds, but they won’t get alarmed and will soon return to going about their day.
Wild Marge versus poison
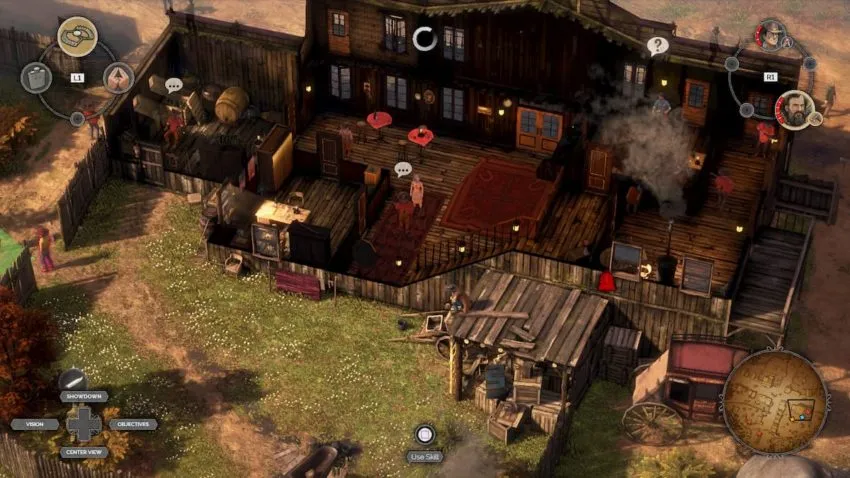
To get to Wild Marge, you’ll want to head up the map from where you killed Jarvis and to the brothel. There are several different ways to get in, but we found the easiest one to be going around the western side by the post office. Once again, pick off all the gunmen you need to and head around the exterior-back of the brothel till you reach the entrance to the room with whiskey casks (in the upper left corner of the above picture). You can poison the whiskey cask, but you’ll have to get some poison first. A bottle of poison is located inside the brothel on a table towards the back of the second floor (in the above picture around where you see the smoke in the bottom right corner of the brothel). Track the enemies’ patterns in the house and kill any gunmen you need to as you sneak up to the second floor to nab the poison. You don’t need to worry about the barmaid who is walking around on a loop, as she won’t raise the alarm upon seeing you. Once you get the poison, head back down to the room with the whiskey cask, poison the cask, and get out of there.
McBane versus wall
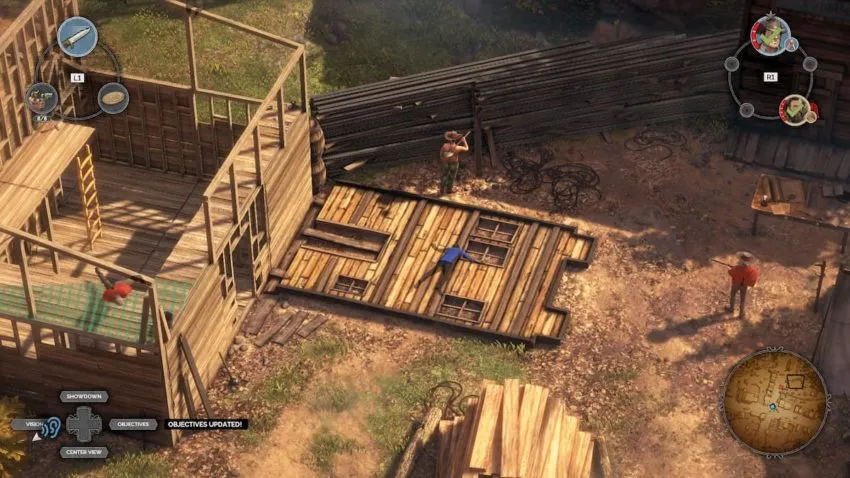
McBane hangs around the construction site on the right-hand side of the map. Getting to him isn’t too challenging, although it is time-consuming. You will have to take out a large number of the gunmen surrounding him to get up to the house under construction (and seen in the above image). Once you’ve cleared a good number of the gunmen in the area, you should be able to kill the poncho-man in the half-built house without anyone noticing. Now, all you have to do is wait for McBane to walk over to inspect his half-built house, interact with the shoddy wall, and it will fall and crush him.
The Duke versus the bell
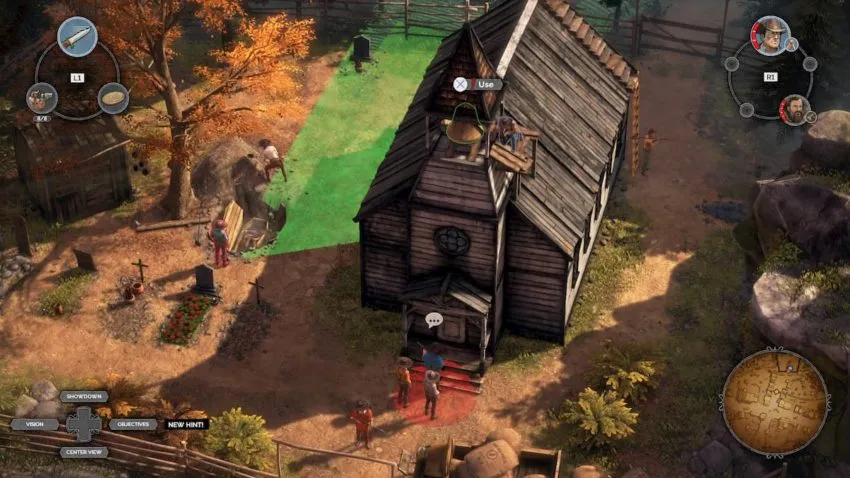
The Duke might seem like a hotshot with the way he swaggers around town in sight of tons of civilians, but offing him is actually quite easy. Head up the right-hand side of the map, climbing some ivy on the cliffs to get around to the back of the church. Wait for an opening to jump down and scramble to the top of the church, and then all you have to do is wait for the Duke to stand underneath.
All other badges
Killing the four targets the fun way will net you a badge, but there are these others to get as well:
- Don’t kill or knock out anyone in the train track area.
- The train tracks are around McBane. This might make getting the wall to fall and hit him a little more complicated, but with a few well place whistles from Hector, you can distract enough people to get to the top of the house and get the job done.
- Don’t touch any bushes or haystacks.
- Listen in on 10 private conversations.
- You can zoom in on NPC conversations with the camera and get tips from them without having to get your party actually near them.
- Kill three mission targets at the same time.
- This requires you to clear out a good number of the gunmen on the map so that you can run around more easily. Once you have enough people out of the way so that you don’t get caught, poison the whiskey cask and then have each character run to a different target. Use Showdown mode to program a simultaneous attack and then just wait for Wild Marge to start drinking her whiskey.
- Speedrun: Complete the mission in under 7:00 minutes.
For the last badge, you’ll have to bury Josh by the church. This is Josh:
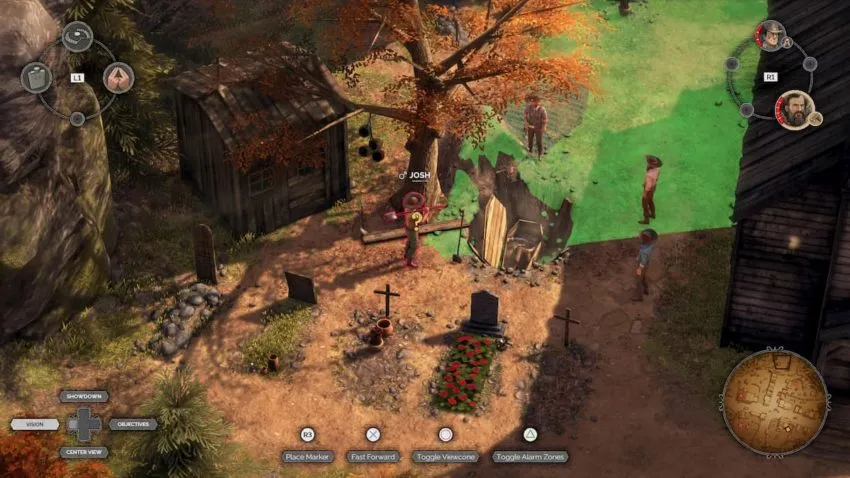
Who knows what he did to deserve such a fate, but all you have to do is wait for an opening, kill him, and toss him in the grave.
Don’t forget, these badges were designed to be done in multiple runs, so always feel free to adjust the difficulty and replay missions as you see fit.

Published: Jun 29, 2020 06:14 pm