The Haligtree is often noted as the most difficult dungeon within the entirety of Elden Ring. Featuring unique enemies, difficult platforming, and dense enemy spawns, this Legacy Dungeon of Elden Ring is optional content, but features some of the best challenges in the game. Including the notorious Malenia, Blade of Miquella.
Contents
- Preparation
- Miquella’s Haligtree Canopy – Introduction
- Miquella’s Haligtree Canopy – Walkthrough
- Elphael, Brace of the Haligtree – Introduction
- Elphael, Brace of the Haligtree – Walkthrough
Preparation
Fortune favors the prepared, and with that in mind there are a few items which players should have readied prior to entering Haligtree.
- Emptied all runes in inventory
- Usable bow (any damage)
- 99 arrows (any type)
- Means of inflicting cold damage (Freezing Grease, Freezing Pot, spells, etc)
- Holy damage mitigation
- Armorer’s Cookbook (6), along with at least 20 Preserving Boluses
Note that, unlike underground dungeons, players may freely exit and re-enter Haligtree as long as they aren’t in combat. Once a Tarnished has prepared sufficiently, move to Ordina in the western reach of the Mountaintop of the Giants and complete the Evergaol puzzle to reach Miquella’s Haligtree in Elden Ring.
Miquella’s Haligtree Canopy – Introduction
The Canopy can be a frustrating endeavor. With multiple platforming segments that must be completed while under attack, enemy ambushes trying to push Tarnished off the edge, and the occasional Escher-like pathway, players should expect a rough go of it. The good news is that the enemy is both so numerous and at such a high level, that players can easily walk out of the Canopy with at least half a million in runes.
Miquella’s Haligtree Canopy – Walkthrough
The Canopy

Upon teleporting into the Haligtree, players will note a Lost Grace found directly in front of them. Touch the Lost Grace, resting if needed to restore flask usage and HP/FP. Before moving farther, take a look around at the various enemies and treasures, the latter of which are notated on the map. Once players move beyond the Grace, seven Oracle Envoys can begin targeting and attacking.
Prepare to move quickly and carefully across the branches. Once you’re ready, turn south and move to the end of the branch. A Stonesword Key is available on the corpse, tucked into the end of the branch. Move north, passing the Grace, and then follow the branch northeast. A small branch connects to the path, cutting east: carefully hop onto this branch, then dash to the end and eliminate the Large Oracle Envoy.

From here, players can either move directly north, taking out five Giant Ants and moving immediately into the dungeon proper, or move across the rest of the boughs and grab the other marked treasures, including a ‘My Beloved’ Muttering Stone, Envoy Crown, and another Stonesword key. As players move north, up the bough and towards the dungeon proper, the first true trap is sprung.
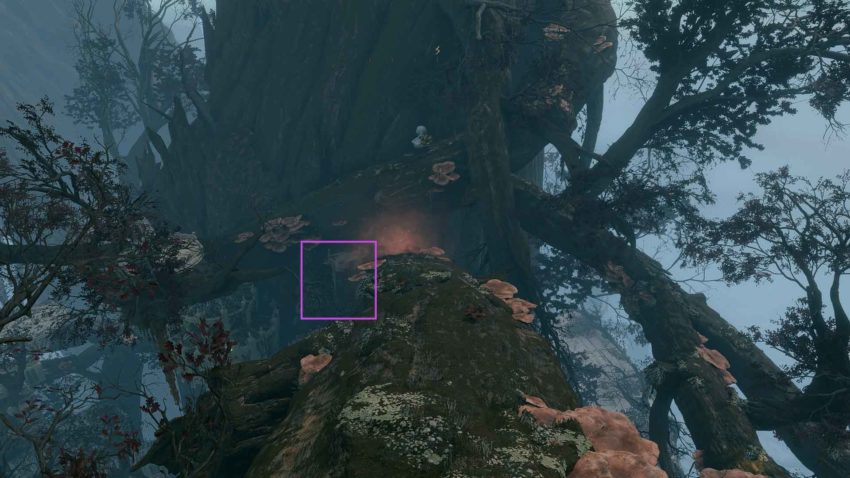
Multiple flowers will spring a Scarlet Rot cloud while a Large Oracle Envoy fires from above. If you have specialized in ranged combat, stopping before the flowers to eliminate the Oracle is recommended. If not, sprint quickly through and dodge to avoid the litany of projectiles from the enemy. Regardless, be careful of Giant Ants that will come from behind you on patrol: the three hazards combined can result in a quick and grisly death.
Once you’re through, make your way to the highlighted ladder on the left side of the bough, and prepare for the dungeon proper. At the bottom of the ladder, move northwest and activate the Lost Grace, Haligtree Town.
Haligtree Town
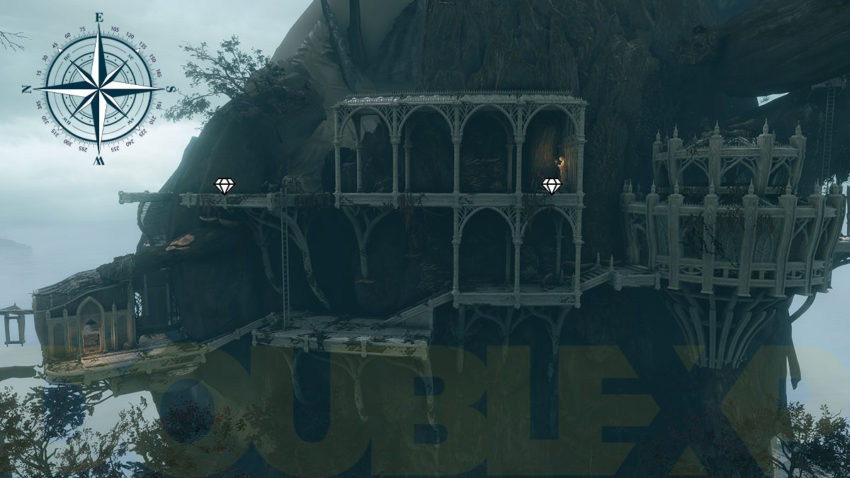
The number of enemies won’t decrease moving forward: three Misbegotten await in this area, and another two in the far north building. Caution is advised if players choose to move up the ladder for the two treasures: a horde of Scarlet Rot Zombies await at the top of the ladder, and it’s far too easy to be pushed from the platform. A Misbegotten joins them at both the north and south treasure. Use large weapons for cleaving, and roll immediately at the top of the ladder to position yourself safely in the center.
Once you’re ready to move into the northern building, note that a Misbegotten with a large axe hides around the first corner to your right. Keep the fight localized on the top floor, as two additional Misbegotten’s await at the bottom; one behind the stairs, and one is visible from the top floor. Eliminate them all, and make a decision.

Two options are immediately present: either leap onto the platform directly north, or take the ladder to the platform on the bottom where two Giant Poison Flowers await. If you’re ranged, the top platform should be the play, where melee Tarnished should head to the bottom. Regardless of selection, eliminating the Large Poison Flowers is recommended before moving on. It’s possible to skip this fight entirely, but the Giant Poison Flowers have a ranged cast that can reach the next battle.
Eliminate both flowers, and move west towards the circular platform with a statue. Three Misbegotten are here, one large and two small. Using your bow, stand on the east side and snipe a small Misbegotten to draw its aggro, and eliminate it away from the large Misbegotten. Do the same to the second small one, and then attempt a stealth crit on the large Misbegotten’s back.
Timed right, and with a high enough poise break, you should be able to eliminate the large Misbegotten without allowing it to hit you. Grab the treasure (an Ancient Dragon Smithing Stone), and move southwest through the doorway. Take the first left, and you’ll see a Misbegotten staring over the ledge near loot. Be cautious of the left side, as two Scarlet Rot Zombies will attempt to push you off the edge; deal with all three and get the Somber Smithing Stone (8) for your trouble.
Move back through the doorway, and across the bridge to the next Lost Grace, Haligtree Town Plaza.
Haligtree Town Plaza

Note that three Lesser Spirit-Calling Snails are marked on this map.
There’s a small branch on the western side of the Haligtree Town Plaza Grace, which brings players to an entrance of the building directly south of the Grace. Eliminate the three Scarlet Rot Zombies, step out of the southeastern doorway, and buttonhook to the right to find a Lesser Spirit-Calling Snail. Eliminate this snail, and then look southeast. Two more snails are in this direction, and it is imperative that you eliminate these snails quickly: their summons can do massive damage, and won’t go away until the snails are eliminated.
If you have the ranged capabilities, kill the visible snail to eliminate the sorcerer summon before closing the distance onto the southwestern snail. Moving quickly and decisively in this region is vital, while dealing with all three snails. Once all three snails have perished, jump southeast across the rooftop and eliminate the Scarlet Rot Zombies. There is a floor between the two rooftops: you can aim for this floor with your jump for a safer leap, and use the ladder to ascend.
If you look back northwest from this position, you’ll see a room beneath the snail fight area — the loot offered is one Golden Rune (12) and one Viridian Amber Medallion (+2), and the jump must be flawless to reach this area. Move southeast from the Zombie platform to progress.
Note: failing to eliminate the Scarlet Rot Zombies before progressing will result in the enemies following the player, and attacking from the rear while you’re preoccupied with a very dangerous fight. If you’ve died, it’s plausible to dash through this area entirely, but pause after leaving the final platform to deal with the Scarlet Rot Zombies dropping down in pursuit.

This segment is, by far, the most treacherous within the Canopy. Two Battlemages await players (notated by the skulls), with a litany of magic spells and a hefty Stone Club that can send Tarnished towards their doom. Eliminate the two Misbegotten’s in the starting building at the top left of the map, and pull out the bow. Snipe the first Battlemage, located East down the first bridge, to pull him towards the starting building.
Once he’s inside of the building with you, it’s far safer to engage while being covered from the spells of the second Battlemage. Eliminate the first, then players should be able to visit the easternmost gazebo to kill the second Battlemage. If you’re fast enough in eliminating the first Battlemage, it’s possible to catch the second on the platform, allowing players to push him off the edge. The southwestern gazebo holds a Hero’s Rune (4) — grab it before moving on against the Canopy boss, Loretta, Knight of the Haligtree.
Loretta, Knight of the Haligtree

Loretta can be a formidable foe. With a similar move set seen at Caria Manor, Loretta has both ranged and melee attacks down to a science, and her being mounted makes it more diffifult. When she summons swords overhead, sprint to one side to dodge them all. When she brings a bow, begin moving towards her and dodge before the impact of the arrow. Try to stay on her non-dominant side (the side with the shield) for a better animation tell of her next attacks.
Once Loretta falls, the time for rejoicing is slim: the second part of the dungeon, the Brace, awaits.
Elphael, Brace of the Haligtree – Introduction
Elphael, Brace of the Haligtree, is also commonly referred to as the Brace. Fortunately, the Brace offers far less chance of dying from falls, although the number of traps and hiding enemies seems to increase as the dungeon progresses. The Brace is the second part of the Haligtree dungeon, with labyrinthian corridors stretching through a comparatively classical castle design.
Elphael, Brace of the Haligtree – Walkthrough
The Prayer Room
From the Canopy Promenade Grace unlocked after defeating Loretta, players will simply need to move forward as they progress from the Canopy to the Brace. After an elevator ride, players will be introduced to the Brace in a scenic fashion, and will cross a bridge where a singular Cleanrot Knight stands guard.
This Knight is a fantastic means of presenting players to the moveset that these enemies use, and the best way to break their guard. Just beyond the Knight is the first Grace of the Brace, Prayer Room, allowing players to re-challenge the Cleanrot Knight as they see fit.

Moving north out of the Prayer Room Grace, and Tarnished will begin to move around the outside walls of a sprawling castle. Haligtree Soldiers are patrolling the path, and suicide bombers are usually within the squad — bait the bomber into a premature detonation, then clean up the rest of the patrol. Two rooms are located on the left, western side of the path. The second, marked with a ‘1’ on the above map, leads to stairs which places players near a large branch.
Jump onto the branch, and walk up it until you reach the wall connected to the northern-most bell tower. Leap onto the top of the wall, grab the item underneath the bell, and then immediately move back west towards the original path. Do not take the eastern ladder down from the bell tower: players can get trapped there due to the Erdtree Avatar patrolling the outer walls, making your runes unobtainable.
Walk back down the branch, and move to the lower level of this segment. On the far south side, a Stonesword gate blocks a treasure; grab it, and move far north to progress through the Brace. Beneath the ‘2’ on the map is a structural brace running from east to west — jump onto this brace, then north to reach an area with a Knight and Soldier. Defeat them both, and reach into the chest for a Cleanrot Knight Ash.

After grabbing the ashes, move west to the next structural brace. You’ll need to hop onto it and walk up to grab a Somber Ancient Dragon Smithing Stone and a Seedbed Curse.

Move to the western side of the platform, and look north: another structural brace connects two platforms, allowing players to dodge the courtyard entirely. This is important: the courtyard has a massive kill zone setup using four stationary arbalests, and an Erdtree Avatar to boot. Bypassing this, at least until the next Lost Grace is activated, is the safest means of progression.

Move north across the structural brace, and then cut west across the rooftop garden. Note that there are a few treasures about, but the Poison Flowers can require patience to safely grab them. Move west, and drop down onto the outer wall of the castle. Cut down the two Haligtree Soldiers manning the stationary arbalests along the northern wall, along with the solo Soldier northwest of the arbalests, and grab the Haligtree Soldier Ashes marked on the bottom right of the map.
From there, move south across the western-most brace until you’re above the platform farthest west. The jump needs to be perfect — begin sprinting north, down the brace, and then cut west and leap. If you miss, it isn’t the end: it’s feasible to either dash through the western gate, and touch the Lost Grace before dying, or take the two highlighted ladders (pictured above) to reattempt the jump.
Once the Elphael Inner Wall Grace has been activated, conquering the bypassed region is far less punishing. Tarnished can opt to skip this area entirely once reaching the Grace, but the treasures awaiting are worth the struggle: a Lord’s Rune is held by the Erdtree Avatar, and another Lord’s Rune is found at the bottom floor (eastern-most marked treasure). Continue east for Marika’s Soreseal, although combatting four consecutive Revenants at the bottom floor makes for a brutal fight.
Elphael Inner Wall
Move south from the Inner Wall Grace, until a T-intersection presents itself. On the left, three Crystalians (two spears, one mage) protect a chest holding the Rotten Crystal Sword. Use a bow to pick one from either side, bait them over the root knots, and eliminate them. After both melee Crystalians are eliminated, then move towards the mage and kill it to access the chest safely. Move west after grabbing the sword, and you’ll enter a large dome-like structure with a singular chasm in the center.

Players will need to move clockwise around this room, making their way to the far eastern side where a doorway ultimately leads to the next Lost Grace. Be mindful of the first enemy hiding behind a wall on your left, and move downwards to the crosshair indication. From here, players should use their bow to aggro the mostly submerged Lesser Kindreds of Rot, and deal with them one by one.
Once no more Rot Kindreds are visible, equip the Preserving Boluses and make your way east. The Scarlet Rot will begin affecting players once they’re in the marsh — avoid rolling, and use soap once you’re out to clean the Tarnished of the long-lasted Rot buildup. Move through the door, and activate the Grace.
Hidden Golden Seed
On the southern side of this dome, there is a circular pit with a sparkling piece of treasure. Don’t move towards this area until the next Grace, Drainage Channel, has been activated. Moving towards this will spawn an Ulcerated Tree Spirit, a brutal fight with little space to safely engage. Stand on the eastern side of the pit, against the wall, and defeat this Ulcerated Tree Spirit for another Golden Seed.
The Chapel

From the Drainage Channel Grace, the end is in sight. Move east from the Grace, then north along the highlighted branches into the chapel. Beneath the balcony where you’ll end up is the final Lost Grace, Haligtree Roots, and finally Malenia, Blade of Miquella. From the chapel, exploring both north and south will net some trifling treasures, along with a few enemies, but nothing necessarily worth deviating from Malenia for.
While learning how to defeat Malenia, Blade of Miquella, is a task unto itself, being able to get there is the obvious first step.


Published: May 12, 2022 08:23 pm