
Although most multiplayer or co-op games can be played online today, it’s always fun to experience them in a LAN setting. However, most players would hop online rather than set up a LAN since it could be a confusing process. Thankfully, VPN services such as Hamachi make setting up a virtual private network easy, and one can use it to play games like Minecraft and CS:GO with your friends locally.
Related: How to set up Discord on Xbox X/S and Xbox One
Steps to set up Hamachi server
To create a private server using Hamachi, follow the below-mentioned steps.
- Head to Hamachi’s official website and click on the “Download now” option appearing in the middle of the screen. Make sure you are downloading the version according to your operating system.
- Once downloaded, Install the application followed by creating an account on it.
- Open the Hamachi application, and you’ll see four options on the top. Select the “Network” option followed by “Create a new network.”
- A new dialogue box will appear for creating a new network. Fill out the details accordingly and set a password to create a new network.
- The system on which you create the server will be the host. Now, download the Hamachi application on other PCs to join the host.
- Like before, open Hamachi on other PCs, but this time, select the “Join an existing network” from under the “Network” option.
- Enter the name of the network you created on the host and the password you set.
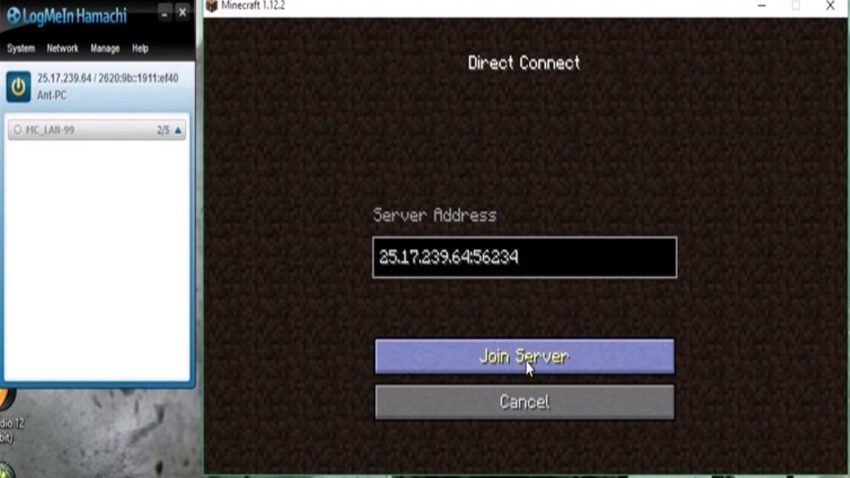
Once done, all the PCs will be connected to the host. However, it’s worth noting that up to five systems can connect to the host in the free version of Hamachi. Finally, open the game you want to play with friends on the host PC first and select the host/create a game option. Remember that the host option might be referred to by a different name depending upon the game. Regardless, you can now play the game in a LAN environment by starting it on the other computers and connecting to the host computer using the IP address provided by Hamachi.


Published: Sep 15, 2022 03:45 am