
Deep Rock Galactic’s Scout class is mainly a character built around being a speedy attacker rather than the big, nearly invincible walking tank the Gunner or the Driller. However, Scouts also make excellent solo classes due to their agility and array of weapons for builds. Sometimes they pair well with an Engineer in groups for lots of terrain traversal options. But a Scout’s strongest suit is their ability to engage enemies from long range. With two different rifle type weapons available to use simultaneously, Scouts can score high-damage critical shots on enemies, so they are great for dealing with high-priority targets while in a group. Here are the five best Scout builds listed from best to worst.
The M1000 “Hipster” build
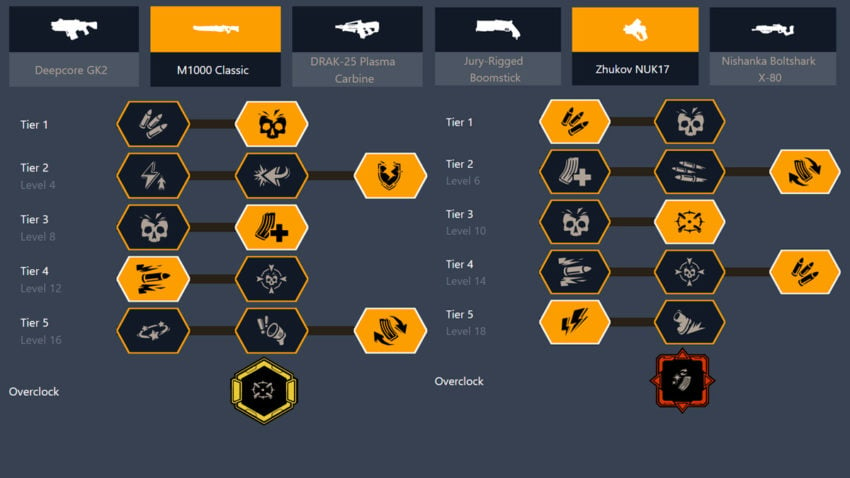
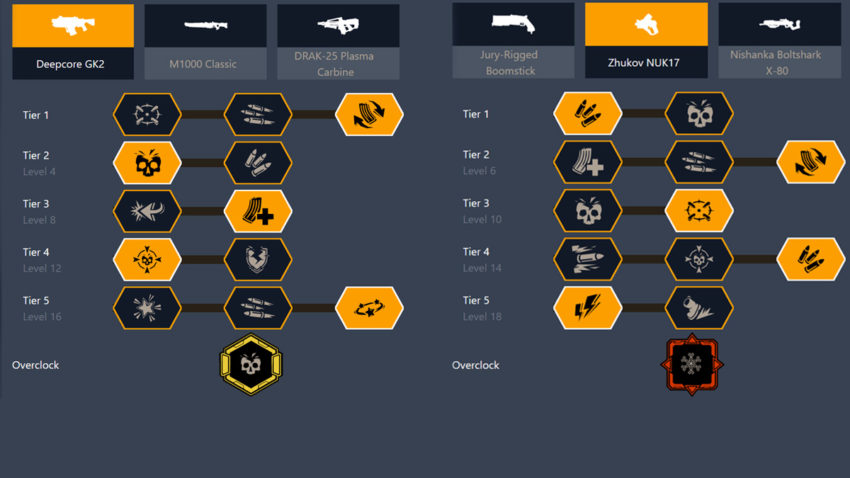
This build utilizes the M1000 rifle along with the “Hipster” Overclock ability, which is regarded as one of the most powerful Overclock powers in the game. It’s mainly built around using the M1000 rifle firing from the hip and rapidly dealing as much damage as possible to singular targets. Abilities like Hardened Rounds and Super Blowthrough Rounds give the M1000 extra penetrating power against armored targets. Other abilities like Killing Machine and Extended Clip give you more ammo and speedy reloads so that downtime is kept to a minimum.
Your secondary will be the Zhukov NUK17 submachine gun. Be sure to use Expanded Ammo Bags twice for the most ammo possible if your M1000 is out. Use Conductive Bullets for the best possible damage potential combined with your Inhibitor Field Generator, as while enemies are shocked they will take extra damage from the Zhukov. Embedded Detonators as your Overclock ability give you some area damage effectiveness. However, do be aware Embedded Detonators’ behavior is a little different versus Dreadnought enemies as it will not work on them unless there is an exposed hardpoint that can be shot.
For equipment, you can use anything suited to your role whether solo or in a group. Most prefer the Light Scouting Suit with the Improved Generator, Overcharger, Shock Absorbers, and Static Discharge perks. For your Throwable, pick the Inhibitor Field Generator as it combines well with the Zhukov secondary perk Conductive Bullets and additional shocking damage comes from Static Discharge on your Scouting Suit.
The M1000 “Focus” Build
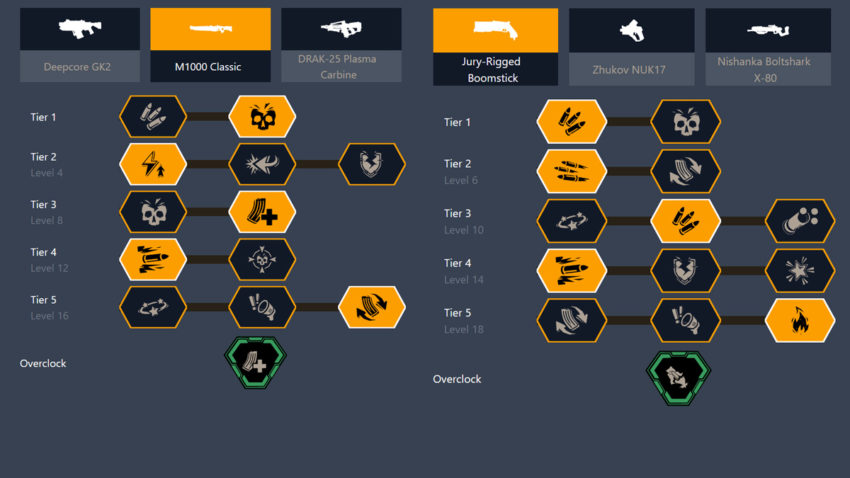
This build also utilizes the M1000 rifle, but instead leans more towards Focus Shots rather than shooting as many times as possible. While a majority of this build can be adjusted to your play style, the most critical perks to maintain are Hardened Rounds and Minimal Clips as your Overclock ability. Precision damage over sheer number of rounds going down-range is how you want to use the M1000 in this case.
Your secondary weapon will be the Jury-Rigged Shotgun. Most of the perks on the gun can be moved around, but mainly you want Special Powder as the Overclock. This special ability allows you to propel yourself in the opposite direction you’re aiming the gun while airborne, effectively performing a rocket-jump. Mobility is key with this weapon as it allows you to open up gaps between you and the enemy quickly so you can use the M1000 while aiming down sights.
For throwables and equipment, your picks are not crucial in this build as the weapon choice is primarily is what this build is about. So you can suit your needs in those categories based on if you are solo or in a group performing a specific role. There is a lot of flexibility in these areas, so experiment with different combinations. The main objective here is this build is meant to be a sniper and highly mobile class over raw damage, even though the M1000 is an incredibly powerful primary weapon.
The DRAK-25 “Plasma Splasher” Build
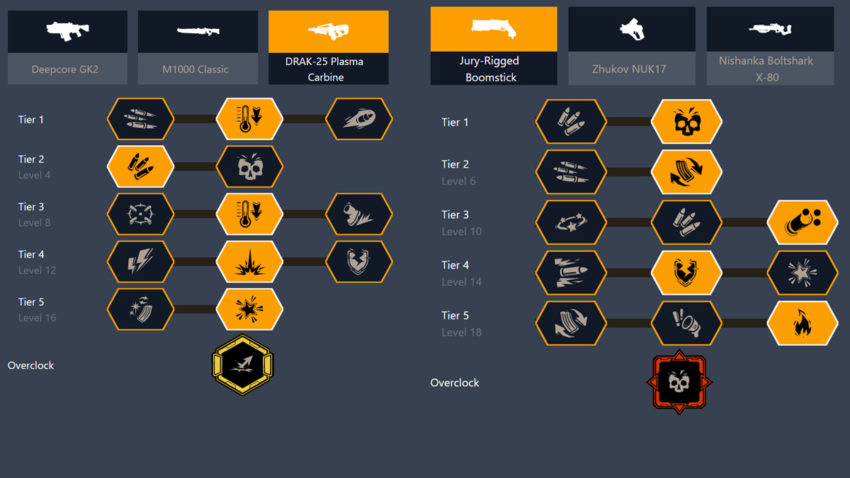
This build uses the DRAK-25 Plasma Carbine primary weapon with the Impact Deflection Overclock ability. This will make it so your shots will bounce once between targets, potentially allowing bullets to hit twice. Plasma Splash allows bullets to also deal a small amount of splash damage around where they stop. Thermal Feedback Loop will end up boosting your rate of fire as the gun heats up, allowing more damage to steadily accelerate. While you can experiment with perks in the other tiers, it is recommended you stick with Plasma Splash in Tier 4.
Your secondary weapon in this build will be the Jury-Rigged Boomstick again. Primarily this is your up-close weapon. Again, you can mess with certain perks, but you want the Overclock to be Jumbo Shells and your Tier 5 perk to be White Phosphorus Shells for huge bursts of damage and lots of spread.
For your Equipment slot, the Flare Gun can be an unexpectedly good choice due to lots of synergy with burning and AoE damage. The best perks would be Thicker Core, Supercharged Feed Mechanism, and Magnesium Core for stacking on burn damage longevity. Or for solo players, swap to the Scouting Suit with Improved Generator, Overcharger, Shock Absorbers, and Shockwave.
The DRAK-25 “Shocker” Build
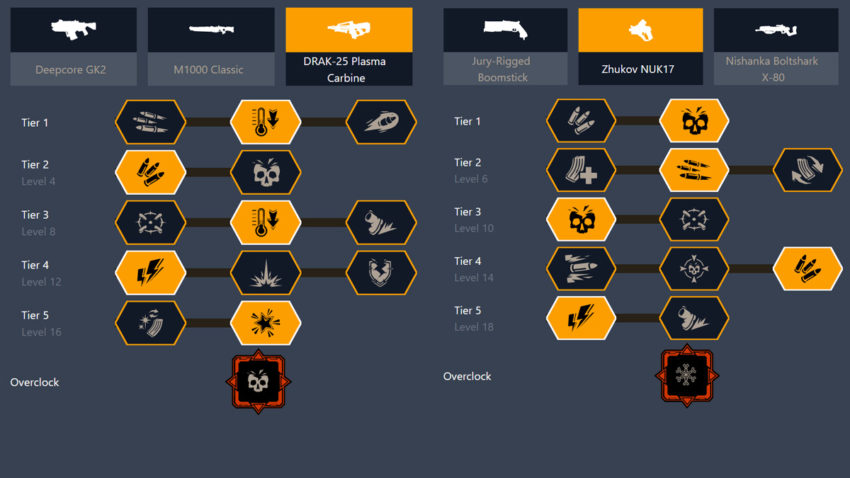
Another build for the DRAK-25 Plasma Carbine, but this one uses Overtuned Particle Accelerator as your Overclock. This one is mainly for more damage over splash and spreading damage and will be using Electrocute damage and stunning enemies. Be sure to pick Improved Thermals and Gen 2 Cooling System in Tiers 1 and 3 for longer periods of time before the gun overheats. In Tier 4, go for Overcharged PCF to spread Electrocute damage and have good crossover with other equipment that deals this damage type.
Your secondary will be the Zhukov NUK17. Perks are largely your preference, but ideally you would want to use Conductive Bullets in Tier 5 and Gas Recycling for the Overclock. This way as you swap between the DRAK-25 and the Zhukov, any Electrocute damage being passed out is triggering Conductive Bullets constantly.
For equipment, pick the Scouting Suit and make sure to pick Static Discharge to synergize with the rest of the kit in this build. For your throwable, use the Inhibitor Field Generator. This way you will have up to four sources of Electrocute damage and something will always be tripping each other. Keep in mind that while this is a dedicated element build, some things may not be as susceptible to Electrocute damage, so make sure to prepare accordingly.
The Deepcore GK2 “Bullets of Mercy” Build
This build will be squeezing the most out of dealing out status effects and using the Bullets of Mercy Overclock on the Deepcore GK2 to boost its damage. Build more towards damage over rate of fire, but make sure to pick Stun in Tier 5, which will count towards Bullets of Mercy’s effect. Now keep in mind the proc from Bullets of Mercy will only trigger once per status effect, so it will not stack up. So if you apply a different status effect, it will only reset the amount of time Bullets of Mercy deals more damage.
For your secondary weapon, use the Zhukov NUK17 similar to the “Shocker” build, using the Conductive Bullets perk in Tier 5 for passing out additional status effects. Use Cryo Minelets for the Overclock in this build, as it thrives the best around passing out status effects. So the more status effects that are happening, the more time Bullets of Mercy can be used.
Equipment in this build is to your preference, but keep in mind anything that deals a status effect will be to your benefit. What you want to make sure of is that whatever is happening, you have a status effect going out as part of your damage kit.


Published: Nov 26, 2022 07:28 am