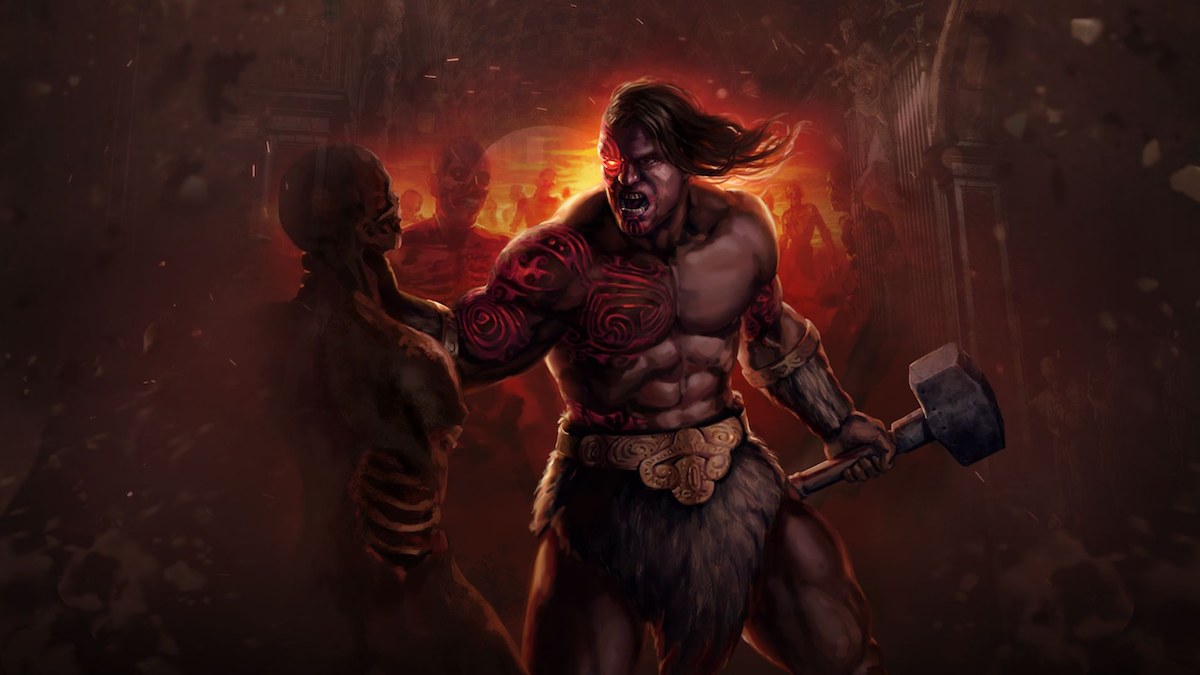
Between Path of Exile’s seven distinct starting classes, Marauder represents the most straightforward, pure Strength-based option. This lends itself well toward brutal melee builds that excel at durability and massive hits. The three ascendencies for Marauders play into those roles as well, providing options to accentuate further the class’s tanky, damaging, and technical aspects — through Juggernaut, Berserker, and Gladiator ascendencies, respectively.
During the last couple of leagues in Path of Exile, melee builds have been on a downward trend with just how spiky the damage could get when you get close to packs of mobs. That has meant that most Marauder (and Duelist and Templar) builds relied on gaining some range to their skills. However, for the current Lake of Kalandra league (Patch 3.19), we estimate that the strongest Marauder build is back where it belongs — on melee. So without further ado, let us introduce you to the General’s Cry Berserker.
General’s Cry Berserker Playstyle
As the name suggests, this Marauder build takes advantage of the aggressive Berserker ascendency and uses General’s Cry and Blade Flurry as its primary skills. These are supplemented by Cyclone to initiate, and a variety of auras and secondary skills. It is a fast-paced and explosive build that zips through maps at break-neck speed once it gets going. In terms of costs, it is a middling build, with a few mandatory items on the list. Despite that, it’s a viable League starter as well, though it’s important to note that the leveling process uses a different skill set and can be a bit challenging for very new players. We will detail more on that further on in this guide.
Related: Are classes gender locked in Path of Exile? Answered
Passive Skill Tree
The initial few skill points will go toward the usual Marauder’s resilience and damage nodes. At the end of Act 1, your skill tree should look something like this:

Keep progressing toward the lower left side of the tree, picking up important nodes such as Kinetic Impacts, Martial Experience, and Brinkmanship. By the end of Act 2, your skill tree should branch like this:

During Act 3, you should pick up your first couple of masteries. For the Life Mastery, you will be picking up “+50 Maximum Life after Bloodless”, and for the Fortify Mastery, take “Melee hits Fortify, -3 to maximum fortification” after Steadfast. This would be the resulting tree progress:

With Act 4, the passive skill tree takes a sharp turn toward the left side, with the main goal of reaching the Slaughter node, like this:

Progressing through Act 5, you’ll pick up a few more important nodes, and among them another mastery. After taking Barbarism, pick up “10% increased maximum Life, 10% reduced Life Recovery rate” Life Mastery:
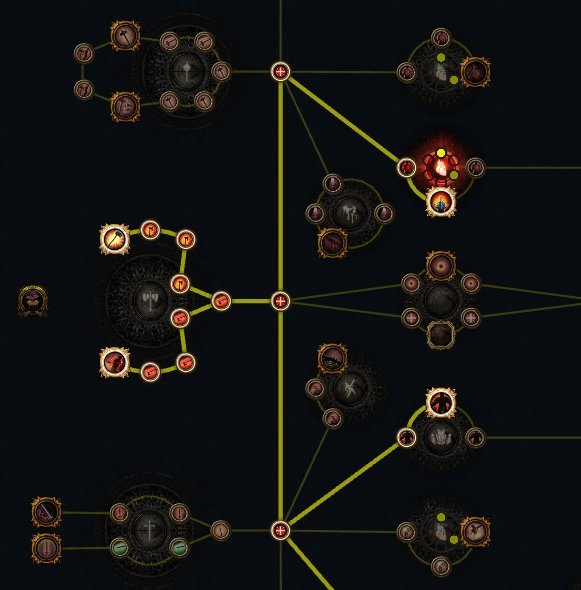
During Act 6, there is some more fleshing out to do on the tree. For example, you’ll take the notable skill Unwavering Stance for some stun protection, as well as the all-important Resistance and Ailment Protection Mastery “Corrupted Blood cannot be inflicted on you” after picking up Prismatic Skin. This will be the macro look at 69 skill points:

Following this, after Act 7, the build takes a departure toward the top-mid part. The most important pickups here are Berserking, followed by the Attack Mastery “50% increased Mana Reservation Efficiency of Stance Skills”:

Act 8 brings fewer points and a bit more detailing to our build. Notably, the Armor Mastery “Determination has 25% increased Mana Reservation Efficiency” after picking up Juggernaut. Then, there’s also the Accuracy Mastery “Precision has 100% increased Mana Reservation Efficiency” to round out Eagle Eye that’s been picked up a few acts earlier:

A few more skill points around Act 9 will take the build up near the beginning of the tree, aiming for the important Deep Breaths node and the following Warcry Mastery “Recover 15% of Life when you use a Warcry” to get ready for the General’s Cry swap:

Ending the Campaign after Act 10, you will be picking up two more Sword Masteries and some important nodes around them. The first one is Blade of Cunning with “20% chance to Impale Enemies on Hit with Attacks” and the second is “120% increased Critical Strike Chance with Swords, -20% to Critical Strike Multiplier with Swords” followed by Blade Master. We also pick up a Shield Mastery “+1% Chance to Block Attack Damage per 5% Chance to Block on Equipped Shield” after getting Aggressive Bastion. This will make the post-campaign tree look like this:

Endgame with this build brings forth several options of where to branch out. Ideally, you would be looking to get into Cluster Jewels and use your future skill points to buff those up. In the meantime, picking up utility nodes such as Command of Steel or +30 Attributes can be very useful. The endgame tree will look similar to this one:


Berserker Ascendency Skill Tree
Unlike the passive skill tree, your ascendency tree is much less flexible. You will be picking up the nodes in the following order:
- Flawless Savagery
- Blitz
- War Bringer
- Aspect of Carnage

Gems and Gem links
Main Skill 6-link
This is your bread-and-butter setup and the main skill you will be using throughout the endgame. You should prioritize building it up from 4-link to the full 6-link setup. The full setup is:
- General’s Cry (Red, 20/20)
- Blade Flurry (Green, 20/20)
- Brutality (Red, 20/20)
- Pulverise (Red, 20/20)
- Impale (Green, 20/20)
- Increased Critical Strikes (Blue, 20/20)
Totem 4-link
This setup increases your damage and grants you buffs. It is important to spec into Multiple Totems so that you can benefit from both at the same time:
- Vaal Ancient Warchief (Red, 20/20)
- Ancestral Protector (Red, 20/20)
- Multiple Totems (Red, 20/20)
- Maim (Red, 20/20)
Channeling attack 4-link
This is an important setup because Cyclone serves to give us Fortify and Blitz charges, as well as provide initial corpses for General’s Cry through Desecrate:
- Cyclone (Green, 1/20)
- Cast While Channeling (Blue, 20/20)
- Desecrate (Green, 1/20)
- Infused Channeling (Blue, 20/20)
Auras 4-link
This is the build’s Aura and Stance setup. Getting Enlighten is a somewhat long-term goal that justifies linking these together:
- Pride (Red, 20/20)
- Determination (Red, 20/20)
- Blood and Sand (Red, 20/20)
- Enlighten (Blue, 3/3)
Shielding 2-link + extra Aura
This is a simple setup for extra defenses and utility. Note that you want to keep the two red gems at lower levels on purpose:
- Molten Shell (Red, 14/20)
- Cast When Damage Taken (Red, 8/20)
- Precision (Green, 20/20)
Mobility + Buff + Curse
These gems don’t need to be linked, because they are not supported. You will use Assassin’s Mark on bosses for extra damage and use Berserk always on cooldown. You should be able to keep the Rage full with the help of your main skill:
- Leap Slam (Red, 20/20)
- Berserk (Red, 20/20)
- Assassin’s Mark (Blue, 20/20)
Equipment
Weapon
For a start, you can look for an Attack Speed rare one-handed sword. Ideally, you’ll then look to transition to the unique Ichimonji which will help with Mana issues and Attack Speed. Later on, the goal would be to get a well-statted Paradoxica as your main weapon.

Shield
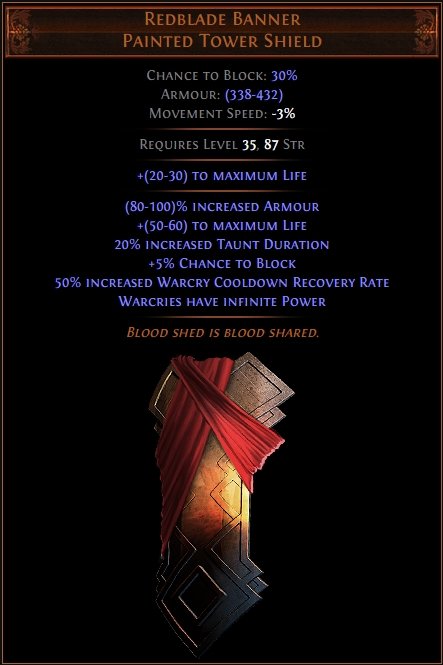
This slot carries one of the most mandatory items of this build. The unique shield, Redblade Banner is essential to enable your full potential. The “50% increased Warcry Cooldown Recovery Speed” and “Warcries have Infinity Power” are buffs that make this build as potent as it is. Try to get it as soon as possible.
Armor
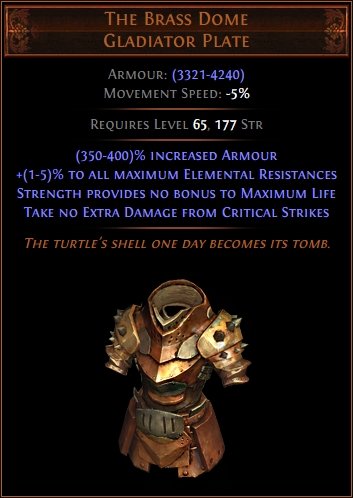
While you can use a defense-oriented rare armor — especially if the links match your main skill, you will want to aim toward these upgrades. Ideally, you’ll want something like Belly of the Beast as a budget unique armor option for extra defenses, or even better Brass Dome to get as much defense and survivability as possible.
Helmet
This is your second mandatory item. Abyssus unique helm is something that should be high on your priority list, as it can practically double your damage once you get it.

Gloves
For these, you will look for a good rare pair. To help with sockets, it might be best to look for a Dexterity base. Your stat priority should be:
- +% increased Attack Speed
- +% Resistances
- + to maximum Life
Boots
Similar to gloves, look for a well-rolled pair of rare boots. Here, we’re looking for:
- + Armor
- +% Movement Speed
- + to maximum Life
- +% Resistances
Rings
For rings, you’ll be looking for a juiced-up pair of rares. The more useful modifiers on them, the better. The most important modifier is the crafted “Channeling Skills have -3 to Total Mana Cost” that you should either craft yourself or get someone to do for you. This will seriously help with the Cyclone setup. Other than that, the stat priority is:
- +% Increased Attack Speed
- + to maximum Life
- +% Resistances
- + Physical Damage / + Melee Damage
- + Critical Multiplier
- + Dexterity/Intelligence (whichever you lack)
- + Area Damage
Amulet
Your amulet will follow the same philosophy as the rings, and it will need to have the -3 channeling modifier if you can’t get it on the rings. Other than that, you want to get an amulet that further buffs your Dexterity and Intelligence, so that you don’t have to look for it on other gear. With that in mind, the stat priority is:
- + Dexterity/Intelligence
- +% Increased Attack Speed
- + Critical Multiplier
- + to maximum Life
- +% Resistances
- + Physical Damage / + Melee Damage
- + Area Damage
Belt
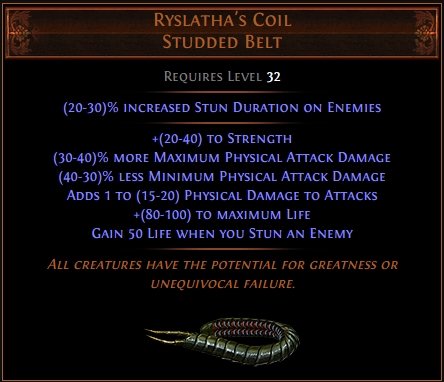
There is a good measure of flexibility for the belt slot. If you want to go with the unique route, you can go with a Ryslatha Coil for a nice damage boost. Otherwise, you can just opt for a good rare or even better, a Stygian Vice with an Abyss Jewel of your choice.
Flasks
This build benefits from running utility flasks. We recommend the following setup:
- Divine Life Flask — with “Instant recovery” and “Removes Bleeding” enchants.
- Quicksilver Flask — with “Increased duration” and “Increased Movement Speed during flask effect” enchants.
- Diamond Flask — with “Increased duration” and “Increased Armor during flask effect” enchants.
- Lion’s Roar Unique Flask
- Rumi’s Concoction Unique Flask
Jewels and Cluster Jewels
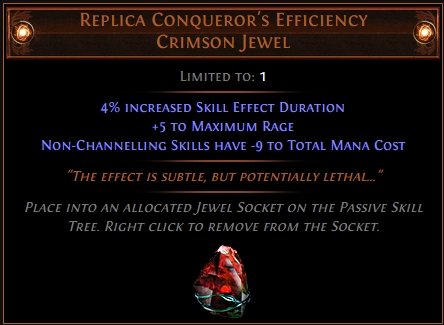
This build needs one mandatory Unique Jewel, and that is Replica Conqueror’s Efficiency that drops from Grand Heists in the Laboratory or the Prohibited Library. This means that it will not be easy to get, but you should aim to add it to your build as soon as you can. It will go a long way to alleviate your Mana issues while granting a nice Rage bonus and prolonging your skills.
Another pair of Unique Jewels that you can use to help is Fluid Motion, which can help with your Dexterity problems and Watcher’s Eye which is an all-around huge damage boost in conjunction with Impale and Pride.
For Cluster Jewels, you want to look for a few variants. For example, an offensive Large Cluster Jewel would have the following skill nodes:
- Furious Assault (main node)
- Battle-Hardened
- Iron Breaker
- Master of Fundamentals
Then, a more utility-oriented Medium Cluster Jewel with the following skill nodes:
- Haunting Shout
- Lead by Example
- Mob Mentality (less important)
Enchantments and Anoints
As you’re rounding out your build, you will want to look for certain enchantments from the Labyrinth. The best enchantments for this build are:
- Helmet — General’s Cry has +1 to the maximum number of Mirage Warriors.
- Boots — 16% increased Attack Speed if you’ve killed recently
- Gloves — “of Fury” (fires projectiles on hit for extra damage)
For Cassia’s Anointment, you want to get your hands on Verdant, Indigo, and Opalescent Oils, then use them to anoint your amulet with Panopticon. This will give you the effect “50% increased effect of buffs your ancestor totems grant while active”, which should add up to a nice damage bump in the long run.
Bandits and Pantheon
During leveling, you will have to make a few choices along the way. One such choice is the killing of Bandit leaders in Act 2. For this build, you will want to kill all three of them for the juicy two extra passive points.
For your Major Pantheon choice, go with Arakaali for durability, and enhance the blessing with:
- Capture Queen of the Great Tangle (extra recovery)
- Capture Gisale, Thought Thief (shock protection)
- Capture Excellis Aurafix (Chaos resistance vs DoTs
As your Minor Pantheon choice, pick Gruthkul for his scaling hit resilience and enhance him with:
- Capture Erebix, Light’s Bane (reduced enemy attack speed)
Leveling build
Before you can fully spread your wings and enjoy this build, there is the Campaign and the leveling process. And as you will know if you’re a PoE player, you won’t get access to all skill gems or sockets right away. Consider the following skills during your leveling journey:
- From levels 1 to 33 use Ground Slam as your main skill. Support it with one or more of the:
- Ruthless
- Maim
- Added Fire Damage
- Melee Physical Damage
- Then, use Cyclone until level 70, which is when you should respec for General’s Cry. Support it with one or more of the:
- Infused Channeling
- Pulverise
- Melee Physical Damage
- Increased Physical Strikes
- Use Herald of Purity and Summon Skitterbots as your initial auras. Add Blood and Sand at level 33.
Plan to swap your whole setup to the main build that we have explained in this article at or around level 70. Use your best judgment, based on what gear and sockets you currently have. There is no rush, and you may want to take more time to farm up extra gear before making the switch.


Published: Aug 22, 2022 10:11 am