The DualShock PlayStation 4 controller is a fantastic controller, but it can run into problems as time goes on. One uncommon problem is analog stick drift, where the game believes you are making movements. This can result in unnecessary movements ruining your experience, which can be dangerous in multiplayer games. It can also ruin a single player experience, especially in stealth games.
Related: How to fix drift on a Nintendo Switch Pro Controller
While most players will associate controller drift with Nintendo Switch’s infamously faulty Joy-Cons, it is an issue that plagues every controller for every console. Fortunately, there are steps you can take to solve the problem, even if you aren’t a DIY repair expert.
1) Soft reset your PS4 controller
Sometimes flushing out a device’s memory can fix drift problems. You will need an additional PlayStation 4 controller to do this process. Soft resetting works with the following steps:
- Use your second controller and access the Settings menu.
- Choose the Devices option, then Bluetooth Devices.
- Select the inactive PlayStation 4 controller, press the Options button, then choose Forget Device.
- Power down your PS4.
- Plug the controller with drift and press the PS button when the PS4 loads up.
If that hasn’t fixed your drift problem (or you don’t have a second controller), you need a hard reset.
2) Hard reset your PS4 controller
Use the following steps to hard reset your PlayStation 4 controller. Having a small, thin tool to press a button will be necessary.
- Turn off your PS4 and make sure the controllers aren’t active.
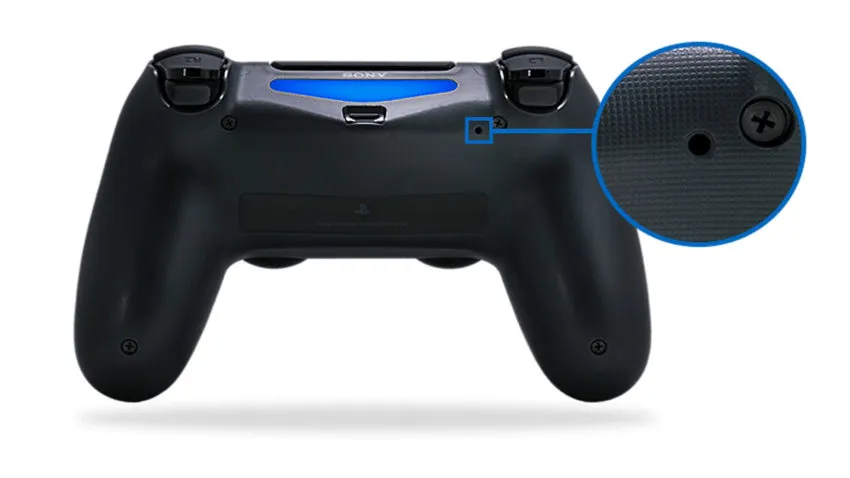
- Turn your affected controller around and look for a small button near the L2 button.
- Press and hold the button down for three to five seconds with your small, thin tool.
- Turn your PS4 on, connect the controller by cable, and test it out.
3) Clean the affected analog stick
Drift usually happens because some grime or small particles are trapped under the analog stick. Get a microfiber cloth or a cotton swab with isopropyl alcohol. Rub it around the affected stick, moving the stick around to get all areas touched up. If drift still persists, you can try using short blasts of pressurized air, moving the stick around while you use short bursts of air.
4) Open up your PS4 controller
This is not recommended if you aren’t comfortable with DIY repair, or you don’t have the tools on hand. You will need a Phillips-head screwdriver to open up the controller. Keep in mind that opening up the controller yourself will void any warranty that’s in effect.
- Lay your controller down on your workspace and remove the four screws on the back of the controller.
- Gently pull the back off your controller. Do not be rough when pulling the back from the front of the controller—there is a ribbon connecting the two halves that should not be broken.
- Once the back is off, carefully deattach the ribbon that is connecting the two halves. You will be able to pop this out of its socket.
- Remove the battery cable connector. This connects a pair of red and black wires from the centrally located battery to the controller’s motherboard. By squeezing the connector and pulling it out, you should be able to pop the connector out of its socket.
- Remove the battery, then the battery plate underneath. Be careful with the plastic pegs that keep the battery plate in place.
- Unscrew the screw in the middle of the motherboard.
- Gently remove the ribbon cable that is in the upper right-hand corner of the motherboard. Depending on your version of the DualShock 4, your controller might have a small clamp over the ribbon cable that you will first have to lift. This cable is very delicate, so be very careful.
- Remove the plastic front shell of the controller and fully examine the panel holding all the buttons and analog sticks.
You can remove any particles or do more intense cleaning to potentially solve the drift problem. Take the steps in reverse to put the controller back together for a test.
5) Replace the analog sticks
Sometimes you will have to replace the mechanical components of the analog sticks. Make sure you have ordered the necessary replacement parts or this won’t work. The process for replacing the analog sticks will happen after you have opened it using the instructions above.
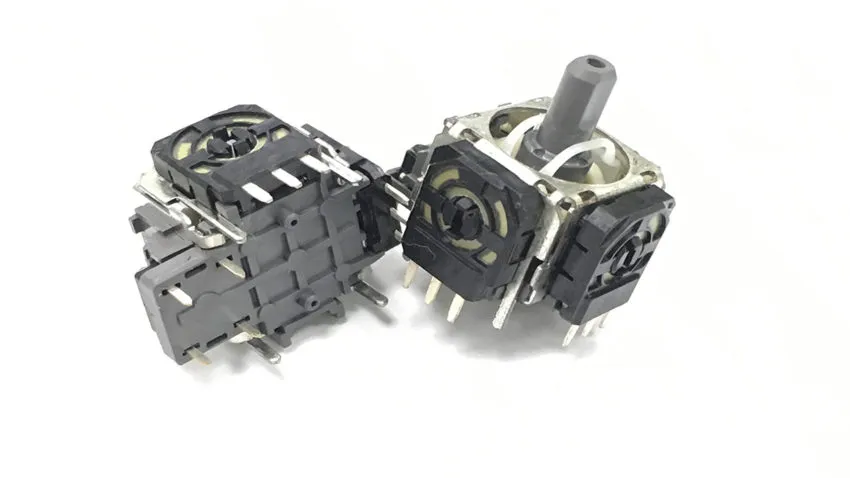
- Pull off the analog sticks. Blow off or dust the underside of the sticks.
- Where the analog sticks were will be two cube-shaped structures with green coverings. Use your screwdriver to carefully pry the green walls back.
- There will be a small white disc hanging on a nub in between the green wall and the cube-proper. Remove the disc and clean the area against the cube with a cotton swab. Do this with all sides of the cube.
- Replace the white disc on its nub and press the green wall back into place This will take some force. Do this with every area you disassembled.
- Reinsert your analog sticks and reassemble the button plate and motherboard inside the shell of the controller.
- Make sure you carefully reconnect the ribbon cable from step seven.
- Reattach the battery.
- Reattach the ribbon connecting the two halves.
- Screw in the back shell of the controller once again.
6) Send the controller to Sony for repairs
If you aren’t confident with DIY repair or your controllers are under warranty, it’s best to send them to your local/regional Sony center. They can take you through the documentation needed for repairs and get it fixed in a professional manner. Alternatively, a licensed repair shop can provide the same services, such as a repair center managed by the store you bought the controller from.
There are always options when it comes to fixing drift on your controller. Whether you want to do it yourself or leave it up to the professionals, drift will soon become a thing of the past as you play. Just remember to take good care of your controller to reduce the chances of drift coming back.


Published: Nov 17, 2022 09:36 am