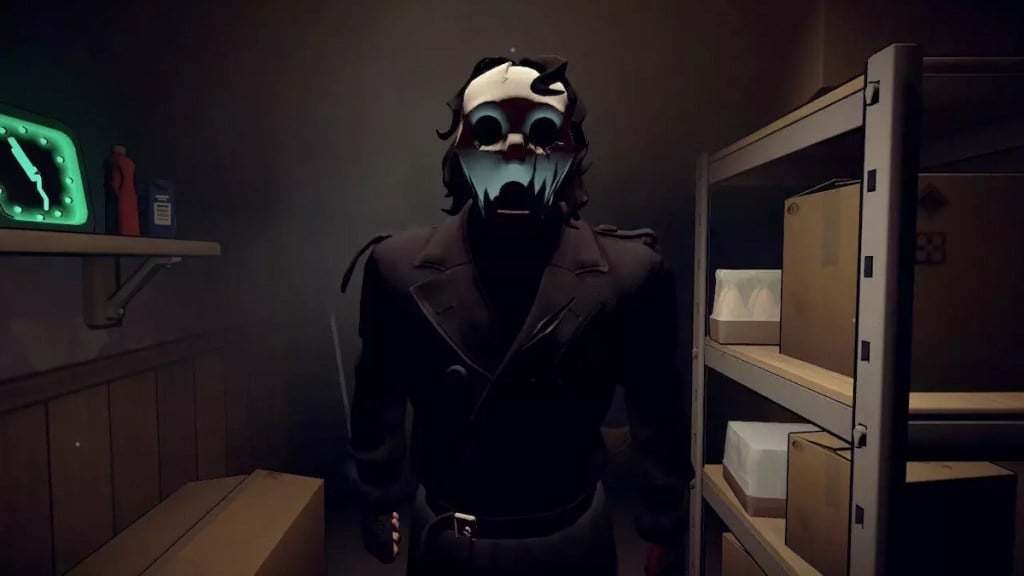
In Killer Frequency, you work as a 911 Operator as the main protagonist against a killer called the Whistling Man. In this well-balanced game that teeters between a comedy and a thrilling experience about saving the lives of victims, you need to use your wits and everything available within the Radio Station to learn how to best guide the victims over the phone and keep everyone you encounter safe. The people you meet in Gallows Creek are, as the name kind of implies, in a lot of danger. Keeping your head on and sufficiently cool with a fair amount of sense can keep them safe as long as you have the right answers at the right times.
Killer Frequency is a thrilling game all about making the right split-second calls. Working well under pressure and having a good intuition can naturally get you to a great place in the game if you’re playing organically. However, if you want to save everyone possible, following a carefully written guide with all the right responses ready to go can be your best bet. While there are a few scripted deaths you can’t avoid, such as the ones involving Sherif Matthews and Jimmy, the rest of the 23 other people involved are yours to carry, all over the phone.
How To Save Everyone In Killer Frequency
To save everyone that you can, you need to have the right answers for each interaction. Every character has a set of scenes they’re a part of with you where your answers impact the outcome. With 23 victims in question and plenty of ways to fumble the bag, having a guide based on which character you’re interacting with can be a real help. Without any delay, let’s get into what you need to do for each name and face you encounter against the Whistling Man.
Martinez and Leslie
The inciting incident (besides you booting up the game) first starts when the first victim calls The Scream Radio Show. Peggy, Forrest, and Leslie all work together to help Martinez, as she’s taken out and locked in a cell. After learning about what happened to the Sheriff, it’s now in Forrest’s hands to handle the victims that are within the Whistling Man’s reach. If you want to save Martinez and Leslie, review the following responses below and mimic them as you progress:
- Select “Find another set of keys” so that you can get Martinez out of the cell.
- Choose “Check Sheriff Matthews” to get said keys.
- Select “That’s the right thing to do.” for Leslie so that she moves Martinez to the car.
- React to the quick time prompt, “Lock the doors.”
- Choose “Take a Police Cruiser.”
- Once you get to the part where you pick a gun, don’t worry about your choice. Both guns don’t have any bullets. Choose the “Is there a weapons lockup?” option so that she checks Martinez for a weapon and finds the tazer.
- Select “Tazer.”
- When the ‘Do you hear that?’ prompt appears, choose “No.”
- Select “Be careful.”
- After Leslie tases the Whistling Man, make sure you choose to tell Leslie to “Try not to crash” before she leaves.
Maurice

Next up is Maurice. He is one of the most troublesome victims to save in Killer Frequency since he’s trapped in the Office with no clear escape route available. You’ll have to lead the Whistling Man away from the Office so that Maurice has a fighting chance at getting out of there. However, you’ll soon notice that the stairway is blocked, so Maurice is basically vulnerable to the Whistling Man getting him. Once you get the fax with the building layout, you can use it to keep track of the Whistling Man and Maurice’s positions (and hopefully prevent them from meeting). Follow the following prompts to get Maurice safely out of the Whistling Man’s murderous arms:
- Select “Call the Editors Room (03)”
- Get Maurice to go to the Kitchen.
- Select “Use a radio?”
- Choose “Must be a The Scream fan.”
- Tell “Maurice, turn the volume down.”
- Get the Whistling Man to “Boardroom (04)”
- Any option you use to get the Whistling Man where you want him is fine, whether that be giving advice, calling him an ass, or doing your best Maurice impersonation.
- Once you’ve done that, tell Maurice to hide in a cabinet.
- To prevent your own noise (that you may not even know is there) from finding him out, turn down the speaker dial on the soundboard.
- When you see the quick-time event prompt show up, do nothing.
- You’ll know you’re in the clear when Peggy signals you.
Sandra
Sandra is a relatively simple case. You need to talk her through the process of hotwiring a car to get her to safety. When on this section of the game, make sure to select the right options for her rescue:
- First, select the “Sheriff Matthre is dead.” option.
- “Is there anywhere else you can go?”
After you talk with Sandra, you’ll need to find a book called the Timberline Twins Talk Motors Manual. To find it, look in the men’s toilets. After you’ve gotten your hands on the manual, instruct Sandra on how to hotwire a car with the following correct steps:
- Choose “Put the screwdriver in the ignition and twist clockwise.”
- Select “Unscrew the steering column.”
- Choose “What’s the serial number?’
- Tell Sandra to “Trip and twist the Red and Yellow wires together.”
- Then “Strip the Purple wire and brush against the twisted wires.”
Virginia

Virginia is next. In order to help Dr. Virginia Sullivan, you’ll first have to locate her. The only issue is that you’re trying to do so by finding the frat party via the takeout they ordered from. If you don’t know which takeout place they ordered from, it’ll mean wasting precious time on a lead that goes nowhere. This is why it’s essential to choose the right one out of three options: Chalupacabras, Ponty’s Pizza, and Grilling Spree.
To identify everything that you need to make the call, first, go to the staff room using the keys that you find under the welcome mat just outside of the toilets. Behind the receptionist’s desk downstairs, you’ll find the entrance to the staff room. In the bin at the cafeteria, you can find the pizza box for Ponty’s Pizza, which gives you the info for them. To find the info for Chalupacabra, you’ll need to go to the office and look at the first cubicle desk. Finally, the last place you’ll need the info for is Grilling Spree. In the second Office cubicle aisle, you’ll find the cassette. With all this information, you can determine from here that Ponty Pizza is your go-to since they offer beer that the frat would have ordered. From here, select the following responses as you make the call:
- Call Ponty’s Pizza.
- Select “Hey dude.”
- Choose “Garlic bread.”
Murphy
Murphy is an interesting case. Your only victim who actually straight-up challenges the Whistling Man. With no surprise there, he loses, being locked in a dumpster. It’s a miracle he wasn’t killed. Since the Fire Department is unable to assist in this particular scenario, you’ll need to use Peggy’s friends to determine who lives the closest to the Waste Disposal Plant to help Murphy out. Out of all your options, the best one to pick is Katherine since she lives on Myers Lane and is physically capable in comparison to some of the other options.
Eugene
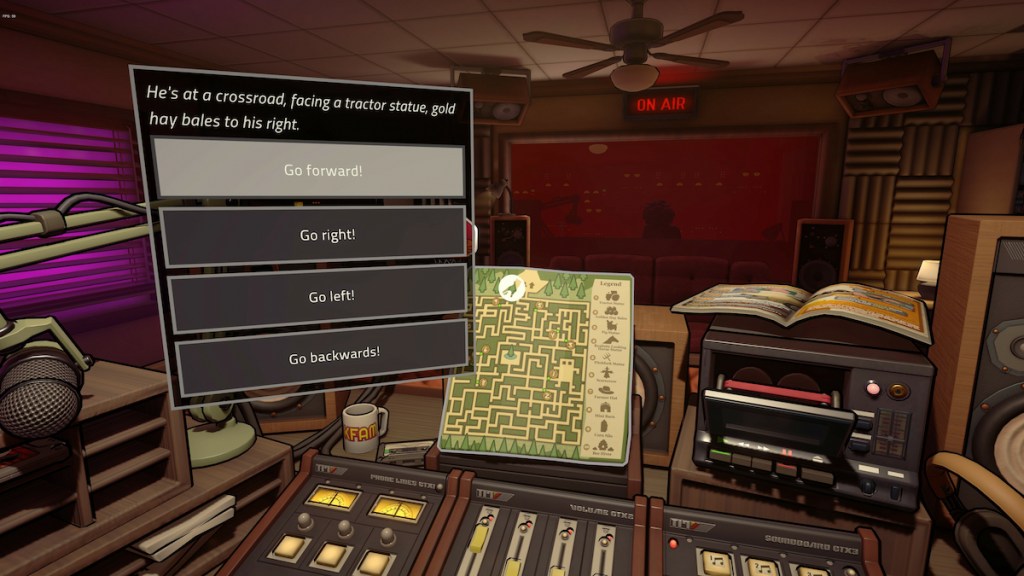
Eugene is a romantic guy who is waiting for his crush. Unfortunately, she isn’t showing. Instead, the Whistling Man is, and you’ll need to pull this guy out of the fire before things get too bad. He’s stuck at the center of a maze, and it’s your job to guide him out:
- First, select “Go left.”
- He’ll be at 3 on the map, near the Pig Statue. From there, tell him to “Go backward.”
- From there, he will be close to 5, near the Pitchfork Statue. Once he’s there, tell him to “Go left.”
- After that, tell him to go right.
- Once you do this, he will be at the Corn Silo. From there, tell him to “Go right.” and he will escape.
Carrie
Carrie is an apparent reference to a certain novel, but aside from that, she’s found herself in the victim role, nevertheless. Carrie tries hiding from the killer after murdering some of her friends. Well placed within the Murder House and with the Whistling Man approaching her, you have to act fast:
- Ask her, “Where are you?”
- Tell her to “Go to the Bathroom”
- During the quick-time prompt, tell her, “Don’t move.”
- Select “Go home, Jimmy.”
- During the quick-time prompt, tell her to run.
- Select “I’m sorry about Jimmy.”
- Find the Friendship Quiz for the next phase.
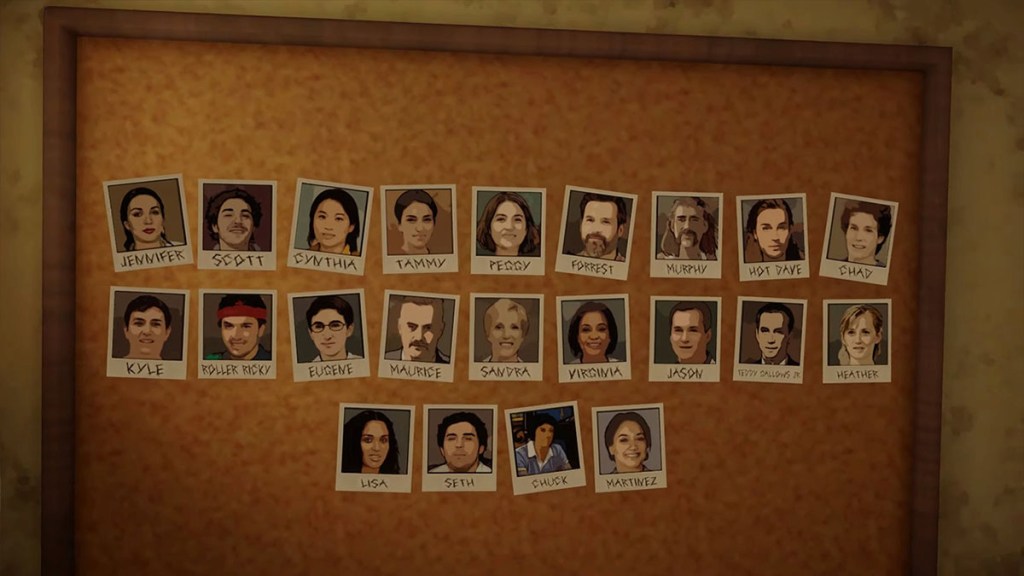
- In a list of Heather, Hot David, and Kyle, pick Heather.
- Between Seth, Scott, and Jennifer, pick Jennifer.
- Select “This plan is impressive.”
- When selecting your runner, choose Hot David.
- When presented with a list of Lisa, Cynthia, and Tammy, choose Lisa.
- Between a list of Chad, Scott, and Cynthia, pick Chad.
- While Carrie is grabbing the keys, remind her to focus.
Chuck
During Chuck’s situation, you’ll have to get Dawn’s Long Ride Home record in order to save him. Dawn has information concerning who the Whistling Man is after next. To get that information, and save Chuck, follow these steps:
- Go outside and pick up the vinyl that Peggy threw out of the Studio
- Say that you’ll complete the task for Dawn
- Get the fire door key from Peggy
- Collect the record from the end of the path. Don’t be surprised that when you go back to the fire door, it’ll be closed and locked behind you.
- To use the cellar door, obtain the fuse that unlocks it by going right to the end of the path and around a corner. On top of the wooden crate is your fuse.
- Once you get the fuse, go past the fire door and place the fuse on the breaker. Once you reach the breaker, go to the crossroads and turn left, where you can find the second fuse.
- Find the third fuse in the tipped-over trash bin across from the fire door.
- Solve the fuse pizzle by having the numbers 15, 5, 20, and 30 on each fuse. Once you flip the switch, you should be able to go back inside.
- Once inside, go to the Janitor’s Closet to find the secret room where the Basement Keys are, on the desk. Once you have those keys, return to the studio to fulfill Dawn’s request to save Chuck.
Rink
Rink is another case that begins and ends with entirely different people other than the victim in question. Dawn claims that the Whistling Man is on the way and that she must break into a house to be safe. To help her avoid doing something rash, locate the Starling 2000 Manual in the Basement Storage Area and give her the alarm test activation code, which she can activate to be safe, saving her and Rink.
Clive
To ensure Clive stays safe, you’ll need to do a lot of legwork. This will involve two phone calls with previous victims: Virginia and Sandra. But before you do those calls, you’ll need to uncover some secrets in the basement:
- Go to the Basement using the Basement Key that you’ll find on the Janitor’s Closet wall.
- Once you’re in the basement, look around for every hint you can get about Clive. The two most important items here are the tape and a Polaroid photo.
- Once you find this information about Clive from the two most essential items, talk to Virginia and Sandra.
- For Virginia’s call, use the following choices: “Clive”
- Answer “Why are you so certain?”
- Answer “It’s okay.”
- For Sandra’s phone call, ask her “Why were you targeted?”
- Answer with “You found the body.”
- Answer “Sure.”
- Answer “Of course.”
Jason
To save Jason, you’ll need to remotely provide instruction to the ones in reach of Jason, who was attacked by masked people. First, find out any relevant information about Jason and his current condition so that you can help him. From there, you can call a Nurse at St. Gabriel Hospital, who gives you as much information as she can that you’ll translate over to Jason’s situation. To save Jason, make these dialogue choices:
- In response to if Casey should pull out the knife, “Don’t touch the knife.”
- “We need to secure the knife.”
- Answer “Use the cleaning rags.”
- Answer “Ok.”
- Answer “Could someone nearby help?”
- “He’s going into shock.”
- “Elevate Jason’s legs.”
- “Apply additional bandages.”
- Answer to Peggy, “John Hedges.”
- “This is a medical emergency.”
Teddy and Peggy
The last encounter you’ll have in Killer Frequency is pretty direct. Distracting Dawn (if you haven’t noticed yet, she’s the Whistling Man) is the main objective here. First head down to the basement and turn the power back on, since a certian Whistling Fellow knocked the power out. Find the generator, restore power, and then you’ll have your time with the Whistling Man. To make sure everything goes smoothly, choose the following dialogue choices:
- “Do you want to die?”
- “Tell me why that night.”
- No. Ricky didn’t know.”
- “Just a prank?”
- “Who was it?”
- “How do you know?”
- “Then why the cover-up?”
- “That’s evil.”
- “Answer the question.”
- “You’ve been through hell.”
- “School Gym”
- “Sister?”
- “You should have said.”
- “Is that why you attacked Eugene?”
- Pick up the birthday card. Rotate it to see the contents.


Published: Aug 11, 2023 01:56 pm