




If you count all the Parts in Star Wars: Galactic Racer, you’d arrive at around 300+ components, which can get overwhelming to study if you’re aiming to make the best builds. And since the Parts available for your vehicle are randomized per Tour, it might feel like it’s impossible to get a specific component for whatever build you’re trying to accomplish.
But if you study the kind of Parts available at your disposal, you should have some idea what kind of builds you can create on the fly. Looking at Galactic Racer Parts will become easier if you separate these components based on their purpose.
A quick primer on Parts
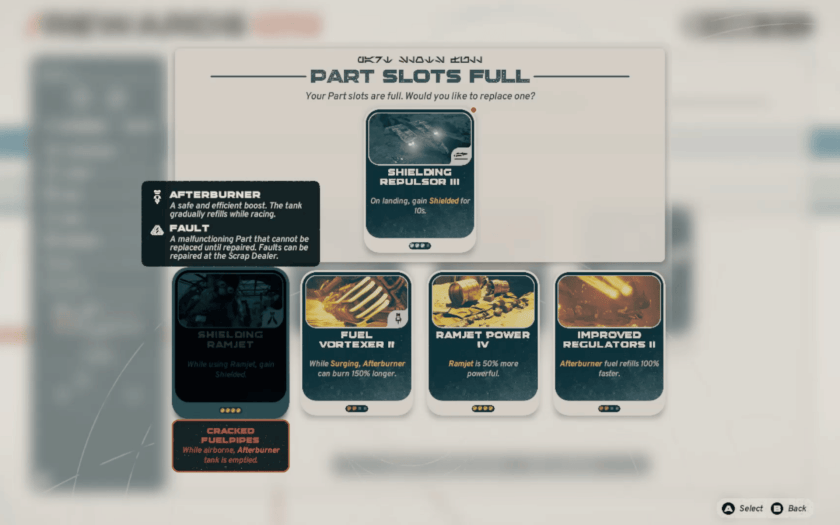
Parts in Galactic Racer serve as the equivalent of “equipment” or “cards” in standard roguelikes. Remember how in some games you can collect a limited number of buffs or debuffs that affect your overall run? This is exactly how Parts function in Galactic Racer, only this time flavored to be unique components of your vehicle.
You can only equip up to four (4) Parts at a time, and some of them become Faulty when damaged or purchased with defects. Faulty Parts can be repaired but only by the Scrap Dealer.
Afterburner Power and Speed
The Afterburner is the first speed boost you’ll encounter in your first Galactic Racer Tours, and chances are it’s going to be your preferred way of getting your vehicle past the competition. But everyone in the race also has an Afterburner, which means your boost is only as powerful as the upgrade points you put into it. Thankfully, Afterburner power isn’t solely reliant on how many Tuning Points you’ve invested in the stat, as there are Parts that reward you with more Afterburner juice when you’re in certain situations.
| PART | EFFECT, TIER 1 (COMMON) | TIER 2 (RARE) | TIER 3 (EPIC) | TIER 4 (LEGENDARY) |
|---|---|---|---|---|
| Afterburner Reconfiguration | During System Malfunction, Afterburner is 100% more powerful. | |||
| Afterburner Thermalizer | While Burning, Afterburner is 100% more powerful | |||
| Enriched Fuel | Afterburner speed boost increased by 10% | 25% | 50% | 100% |
| Enriching Siphon | While Surging, Afterburner power increased 2x | |||
| Fuel Agitator | Every Takedown, +5% Afterburner power | +10% | +15% | +20% |
| Heated Fuel | Redlining increases power of next Afterburner by 25% | 50% | 100% | 150% |
| Optimized Fuel | When fully fueled, Afterburner power increased by 25% | 50% | 100% | 150% |
| Thermophilic Fuel | Redlining adds +3% Afterburner power, lost on Crash | +7% | +10% |
Afterburner Fuel and Burn Time
Similar to the Ramjet, the Afterburner in Galactic Racer is a temporary boost you use to speed up and keep up with other racers. The Afterburner refills much faster than the Ramjet, making it more sustainable, but gives a far “weaker” push. Then again, due to its consistency, you might prefer using the Afterburner to the Ramjet. This means you’d want your Afterburner to be available either as soon as your Ramjet is out or whenever you need to recover from a crash or a bad turn. These Parts help you get your Afterburner much sooner instead of waiting for the recharge.
| PART | EFFECT, TIER 1 (COMMON) | TIER 2 (RARE) | TIER 3 (EPIC) | TIER 4 (LEGENDARY) |
|---|---|---|---|---|
| Ability Catalyst | Each Ability activation, +10% Afterburner refill rate | |||
| Afterburner Efficiency | Afterburner can burn 50% longer | 100% | 150% | 200% |
| Afterburner Recharger | When Ramjet becomes ready, fully refill Afterburner. | |||
| Expanding Fueltank | Redlining expands Afterburner tank by 10% each time | |||
| Fuel Coolant | While Cooled, Afterburner can burn 75% longer | 150% | 200% | 300% |
| Fuel Synthesis | At 6+ Energy, Afterburner refills 150% faster. | |||
| Fuel Vortexer | While Surging, Afterburner can burn 75% longer | 150% | 200% | 300% |
| Improved Regulators | Afterburner fuel refills 50% faster | 100% | 150% | 200% |
| Kinetic Refueler | On collision with another vehicle, refill 30% of Afterburner. | 60% | On collision with another vehicle, fully refill Afterburner | |
| Overcharging Afterburner | While Overcharged, Afterburner fuel refills 3x faster | |||
| Reconstituted Fuel | On Perfect Landing, refill Afterburner fuel by 50% | On Perfect Landing, fully refill Afterburner fuel | On landing, fully refill Afterburner fuel | |
| Refueling Abilities | Upon activating an Ability, fully refill Afterburner | |||
| Residual Afterburner | Ramjet no longer slows Afterburner refill rate | |||
| Surging Fuel | When entering Surging, fully refill Afterburner | |||
| Underbody Intakes | While airborne, Afterburner consumes 50% less fuel | 75% | While airborne, Afterburner consumes no fuel |
Ramjet Power
The Ramjet is the equivalent of nitrous in Galactic Racer, and it can be the crutch you need whenever you want to build momentum and zoom past your rivals. But if a lot of racers are Ramjetting at once, it all boils down to who has the best stat upgrades – the more powerful the Ramjet, the better the boost it gives. And with these Parts, you’ll get access to situations that reward you with a more powerful Ramjet the next time you use it.
| PART | EFFECT, TIER 1 (COMMON) | TIER 2 (RARE) | TIER 3 (EPIC) | TIER 4 (LEGENDARY) |
|---|---|---|---|---|
| Burning Ramjet | While Burning, Ramjet is 200% more powerful | |||
| Hail-Mary Reset | 60% chance Ramjet resets and strengthens rather than explodes. | 75% | 90% | |
| Overheat Loop | Redlining adds +1% Ramjet power, lost on Crash. | +3% | +5% | |
| Ramjet Accelerator | While Cooled, Ramjet is 15% more powerful | 30% | 50% | 75% |
| Ramjet Power | Ramjet is 10% more powerful | 25% | 40% | 50% |
| Ramjet Reconfiguration | During System Malfunction, Ramjet is 100% more powerful | |||
| Ramming Jet | Every Takedown, +5% Ramjet power | +10% | +30% | |
| Redlining Power | While Redlining, Ramjet is 100% more powerful | |||
| Superconducting Ramjet | While Frozen, Ramjet is 100% more powerful |
Ramjet Heat and Cooldown
The Ramjet is an amazing asset in Galactic Racer gameplay, but its overheating on top of maneuverability challenges at high speeds can make it unreliable. Sometimes you don’t get your Ramjet filled when you need it the most, so you can’t keep up with the competition. Thankfully, these Parts ensure your Ramjet either doesn’t heat up as much or cools down much faster, so you can use it more often.
| PART | EFFECT, TIER 1 (COMMON) | TIER 2 (RARE) | TIER 3 (EPIC) | TIER 4 (LEGENDARY) |
|---|---|---|---|---|
| Aerial Intakes | While airborne, Ramjet generates no heat | |||
| Heat Reduction | Ramjet generates 5% less heat | 10% | 20% | 30% |
| Optimized Radiators | Ramjet cooldown after use improved by 20% | 50% | 80% | |
| Ramjet Cooling | Speed-based Ramjet cooling improved by 10% | 20% | 30% | 40% |
| Redline Purge | Releasing Ramjet while Redlining readies it but increases heat gain | |||
| Release Actuators | On Takedown, ready Ramjet and reset heat | |||
| Thermocycling Dampers | On Perfect Landing, reset Ramjet temperature | On landing, reset Ramjet temperature | ||
| Uncapped Cooling | Ramjet temperature can decrease while active | |||
| Slipstream Intakes | While Slipstreaming, speed-based Ramjet cooling improved by 2x | |||
| Purging Surge | Upon Surging, ready Ramjet and reset heat | |||
| Dissipative Plating | Burning generates 50% less heat | 70% | 90% |
Redlining Duration
When you use your Ramjet in Galactic Racer, the game lets you know immediately that using it past a certain threshold gets your vehicle overheated. And really going over that red line can make your engine explode, causing a Crash. But you don’t necessarily have to stop the Ramjet when it reaches that red line, since there’s a threshold between unstable and critical that you can skirt and extend your Ramjet. This is the center of the Redlining playstyle, and there’s a Part that guarantees much longer stays in that danger zone.
| PART | EFFECT, TIER 1 (COMMON) | TIER 2 (RARE) | TIER 3 (EPIC) | TIER 4 (LEGENDARY) |
|---|---|---|---|---|
| Extended Alarm | Redlining duration is 50% longer. | 100% | 150% | 200% |
Gain or Boost Cooled
When you encounter the Cooled condition in your Galactic Racer gameplay, you might be wondering what it’s got to do with builds at large. It just shuts down your vehicle when you get Frozen, right? That’s half true, since where Cooled really counts is the fact that it slows down – sometimes outright pauses – the overheating of your Ramjet. In the right situations, you can exploit Cooled to get unlimited Ramjet duration, which is essential if you need to get past that pesky rival who keeps on overtaking you. These Parts get you to that status as soon as possible.
| PART | EFFECT, TIER 1 (COMMON) | TIER 2 (RARE) | TIER 3 (EPIC) | TIER 4 (LEGENDARY) |
|---|---|---|---|---|
| Coolant Cycler | After a full Afterburner use, gain Cooled for 5s | 10s | 15s | |
| Cooling Slipstream | While Slipstreaming, gain Cooled | |||
| Thermoactive Fuel | While using Afterburner, gain Cooled | |||
| Phase-change Radiators | While Redlining, gain Cooled for 10s | 15s | 20s | |
| Surplus Cooling | At 8+ Energy, gain Cooled | |||
| Cooling Aerofoils | While airborne, gain Cooled | |||
| Cooling Dampers | On Perfect Landing, gain Cooled for 5s | 10s | 15s | 20s |
| Critical Hope | While 1 Crash remains, gain Surging, Shielded and Cooled | |||
| Cooling Surge | While Surging, gain Cooled | |||
| Amplifying Regulator | Every Takedown, Cooled becomes 10% more potent | |||
| Cooling Actuator | On Takedown, gain Cooled for 5s | 10s | 20s | 30s |
| Critical Cooling | While 1 Crash remains, gain Cooled | |||
| Emergency Cooling | During System Malfunction and 10s after, gain Cooled | |||
| Recovery Coolant | After a Crash, gain Cooled for 30s | |||
| Enhanced Coolant | Cooled is 10% more potent | 30% | 80% | 150% |
| Extended Cooling | Cooled lasts 5s longer | 10s | 15s | |
| Subzero Cooling | While Frozen, Cooled is 100% more potent |
Gain Shielded
When you start your Galactic Racer experience, you begin with the Survivor Racer Style that grants you the Shield Ability. This gives you, well, a shield that protects you from major collisions. Given how the Landspeeder is already a tough beast, Shield is a nifty Ability to have to stay away from crashes involving environmental hazards, walls, and even impact from other Racers. These Parts help add that crutch in situations where you need an extra dose of survivability.
| PART | EFFECT, TIER 1 (COMMON) | TIER 2 (RARE) | TIER 3 (EPIC) | TIER 4 (LEGENDARY) |
|---|---|---|---|---|
| Depleted Shielding | After a full Afterburner use, become Shielded for 5s | |||
| Shielding Fuel | While using Afterburner, gain Shielded | |||
| Overflow Shielding | While Redlining, gain Shielded | While Redlining and for 5s after, gain Shielded | While Redlining and for 10s after, gain Shielded | |
| Shielding Ramjet | While using Ramjet, gain Shielded. | |||
| Shield Cycler | Upon activating an Ability, gain Shielded for 5s | 10s | ||
| Shielding Lead | Upon taking first place, gain Shielded for 30s | |||
| Protective Ignition | Perfect Start grants Shielded for 30s | 60s | Perfect Start grants Shielded until it is broken | |
| Shielding Repulsor | On Perfect Landing, gain Shielded for 5s | 10s | On landing, gain Shielded for 10s | |
| Critical Hope | While 1 Crash remains, gain Surging, Shielded and Cooled | |||
| Critical Shielding | While 1 Crash remains, gain Shielded | |||
| Defensive Start | At race start, gain Shielded for 10s | |||
| Inertial Shield | When speed reaches 450, gain Shielded for 10s | |||
| Recovery Shield | After a Crash, gain Shielded for 30s |
Gain or Boost Surging
Speed is the lifeblood of any racing game, especially in the Galactic League where there’s no holds barred, and you have both the Afterburner and the Ramjet as reliable speed boosts. But if you really want to leave your rivals in the dust, that’s where Surging comes in. This status gives you a massive increase in top speed and acceleration, practically giving you better “base stats” so to speak to get the momentum you need before your other speed boosts slingshot you to first place. These Parts ensure you gain Surging in the moments that count.
| PART | EFFECT, TIER 1 (COMMON) | TIER 2 (RARE) | TIER 3 (EPIC) | TIER 4 (LEGENDARY) |
|---|---|---|---|---|
| Surging Alarm | When Redlining, gain Surging for 10s | 15s | 20s | |
| Surplus Surging | At 8+ Energy, gain Surging | |||
| Aerial Surge | While airborne, gain Surging | |||
| Overcharged Supercharger | While Overcharged, gain Surging | |||
| Critical Hope | While 1 Crash remains, gain Surging, Shielded and Cooled | |||
| Surging Inlets | Upon Slipstreaming for 5s, gain Surging for 5s | 10s | 20s | |
| Aerial Surge | While airborne, gain Surging | |||
| Critical Surging | While 1 Crash remains, gain Surging | |||
| Jolted Boost | After Concussed, gain Surging for 10s | 20s | 30s | |
| Optimized Surge | Surging is 20% more potent | 50% | 100% | |
| Recovery Surge | After a Crash, gain Surging for 30s | |||
| System Surge | During System Malfunction and 10s after, gain Surging | |||
| Power Cascade | On Takedown, gain Surging and Overcharged for 10s | 15s | 20s |
Gain Overcharged
If your Galactic Racer playstyle counts on building Energy and using it on Abilities, then the Overcharged status will be your best friend. When you gain Overcharged, your Abilities recharge faster and you get extra Energy to use. With the right timing, Overcharged can lift you from last place to someone who just dominates the match. These Parts ensure specific actions reward you with Overcharge.
| PART | TIER 2 (RARE) | TIER 3 (EPIC) | TIER 4 (LEGENDARY) |
|---|---|---|---|
| Overcharging Propellant | On Ramjet activation, gain Overcharged for 10s | ||
| Charging Coils | Perfect Start grants Overcharged for 30s | ||
| Charging Repulsors | On Perfect Landing, gain Overcharged for 10s | On landing, gain Overcharged for 10s | |
| Repulsor Surplus | While airborne, gain Overcharged | ||
| Cooling Overcharge | While Cooled, gain Overcharged | ||
| Overcharged Injector | When speed reaches 350, gain Overcharged for 10s | ||
| Overcharged Systems | On System Malfunction, gain Overcharged for 10s | ||
| Thermal Inverter | While Burning, gain Overcharged. | ||
| Power Cascade | On Takedown, gain Surging and Overcharged for 10s | 15s | 20s |
Speed Boosts
If you’ve played any racing game like Galactic Racer, you know it’s all about speed – and keeping it. One wrong move and you’d slow down enough for your rivals to zoom past you, barely giving you any room to recover. These Parts ensure you get boosts of speed when you need them the most, and that you’re rewarded with even more speed when you excel in a particular playstyle.
| PART | EFFECT, TIER 1 (COMMON) | TIER 2 (RARE) | TIER 3 (EPIC) | TIER 4 (LEGENDARY) |
|---|---|---|---|---|
| Optimized Inlets | Perfect Start improves Slipstreaming by 3x for 30s | 60s | Perfect Start improves Slipstreaming by 3x, but lose this on Crash | |
| Spark Plugs | Perfect Start slightly increases Speed | Perfect Start moderately increases Speed. | Perfect Start considerably increases Speed. | Perfect Start greatly increases Speed |
| Calibrating Landings | After each Perfect Landing, slightly increase Speed | After each Perfect Landing, moderately increase Speed. | After each Perfect Landing, considerably increase Speed | |
| Repulsormod | On Perfect Landing, massively increase Speed for 5s | 10s | 15s | 20s |
| Improved Drafting | Slipstreaming speed bonus increased by 100% | |||
| Polished Inlets | Keep all Slipstreaming bonuses until impact | |||
| Lethal Velocity | Every Takedown slightly increases Speed | Every Takedown moderately increases Speed | Every Takedown considerably increases Speed | Every Takedown greatly increases Speed |
| Critical Injectors | Perfect recovery from Critical Malfunction considerably increases Speed | Perfect recovery from Critical Malfunction greatly increases Speed | ||
| Strategic Ablation | After every Crash, +8% top speed | |||
| Frozen Finesse | While Frozen, massively increase Speed | |||
| Impact Regulator | Concussed clears quickly, then massively increases Speed for 10s. | 20s | 30s |
Energy and Abilities
Among mechanics in this Star Wars title, Abilities in Galactic Racer are your aces in the hole, as you can use this to gain the edge on your rivals, be it through anything offensive or some nifty boosts to your perfromance. These Parts help ensure you get the Energy you need to fuel those Abilities.
| PART | EFFECT, TIER 1 (COMMON) | TIER 2 (RARE) | TIER 3 (EPIC) | TIER 4 (LEGENDARY) |
|---|---|---|---|---|
| Ability Catalyst | Each Ability activation gives you +10% Afterburner refill rate. | |||
| Fuel Synthesis | At 6+ Energy, the Afterburner refills 150% faster. | |||
| Faster Attachments | Abilities reload 50% faster | 100% | 150% | 200% |
| Kinetic Energizer | For every Takedown, you get +1 max Energy (limited) | +2 | ||
| Plug-F Power Cell | Experimental: +13 Energy | |||
| Reload Surge | While Surging, all Abilities reload 150% faster | |||
| Scrap Recycler | On Takedown, get 1 Energy. | 2 Energy | 3 Energy | 4 Energy |
| Scrap Reloader | On Takedown, instantly reload all Abilities. | |||
| Supercooled Attachments | While Cooled, Abilities reload 3x faster. | |||
| Surplus Cooling | At 8+ Energy, gain Cooled | |||
| Surplus Surging | At 8+ Energy, gain Surging | |||
| Volatile Battery | Start a race with +4 Energy, but lose them on a Crash | |||
| Acid Battery | While Corroded, rapidly recharge Energy |
Crash Recovery
You only get a limited number of Crashes during your Galactic Racer Tours, so every reset counts. Crash too much, and you’ll get Wrecked Out, losing a Galactic League Token. These Parts help you get more Crashes based on specific conditions.
| PART | EFFECT, TIER 1 (COMMON) | TIER 2 (RARE) |
|---|---|---|
| Scrap Reclaimer | Every 3 Takedowns restores a Crash | |
| Systematic Servicing | Perfect recovery from Critical Malfunction recovers a Crash |
Status Protection and Resistance
Some Abilities in Galactic Racer are built to disrupt the enemy’s performance, so it can get very difficult to recover when these things happen to your vehicle as well. One wrong status can take you out of the running, which can make Eliminators deadly. These Parts protect you from those statuses.
| Part | Effect, Tier 1 (Common) | Tier 2 (Rare) | Tier 3 (EPIC) | Tier 4 (LEGENDARY) |
|---|---|---|---|---|
| Particulate Filter | Choked no longer cancels active Ramjet | |||
| Protective Overcharge | While Overcharged, you can’t get System Malfunction | |||
| Dechoking Mechanism | While Surging, you can’t get Choked | |||
| Robust Surge | While Surging, you can’t get System Malfunction | |||
| Critical Assist | Perfect recovery zone during Critical Malfunction is larger | |||
| System Degausser | Recover from System Malfunction 2x faster | 200% | ||
| Antacid Coating | Corroded no longer causes Choked | |||
| Burn Protection | Protected from Burning | |||
| Chassis Cleansing | While Cooled, you can’t get Corroded | |||
| Corrode Resistance | Takes 2x longer to Crash from Corroded | |||
| Corrosion Shedding | Corroded clears 4x faster | |||
| Disruption Protection | You can’t get Disrupted | |||
| Dissipative Plating | Burning generates 50% less heat | 70% | 90% | |
| Freeze Resistance | Takes 2x longer to become Frozen | 4x longer | ||
| Freeze Shedding | Frozen clears 3x faster | |||
| Frost Protection | You can’t get Frozen | |||
| Impact Regulator | Concussed clears quickly, then massively increases Speed for 10s | 20s | 30s | |
| Insulated Servos | Frozen has 20% less impact on Cornering | 40% | 60% |
Frequently Asked Questions about all the Parts in Star Wars: Galactic Racer
What are Faulty Parts in Galactic Racer?
Faulty Parts are exactly like regular Parts except they come with a disadvantage. These stay throughout the Tour unless you repair those Faulty Parts.
How can I get Parts in a Tour?
You can get Parts for your vehicle as you complete Tour Events, or if you get access to the Scrap Dealer as a node in your run. In between planets, you can also go to Hibi’s Shop to buy Parts.










Published: Oct 21, 2026 03:21 pm