
The Skull Merchant is a brutal Killer in Dead by Daylight that developer Behaviour Interactive even admits is hard to master. While her ability seems daunting, it’s finding the right perks and add-ons that you’ll struggle with. This guide outlines the best build for The Skull Merchant so that you can wipe out the Survivors in your first Trial with her.
Related: How Teamwork Survivor perks work in Dead by Daylight
The best build for The Skull Merchant
We’ve tried a few builds out with The Skull Merchant and found that this one, with a potential minor variation, is the best. In each section below, we explain how to make the most of the perks and add-ons, so you’re not in the dark as soon as you start hunting.
The best perk build for The Skull Merchant
The perks we recommend you use with The Skull Merchant and why are as follows:
- Dissolution: When you damage a Survivor, this perk activates for 20 seconds. It destroys any pallets a Survivor fast vaults over while they’re in your Terror Radius when it’s active. You’re going to be doing a lot of chasing with The Skull Merchant, and this perk punishes any Survivors who get too ahead of themselves. It also helps keep chases going without any interruptions, ensuring a hit.
- Leverage: Hooking a Survivor gives you a Token up to 10 in total. Then, when you hook a Survivor, the perk activates, decreasing the speed at which Survivors can heal for 5% for every Token you hold for the next 30 seconds. If a Trial is going on for a long time, you’ll hook more Survivors, and this perk prevents them from healing as fast as they’d like to. Many give up, meaning you can down them the next time you see them.
- Jolt: When you put a Survivor into the dying state with a basic attack, all generators within 32 meters will explode and begin regressing. They also get an initial burst of damage to add insult to injury. When Survivors enter the detection zone of your drones, they’ll trigger an effect that allows you to down them in a single hit. This boosts Jolt and makes it essential for The Skull Merchant.
- Iron Grasp: The effects of a Survivor struggling are reduced and the time they have to struggle out of your grasp is increased. This just makes life easier for you since you can end up with multiple Survivors to hook rather quickly.
This perk loadout makes the most of The Skull Merchant’s ability – Eyes in the Sky. To make the most of this Killer, you need to place drones near the generators in a Trial and then rush to them when Survivors set them off. A Survivor becomes Exposed if they fail to disarm a drone or are in the radius for too long, meaning you can down them in a single hit. Jolt ensures you make the most of that hit, and Leverage pushes Survivors to be riskier, so even if they escape the drone’s radius, they’ll still go down in one. Dissolution just helps you get to a Survivor faster and without being stunned, and Iron Grasp is perfect for hooking Survivors and moving on. You can’t place drones near a hooked Survivor, so you’ll need that extended time you have to hook to find one further away from your established drones.
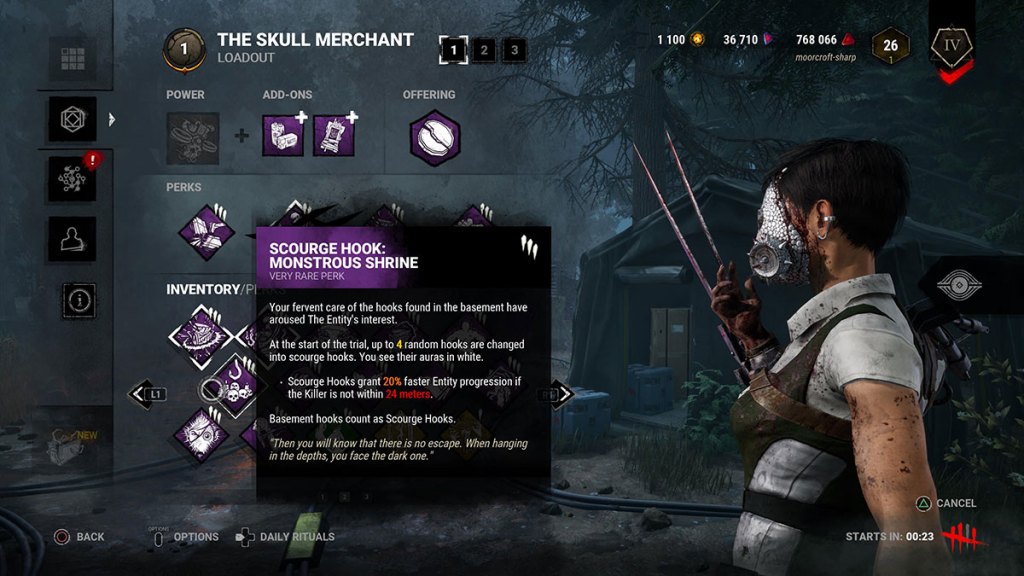
While we think this is the best set of perks to use with The Skull Merchant, there’s one alternative we can suggest. Instead of using Leverage, you can swap in Scourge Hook: Monstrous Shrine. This transforms four random hooks into Scourge Hooks, which progress faster when you’re outside their radius. Leverage is great because it hinders the Survivor’s ability to heal, but Scourge Hooks can go so fast that a Survivor is sacrificed before anyone can save them.
The best add-on build for The Skull Merchant
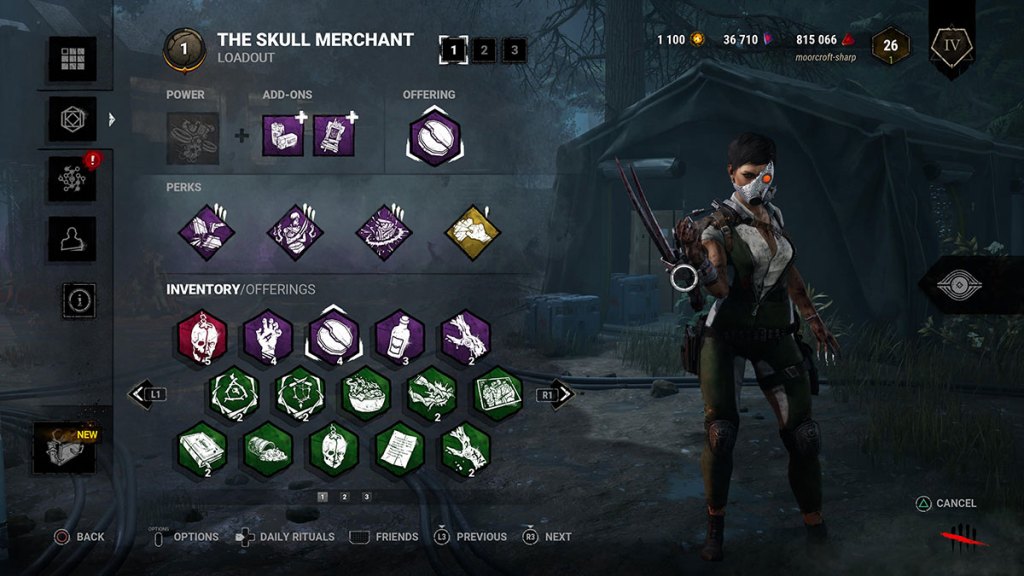
Of the two add-on slots you have, there are two that work best with this build. We’ve outlined them below.
- Expired Batteries: Forces every Survivor to start with a Claw Trap, and the batteries for all Claw Traps are increased. While Survivors can remove these once the batteries are depleted, they recharge inside a drone’s radius. These items allow you to track Survivors around the map even when Survivors aren’t near a drone, and they’ll push them into the Exposed status faster. This makes it possible to instantly down a Survivor in the first minute of the Trial.
- Advanced Movement Prediction: Any Survivors that enter a drone’s Active Zone have their aura revealed for a short time. This is incredibly powerful because you get an audio notification for that Survivor and can easily see them across the map. This is very useful when trying to keep Survivors away from generators and force them to continue to enter a drone’s radius, recharging their Claw Traps.
- Offering – Cut Coin: We believe the Cut Coin is the best Offering to use with The Skull Merchant because it further limits the options Survivors have. With the Leverage perk, most Med-Kits won’t heal a Survivor. The entire team has to work with what they brought into the Trial, and that doesn’t last long. This is a great Offering because it plays into what The Skull Merchant does in real life, cutting away the advantages competitors have until all that’s left is the bare bones.
These add-ons and the Offering make it very difficult to be a Survivor in the next Trial. You’ll need to spend a lot in the Bloodweb to acquire enough to use them in every Trial, but it’s worth it. We found that Survivors barely used any items against us because they were all either focused on working on generators or just didn’t want to be found. The thing is, these add-ons make them easy to find, down, and hook, meaning very few Survivors will escape you. Even when the exits are live, you can use drones on the doors to push back and get a few extra kills in.


Published: Mar 8, 2023 08:00 am