
Floor 12 of the Spiral Abyss has reset, making it the most challenging series of fights in Genshin Impact to date. Even players with strong teams will struggle to clear the Spiral Abyss in one shot. If you aim to get all nine stars on this floor, you will likely have to run through Floor 12 more than once.
Each Spiral Abyss update grants a unique buff to help you out in your battles. This update is the Blessing of the Abyssal Moon: Blade-Flourish Moon. This buff has the following effect:
“When opponents take Electro-Charged DMG, their Electro RES decreases by 10% for 10 seconds. Max 4 stacks. Each stack’s duration is independent. Each enemy can receive this effect once every 1.2 seconds.”
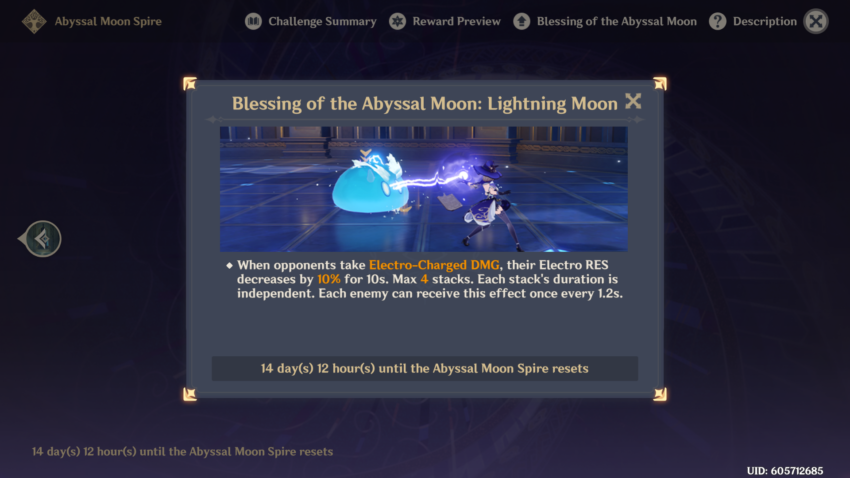
This Blessing of the Abyssal Moon obviously benefits Electro characters greatly, which impacts the characters you can consider bringing. It’s a good idea to have at least one team in the Spiral Abyss tailored to an Electro-Charged focused team, which means bringing a strong Electro character and strong Hydro character.
Unlike the complex team-building required for Version 2.4 of the Spiral Abyss, Version 2.5’s Spiral Abyss is much simpler. However, there are still some near-mandatory requirements you’ll need to fulfill while drafting teams for this version’s Spiral Abyss.
Characters to consider

You’ll need a Geo character for your second team. The second chamber for this floor contains the Golden Wolflord, which is a weekly boss that requires at least one Geo character on the team, as there’s a phase where Geo attacks are required to advance.
Of course, this floor still benefits from this version’s Blessing of the Abyssal Moon, which allows you to bring an Electro character and receive some great buffs. For this reason, you should bring a team focused on Electro characters and a team focused on Geo characters.
- Arataki Itto / Zhongli / Albedo / Gorou: This strong quad-Geo team excels in this floor, dealing high damage for other bosses, offering great protection with Zhongli and high-constellation Gorou, and the ability to easily deal with the Golden Wolflord.
- If you don’t have all four characters, consider swapping one of these characters out for Bennett. If you don’t have the ability to draft a Geo-focused team, you at least need Ningguang or Noelle to deal with a specific phase in the Golden Wolflord fight.
- You can also consider common meta teams that utilize Geo characters. Double Geo Hu Tao or Xiao for example often slots in for Zhongli and Albedo, and just having those two characters are more than enough for the Golden Wolflord.
- Any Electro team: The team we used in our fight was Keqing, Xingqiu, Fischl, and Kazuha, which is a strong team that takes advantage of the Blessing of the Abyssal Moon. However, the Raiden Shogun, Beidou, and Yae Miko are other strong options you can form a team around.
Floor 12: Chamber 1 – First Half

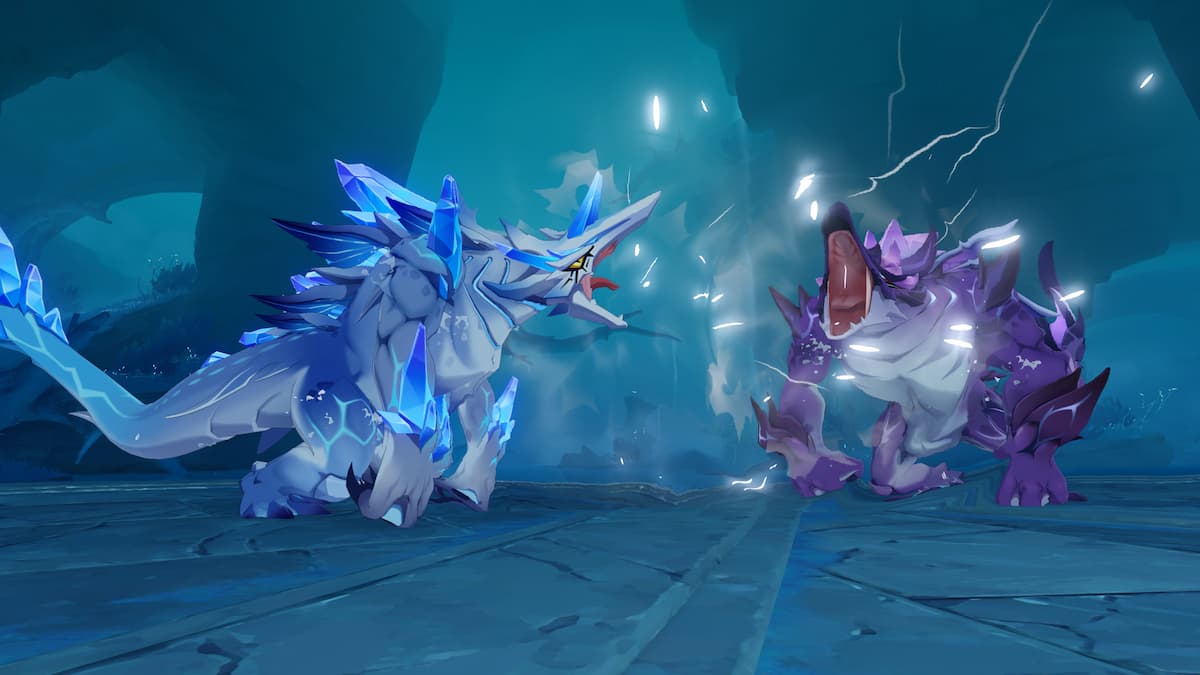
Fortunately, the First Half of this chamber is against mostly straightforward enemies. The six Electro Rifthounds that are present on this floor are honestly the most difficult fights for your first team. Fortunately, as Electro Rifthounds are weak to Electro damage, we’re well equipped to take this fight.
You’re gonna face a wave of four Electro Rifthound Whelps, and then two larger Electro Rifthounds. This is a straightforward fight, and it’ll be a test of whether your damage is high enough. You can increase your chances of a perfect clear by taking advantage of the Blessing of the Abyssal Moon and drafting a strong Electro team.
Floor 12: Chamber 1 – Second Half

The second half of the first chamber is the most straightforward fight for your second team, as you fight some Bathysmal Vishaps. You’ll just have to defeat these enemies as fast as you can, as it’s just a standard fight that tests how much damage you can put out.
It’s worth noting you can get Frozen by their attacks, as one deals Hydro damage while the other deals Cryo damage. As a result, be mindful while dealing damage and try not to get Frozen as it can severely impact your time.
Floor 12: Chamber Two – First Half

This chamber is just a fight between two Ruin Graders. While these two have some strong attacks that can mess up your run, this is a fight you shouldn’t be scared of if you have enough damage. It’s recommended to try to clear this chamber in about a minute or less to have enough time for the second half.
Running to the first Ruin Grader on the left provided the most consistent results, allowing the Ruin Graders to naturally group up themselves. This will let you dish out some prominent AoE damage.
Floor 12: Chamber Two – Second Half

The controversial addition of the Golden Wolflord is actually not too difficult if you have the proper team. You’ll need a large amount of Geo characters to deal with the second phase of this fight. The most aggravating part, however, is likely the first phase of the fight.
Here, the Golden Wolflord will frequently dip into the air, only occasionally coming to the ground for certain attacks. When the Golden Wolflord comes to the ground, this is when you want to go through your first rotation of Elemental Burst attacks, dealing as much damage as you can to trigger the second phase of the fight. One of the best times for this is during the Golden Wolflord’s laser attack, as he stays on the ground for a long time.

You only need to get the Golden Wolflord’s health down to about half to trigger the second phase. During this phase, the Golden Wolflord will throw down structures on different sides of the map, which can only be destroyed with Geo attacks.
Destroying these structures will destroy the white shield, which is found underneath the Golden Wolflord’s health bar. You need a lot of Geo attacks to destroy these structures in a timely manner. That’s why a 4-man Geo team is pretty strong here.
Once you defeat the structures, the Golden Wolflord will collapse on the ground. Quickly get your Elemental Burst back up, and then defeat it while it’s still on the ground.
Floor 12: Chamber Three – First Half

This is another straightforward, and frankly easy fight, that doesn’t require much effort. There aren’t any complex attack patterns or enemy movements. Just head to the center and defeat these enemies as quickly as possible. There aren’t any obnoxious invulnerability patterns to be aware of. It’s just damage, damage, damage.
However, this also means this should be the half you clear very quickly. The next fight can take up a good amount of time if you aren’t prepared for it, so try to clear this half as quickly as possible.
Floor 12: Chamber Three – Second Half
The second half of this fight is against two Bathysmal Vishap Herd, a weekly boss fight. You can read up on the boss mechanics here, as the fight is mostly the same. There is a twist, however, that isn’t present in the version of the regular World Boss.
Here, you have to defeat these two enemies at the same time. If you defeat one without defeating the other, they will revive in about six seconds. They don’t revive with a lot of HP, so it’s not the end of the world if you can’t defeat both at the same time first. But eventually, you need to be able to defeat both at once.
If you cleared this floor, congrats. You have finished the Spiral Abyss. You have plenty of time now to build up your characters for the next cycle, which is looking rather challenging to deal with.


Published: Mar 1, 2022 05:15 pm