
Floor 12 of the Spiral Abyss is the biggest challenge in Genshin Impact, available to you after clearing all eleven floors before it. Unlike the last Spiral Abyss rotation, this Spiral Abyss is relatively more straightforward, so there’s not as much to stress about when it comes to your DPS. There are many strategies here when it comes to manipulating the enemy movements rather than big DPS checks.
Because this is Floor 12, however, you do not need to get a lot of stars. But clearing the Abyss as fast as you can give you access to even greater rewards. Floor 12 has no Leyline Disorder, so focus on dealing as much damage as you can. You still have the “Blessing of the Abyssal Moon,” so use that to your benefit.
This week’s Blessing of the Abyssal Moon is the Exacting Moon. You will obtain 1 Extract stack after obtaining a shard created through the Crystallize reaction, which will increase the damage dealt by your active character by 8% for 10 seconds. Max 3 stacks. When characters possessing 3 stacks obtain more Crystallize reaction-created shards, they will unleash a shockwave that deals True DMG to opponents. Shockwaves created this way can occur every 3 seconds.
Characters to consider
Version 2.3’s Spiral Abyss is somewhat easier than Version 2.2 but can still give you tons of trouble if you don’t have the correct characters with you. Version 2.3 is a bit easier because there’s less RNG involved when mapping out enemy movements. However, damage requirements have gone up somewhat, so you’ll need to bring the best characters you have.
Zhongli / Albedo / Geo MC: Geo characters who can trigger Crystallize will increase the damage of your active character. You don’t need to run Geo-focused teams, but it’s helpful to bring someone who can Crystallize. Zhongli, in particular, adds a level of protection while also adding to your team’s damage.
Tartaglia / Xiangling / Bennett / Kazuha or Sucrose: The classic “International Team” as dubbed by the community is incredibly effective on this floor. The Rifthounds in the third chamber are extremely tanky and require high degrees of AoE damage to clear efficiently.
Freeze Comp: Running a Freeze comp helps slow down the massive amounts of invulnerability frames the Rifthounds have. Keeping them frozen in one place is helpful to decrease the time the Rifthounds spend dodging.
Floor 12, Chamber 1
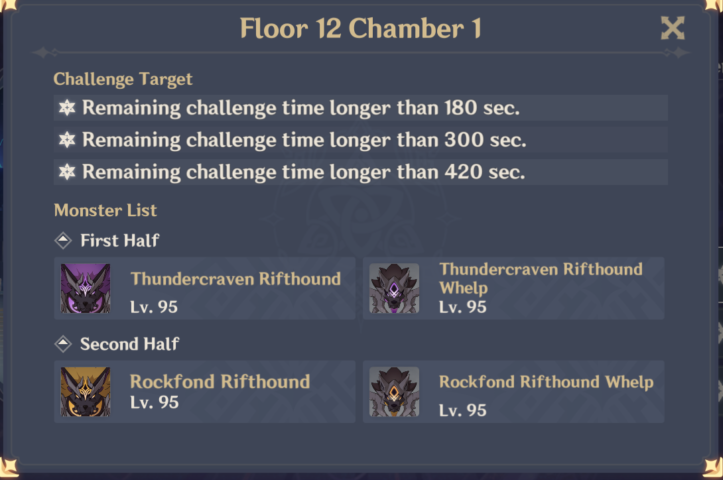
The Thundercraven Rifthounds is an immediate power spike. While also bulky, they dodge frequently as well. The second chamber has one less Rifthound, so you have a little more time to clear the first chamber. To receive max rewards, ideally, clear the floor in two minutes or less.
Floor 12, Chamber 2
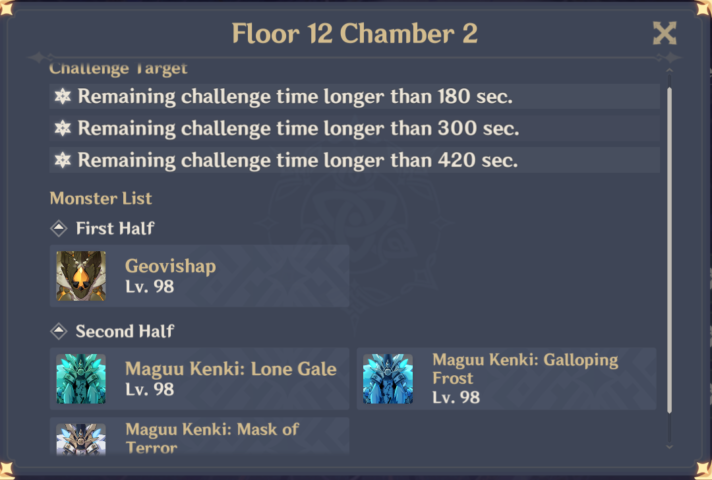
The first Chamber is a simple affair. You’ll just have to fight two Geovishaps. It’s a simple fight, so clear it as fast as you can before moving on to the second half. A Freeze comp will help make this fight go smoothly, so the Geovishaps don’t go crazy.
Meanwhile, the second Chamber is an intimidating duel between three different Maguu Kenki’s. This is where you need a team with strong AoE damage. The Tartaglia International team is highly effective here, able to deal tons of damage at once.
Pay close attention to the stances of the Maguu Kenki’s. One can charge up for a massive one-shot attack, as it rises into the air. You can save your Elemental Burst for this attack if you have trouble dodging the attack. This is because during the Burst animation, your character will be invincible.
Floor 12, Chamber 3
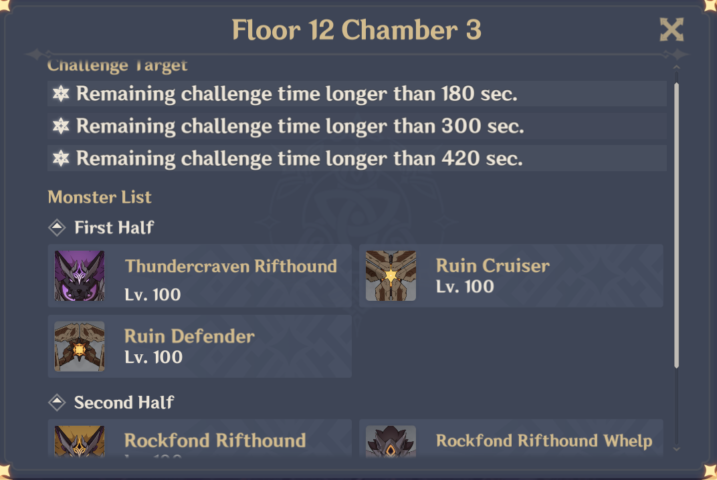
This floor, while seemingly simpler, is arguably harder than the last chamber. This is because of the prevalence of Rifthounds, which are extremely bulky and hard to hit as they fly across the screen. Here are some tips used during my run to help decrease the time needed to defeat these enemies:
As you spawn in, head to the back of the Ruin Cruiser. Going behind the Ruin Cruiser will help group up the Cruiser and the Defender. Defeat these two at the same time, ideally, before moving to the Rifthounds.
The second wave will feature the Thundercraven Rifthounds. If you are able to defeat the Ruin Cruiser and Ruin Defender at once, the Rifthounds should be on your right. Go to the farthest Rifthound, and focus on that one. The AI of the enemies is likely to group next to each other at this point, allowing you to deal some more damage at once. Regardless of whether or not the Rifthounds grouped, focus on one at a time.
The final chamber on this floor will feature some Rifthounds and two Ruin Guards. This is simply a battle of speed. Defeat the Rifthound as fast as possible, so you can clear the Ruin Guards quickly.
Once you master this fight, you’re finished with the Spiral Abyss! The Spiral Abyss resets once every two weeks or so, so you can return to this challenge during the next reset to earn even more Primogems.


Published: Dec 1, 2021 11:28 pm