The Gunsmith – Part 3 quest is received from the Mechanic once players hit Level 12 in Escape from Tarkov, and is the standard introduction to the weapon system conversion. Escape from Tarkov has a robust weapon crafting system, and Part 3 turns a standard MP5 into a brutal laser-fast SMG that can crack specific armors or leg-burn a tanked player. It might benefit players to craft two of these because they’re not only fun to use but highly effective.
How to complete Gunsmith – Part 3
For the third Gunsmith quest, players will need to source an MP5 in order to begin figuring out the modifications necessary. Once the Peacekeeper reaches Level 2, and after completing his quest Scrap Metal, an MP5SD or MP5 can be purchased from him. Alternatively, the Mechanic offers a barter for an MP5 at Level 2. The final resort should be purchasing an MP5 from the flea market. The following characteristics are demanded for completing this quest:
- 50-round magazine
- Silenced
- Tactical Flashlight
- Sighting range above 200
- Ergonomics above 45
- Recoil sum below 200
- Maximum weight of 3.8 kg
Related: How to complete the Pharmacist quest in Escape from Tarkov
What parts are needed for Gunsmith – Part 3
Players are tasked with shifting a standard MP5 to an MP5 SD, which involves removing the upper receiver of the weapon system and replacing it with a suppressed version. For this, we’ll craft two different configurations and then combine them for the final version. The shopping list necessary for changing an MP5 to an SD variant is as follows:
- HK MP5DS polymer handguard
- HK MP5SD 9×19 upper receiver
- HK MP5SD 9×19 sound supressor
Note that your MP5 may already come with the polymer handguard. Inspect the weapon prior to shopping to ensure you don’t overspend, as this build is already pricey enough. Once the weapon variant has changed, players will need to mod the result with three additional pieces:
- HK MP5 9×19 X Products X-5 50-round drum magazine
- HK MP5SD B&T tri-rail ring mount
- NcSTAR blue laser LAM-module
Again, items could be purchased and bartered from various Traders like in Gunsmith Part 2, but at this stage of the game, using the flea market is simply a faster means of purchasing all of the necessary items. Double-check your inventory for the six items prior to beginning.
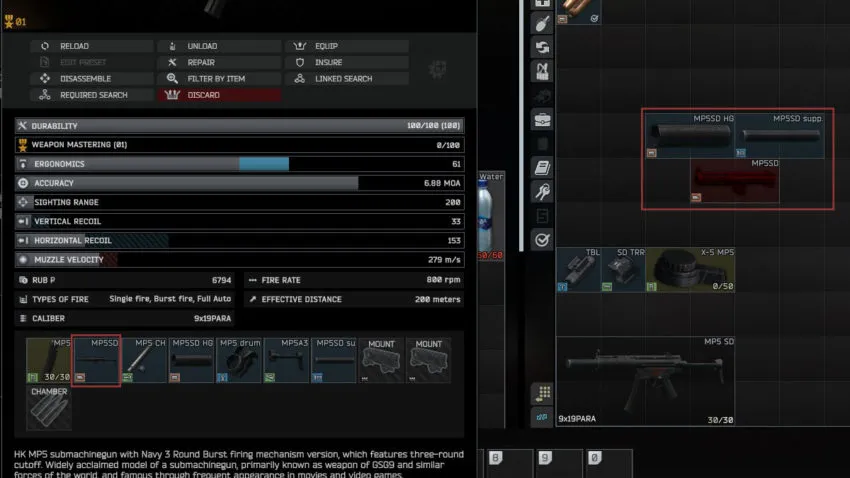
How to assembly the MP5 for Gunsmith – Part 3
Understand that weapons mostly come in two primary pieces, being the upper and lower receivers. The upper receiver determines gas blocks, silencers, and rail systems, while the lower determines firing rates, magazine size, and ergonomics. Both parts determine the weight.
Building the upper receiver
Take the purchased items for converting the MP5 to an SD variant: the upper receiver, sound suppressor, and polymer handguard. Drag the suppressor and handguard into the upper receiver for a finished SD variant upper, and replace the current upper receiver on the MP5. Remove the MP5A3 stock and drum rear sight from the MP5’s upper receiver, and place it on the SD variant upper.
Kitting the MP5SD for turn-in
Once the new upper receiver has been matched to the MP5 lower receiver, add the tri-ring, laser, and drum magazine to finalize the build. Double-check that you’ve added the rear drum sight and MP5A3 stock to the new weapon, and this weapon is good to turn in.


Published: Oct 13, 2022 03:26 pm