
Monster Hunter is a strong franchise from Capcom that continues to iterate on gameplay hit after hit, but one of the earlier hits of the title was an MMO experience called Monster Hunter Frontier. Released on June 21, 2007, this game enjoyed over a decade of popularity.
The Monster Hunter community is a tenacious one, however. It has compiled the means for dedicated players to host their own Monster Hunter Frontier servers so players can continue the fight — here’s how to set up a Monster Hunter Frontier server and how your friends can join it.
Related: The 10 most fun monsters to hunt in the Monster Hunter games
How To Install the Monster Hunter Frontier Server
Note: this guide will walk users through setting up SQL databases and related schema, but it’s expected that the user understands how internet ports operate and how to alter firewalls. While the community actively uses the Erupe Community Edition server and client files, these files can only legally be obtained via the lawful purchase of Monster Hunter Frontier — copyright laws may apply. Finally, users follow this guide at their own risk — we do not guarantee safety, efficiency, or security in using found files.
Installing PostgreSQL
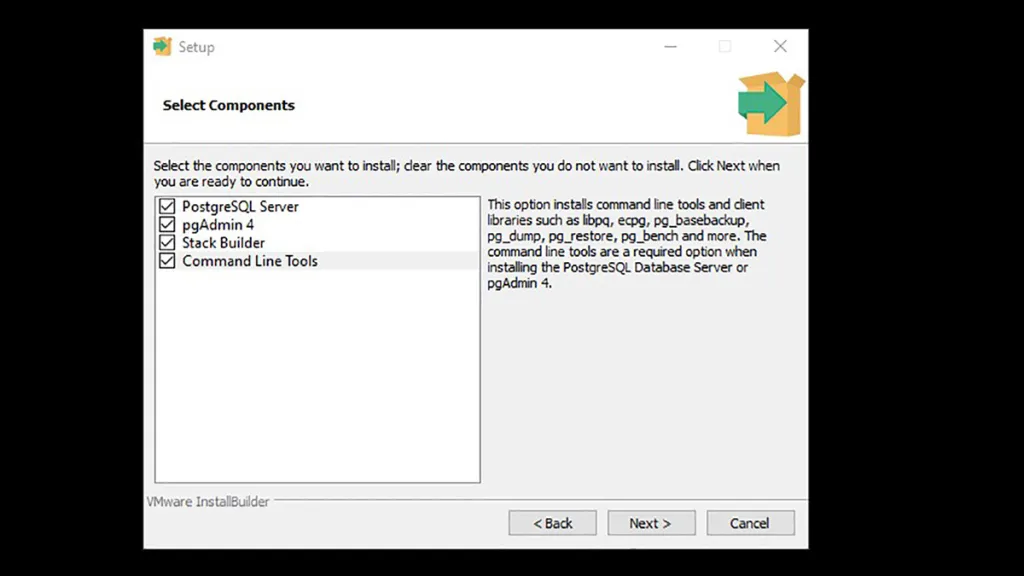
After obtaining the server files, users must install PostgreSQL, an open-source relational database system. Where this program is installed ultimately doesn’t matter, but we suggest placing a sub-folder where you plan on placing the server as a reminder to uninstall the program. Users will want to install all options with the PostgreSQL server: the server itself, pgAdmin 4 (a GUI for database management), Stack Builder, and Command Line Tools.
Where the Data Directory goes won’t ultimately affect too much — we recommend placing the directory in its default location, which is an automatic sub-folder of PostgreSQL. Relational databases are secure entities — you’ll be prompted to create master passwords while installing PostgreSQL. Ensure you note the password, as you’ll need the string to interact with the database. When queried, select to install your database into the local cluster.
Preparing PostgreSQL for the MHF Server Schema
Once the installation has been completed, open the installed application ‘pgAdmin’ and enter a new master key password when prompted. This is a different password than what was created during installation. Within the pgAdmin application, navigate to File, then Preferences. Here, we’re going to set the binary path of PostgreSQL to your installed version, which is found within the bin sub-folder of PostgreSQL.
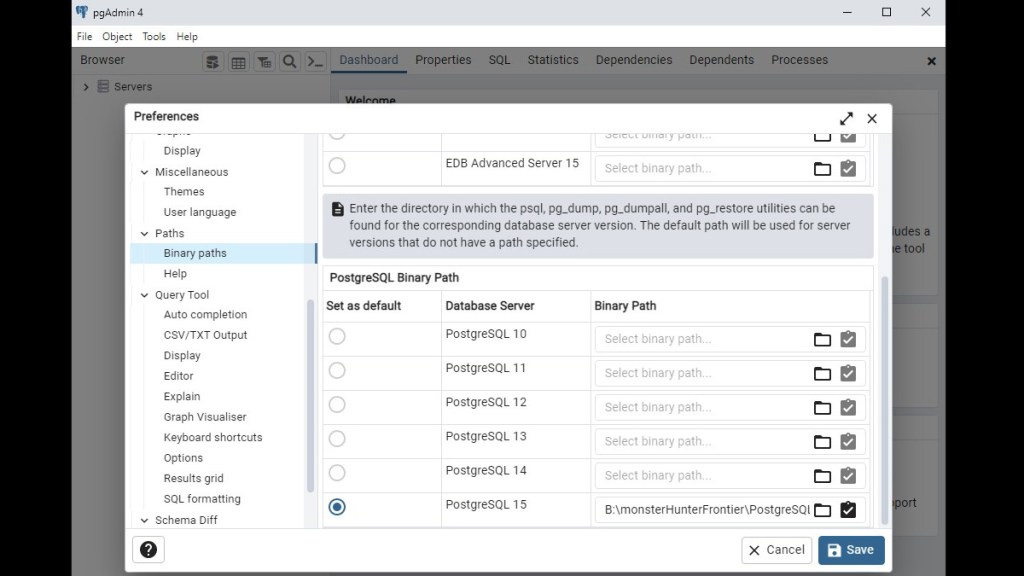
- Scroll down to find the ‘Paths’ gump on the left side of the screen.
- Select ‘Binary Paths’
- Scroll down on the right side of the opened window into the PostgreSQL Binary Path
- Browse for your downloaded version of PostgreSQL, and select the Bin folder in the sub-folder.
- Once the Bin has been appropriately marked, you can set it as default.
- Select Save, which will close the window.
Installing Schema Into Your SQL Database
Within the pgAdmin application, left-click on the Servers on the left side of the window. You will be prompted to enter a password — this is the password set-up during the installation process of PostgreSQL, not the Master password set upon opening the application. Right-click your installed version of PostgreSQL, then navigate to ‘Create’ and select ‘Database.‘
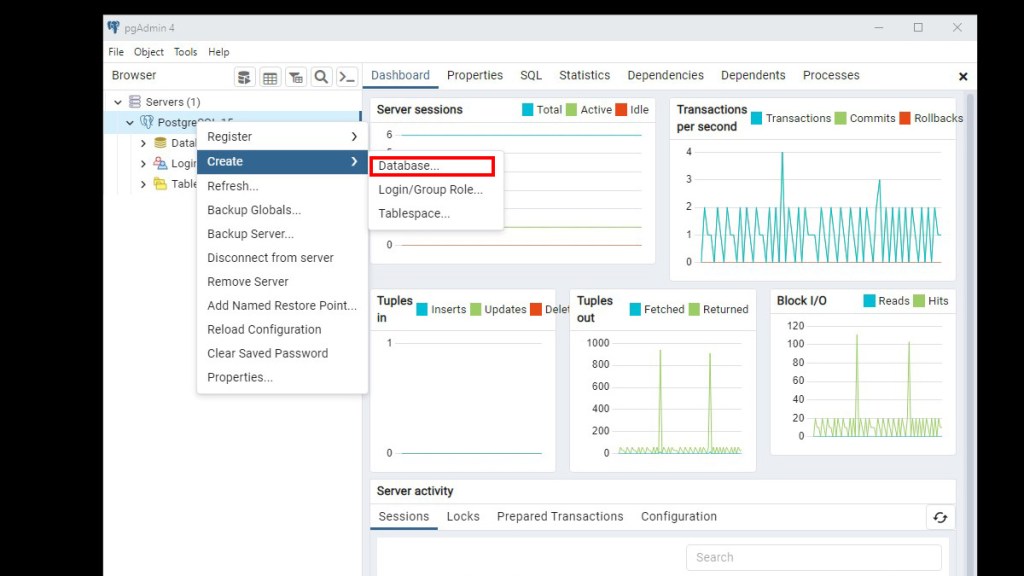
This will bring you to a new window to create the actual database. Call the database ‘erupe,’ then click Save on the bottom right. You will now effectively import the included schema from erupe by using a Restore command. Right-click the database erupe, then select ‘Restore’ in the context menu. In the ‘Filename’ text field, click the folder icon to browse, then navigate to your unzipped Erupe – Community Edition – Server Files folder and find a SQL file named ‘SCHEMA.sql.’ Select the folder, then click ‘Restore.’

Related: The strongest Monster in each Monster Hunter game
Completing the Monster Hunter Frontier database
Within the server files is a sub-folder called ‘bundled-schema,’ which contains three SQL files: FestaDefaults, NetcadeDefaults, and RoadShopItems. We must upload all three files into our newly created erupe database. To do so:
- Right-click the database named erupe within pgAdmin.
- Select ‘Query Tool’ in the dropdown.
- Drag and drop (one File at a time) onto the top window of pgAdmin.
- Verify that the top window has populated with multiple arrays.
- Press F5 to execute the SQL query, filling the database with values.
- Open a new Query Tool, and repeat the steps for the other two SQL files.
Finally, unzip the erupe server sub-folder named Quests.
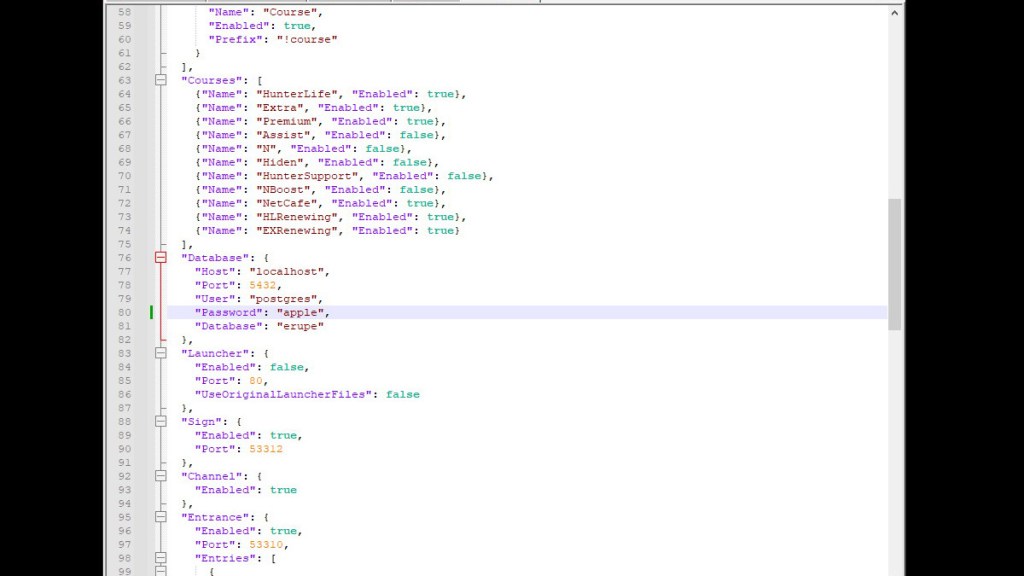
Right-click the Config file within the folder ‘Erupe – Community Edition – Server Files‘ and open it using Notepad++. Find the segment within the Javascript that is labeled “Database.” Append this segment with your database password (not Master password) where the script says “Password”: “between the latter quote marks. Note that this folder also controls Host IP, welcome message, Discord integration, and other admin variables.
Related: The 10 best monster designs in the Monster Hunter series
At this stage, your server set-up is complete. Double-click the application ‘erupe-ce’ within the server folder to start your server. Ensure that the host IP is reachable from external IPs, the ports are open, and all variables are configured as desired within the Config folder. If there is an intrinsic failure, the application will warn users of the type of failure, along with possible troubleshooting methodology.
How to join a Monster Hunter Frontier community server
To join a community server for Monster Hunter Frontier, you’ll first need to find the accompanying folder of the Erupe Server — they are typically packaged together. This is necessary as Erupe Community Edition is a fan project that furthers the work of Capcom’s Monster Hunter Frontier Z. As such, the client-side files must be from the same repository of Erupe Community Edition Server files. Once this folder is unzipped, users must complete three tasks to begin gameplay: localize, determine connecting IP, and create an account.
While the community actively uses the Erupe Community Edition server and client files, these files can only legally be obtained via the lawful purchase of Monster Hunter Frontier — copyright laws may apply. Finally, users follow this guide at their own risk — we do not guarantee safety, efficiency, or security in using found files.
How to localize Monster Hunter Frontier Z
To localize Monster Hunter Frontier, we’ll use a GitHub project called Locale Emulator, allowing us to spoof being in Japan while playing Monster Hunter Frontier. Download and install Locale Emulator. After installing, create a shortcut of mhf.exe within the Client files of Erupe Community Edition, place the shortcut on your desktop, right-click the shortcut, navigate to Locale Emulator, and finally select Edit Global Profile List.

In the open LEGUI Global window, ensure that the Location field is set to ‘Japanese (Japan)‘ and the Timezone field is set to ‘(UTC+09:00) Osaka…’ and save the configuration.
Change the connecting IP for Monster Hunter Frontier
If you’re trying to join a friend’s server, you must plug in their host IP within the System32 Hosts file. Open your file browser, navigate to C:\Windows\System32\drivers\etc, and find the Hosts file. Open with Notepad++, and add the host IP in the following format, exchanging the X’s for the Host IP:
- xxx.xxx.x.xxx erupe.custom
Save the document, and close it.
How To Connect To A Monster Hunter Frontier Server and Making a Character
If you’ve completed all the steps, you’re finally ready to start playing Monster Hunter Frontier Community Edition. Start the application from the desktop shortcut you created, and a new window will pop up, asking you to sign into your character. First, find the ‘Server Selection’ dropdown and scroll to the bottom — select ‘Custom’ to connect to the IP specified in your Host file.

Once the appropriate server has been selected, it’s time to determine your account ID and password. Your name and password can be anything, but note that you cannot change either while keeping your game characters. Even selecting ‘Remember Me’ will ask players to input their User ID, so ensure you take note of your username and password. After entering the game, you’ll create your first character — ignore the messages telling you to create it before signing into the server.


Published: Jan 4, 2024 10:51 am