Setting up a Minecraft can simultaneously be a lot of fun and a major headache. The rewards are worth any difficulties, though. An MC server is a great way to make friends and build a new community. They can also be a source of income so long as you abide by Minecraft’s EULA. Being a server owner can be a big responsibility, but it grants you a lot of creative freedom to construct your server in any way you see fit.
This guide provides a walkthrough for how to create both a paid and self-hosted server. We have also included a lot of information about important subjects that new server owners need to consider. There is no “best” way to manage a server, but we do offer a handful of suggestions and helpful tools for you to use. Ultimately the “best” way to create a server is whatever method fits within your personal budget while also meeting your goals. Keep in mind the end goal, like in any game, is for you and your players to have fun.
Self-hosting vs Paid Hosting
Before you can do anything on your server, you need to decide how it will be hosted. Are you going to host the server on your own PC? Or through a paid hosting service? Both of these are viable options that have a lot of different pros and cons. Ultimately the choice is going to depend on the specs of your PC, your goals in starting the server, and the number of players you are hoping to have on your server. The minimum requirements to host a server are:
- An internet connection with an upload speed of at least 3 MBit/s and download speed of 2 MBit/s
- 1 GB of RAM
- at least 2GB of free space on the device the server is being hosted on
- An Intel Pentium 4 2.0 GHz or AMD Athlon XP 2000+ processor or better.
These are the bare minimum requirements for a server to run, but it won’t be pretty and will likely crash after prolonged gameplay. If you have a poor internet connection or a lower-end or older PC or laptop that doesn’t meet these minimum requirements, running a self-hosted server is not a viable option for you. Paid hosting platforms such as Apex, Shockbyte, and Cubed Host are a great option for hosting a server, but they do cost money. They can also become very expensive if you have a large player base unless you set up a kind of donation system.
Self-hosting gives you the most control over your server and is the best option if you are only going to host a server for a few friends or to work on your own projects. If you are only using it for a few friends, you also won’t need to leave the server on all the time and instead only have it active when all of you are available to play. Your electrical and internet bills will appreciate not having to keep a device active all the time.
It is possible to run a very large self-hosted server if you have the hardware and internet requirements and can leave it running 24 hours around the clock. You will need a basic understanding of how servers work and some fundamental technical skills if you plan on self-hosting a large server. Self-hosting can cost less in the long run, but it doesn’t have the technical support or security provided by a hosting service. If you are self-hosting a server and something goes wrong, it is on you to fix it without, you are your servers IT guy. This is particularly problematic if you are hosting a large number of players at a time or if you aren’t always going to be readily available to handle any server-side issues.
Vanilla, Mods, or Plugins
There are a lot of different types of MC servers you can create. You can play just standard Minecraft without any extra bells and whistles or add mods and plugins to change the game. You can also dedicate your server to focus on a specific type of gameplay like Skyblock, Prison, or Roleplaying. The flexibility of Minecraft means that the sky is the limit. It is also possible to learn how to create your own mods or plugins to do whatever you like in the game, so long as it doesn’t breach any of the terms of the End User License Agreement for the game and server. Here are some of the differences and considerations between Mods, Plugins, and Vanilla MC to keep in mind when creating your server.
Vanilla
A vanilla Minecraft server is the same as the singleplayer or local multiplayer version of the game. There are no extra frills for you to think about or configure to play. The only real difference is that your game is now available outside your local network. Vanilla MC is a lot of fun as is, which is probably why the game is the best selling ever. The biggest problem with these servers is security and grief prevention. Griefers are unfortunately common in any multiplayer game, and MC is no exception. It is entirely possible to log on one day and find out that some random player has come along and destroyed your world while you weren’t around. The best ways to handle this on vanilla MC is through server backups, whitelisting, and having an active mod team. More information on these measures can be found below under the “Security” heading.
Mods
Minecraft mods, like most mods for other games, fundamentally changes the game in some way or another. There are mods for everything from changing how mobs behave to completely changing the game to the point that it is unrecognizable. The vast majority of Minecraft mods need to run on your client, meaning your players will have to download the mods or modpacks to be able to play on your server. Because of this, it is generally a good idea to include a complete list of server mods when you are telling others about your server or posting it on a server list.
There are some exceptions to this rule, such as “server-side mods” that only need to be installed on your server and “client-side only mods,” which are only required on the local MC client and not on the server to be used. Typically mod creators will note if a mod is client or server-side only in the description.
To use mods on a server, you need to install a modding API and loader like Forge, Fabric, or Rift. All of these APIs have their merits. Forge is the most popular and has the most features, while Fabric is a simpler, lightweight API with a smaller but growing community. Either option will require a few more steps for installation than a plugin-based API, but mods tend to change a lot more in the game than the average plugin.
There are a few different places to download mods for your server, but the best, and possibly the safest, are Planet Minecraft and Curse Forge. You can also create your own mods if you have a knack for programming and a love for Minecraft. There are even courses offered on how to create Minecraft mods online with a handful sponsored by some well-known universities.
Modpacks are a bit different from normal mods in that they are much larger and change the game in a much more expansive way. Many popular modpacks make the game almost unrecognizable while providing an amazing experience for players to enjoy. For Modpacks, we recommend Feed the Beast, RLCraft, Pixelmon, Roguelike Adventures and Dungeons, and All the Mods 3. Each of these packs is a blast to play on and is well worth installing on your server.
Plugins
Plugins are similar to mods with two big differences. First, plugins only add functionality to the game without fundamentally changing or modifying it. Second, they are purely server-side and do not require players to install anything client-side. Players can log in and play on servers with plugins without having to do any extra work on their end.
Running a server with plugins requires an API like Bukkit, Spigot, or Paper. All of these APIs are very popular, but Paper is the one we recommend as it features many different bug fixes, cuts down on lag, and improves performance. The vast majority of plugins are designed to run with the Spigot or Bukkit API. Spigot and Paper are both forks of the original Bukkit API so they can run any of these plugins with ease.
Installing a plugin is very easy. All you need to do is download the plugin you want and drop the .jar file into the “plugins” folder on a server running one of the plugin APIs. Some server hosts allow you to search for and install plugins directly from your server control panel, but more often than not the search results will be out of date. We recommend using sites like CurseForge or SpigotMC to find and install your own up-to-date plugins following the instructions of the developers.
For every server, we recommend installing EssentialsX, WorldGuard, GriefPrevention, Vault, WorldEdit, Core Protect, and some kind of permissions handling plugins like bPermissions or LuckPerms.
Port forwarding
If you are hosting a server yourself or just plan on playing a lot of Minecraft, it is a good idea to use port forwarding to get the best performance and reduce lag. Port forwarding is a very common process used by gamers, but how you do it will depend a lot on the router you use for your internet connection. Since there are a lot of different ways to do this, the best option is to go to portforward.com and choose your router from the list to find the exact instructions you need. You will need the IP address of the device hosting your server or using it to play Minecraft. The ports needed for Minecraft are TCP 25565 and UDP 19132, 19133, and 25565.
Setting up a self-hosted server
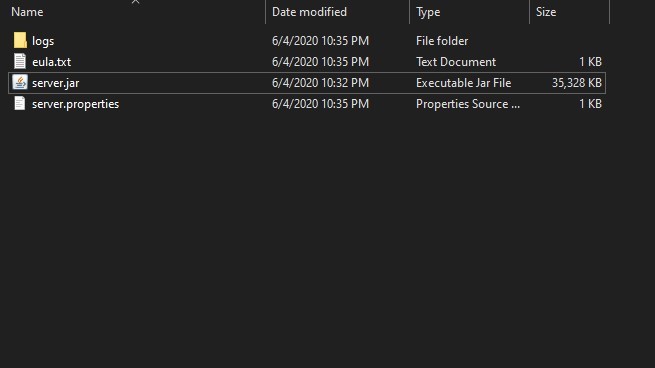
Setting up a self-hosted server is very simple. First, you need to create a folder for all of your server files to be kept. You can create this folder anywhere you want, but it is generally a good idea to place it somewhere you won’t forget. You can also name the folder whatever you like, but typically it is a good idea to name it what you would like the server to be called. Once the server folder is created, you will need to download the server.jar from Mojang. The quickest way to do this is from the Minecraft launcher. Open the launcher and click on the “installations” tab. Click on “New…,” and on the next page above the “Version” drop-down, there is a link called “Server.” If you click on the link, your default browser will open to the download page for the jar, and the download should begin automatically. Keep this page open as it has important information on it.
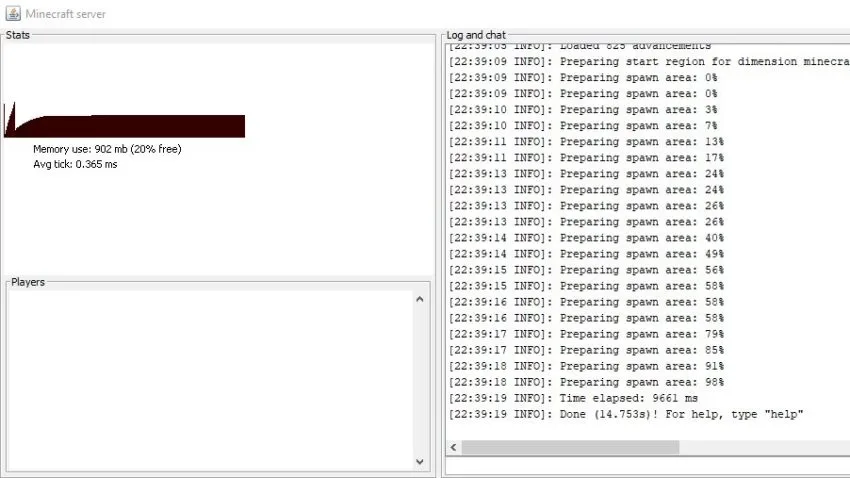
Once you have downloaded the .jar, drop it into the server folder you created earlier. Double click on it to start the server. If you get an error when you click on the .jar, you probably need to download or update your Java installation. You will notice that when you double click on server.jar the first time, it will create two new files and folders. Before you can do anything else, you need to accept the Minecraft EULA. Open “eula.txt” in a text editor and change the last line from “eula=false” to “eula=true” and save it. Double click on server.jar again, and your server will start. This will take a little while on the first start as the game needs to create the world and configuration files. If you are ready to stop the server just type “stop” into the text bar at the bottom, and the UI will close.
If all you wanted was a vanilla Minecraft server and nothing else, you can stop here. There are a few more steps to go through to set it up if you have any other plans for the server. First, you will need to create a new .bat file to open and run your server. Just right-click inside the server folder and choose “new text document” from the “new” menu. You can name this whatever you like, so long as you remember what it is. Open the new document and paste this line into it:
java -Xmx1024M -Xms1024M -jar server.jar nogui
Save the file as a .bat by going to “file” and choosing the “save as” option in the text editor. In the next window, select “All Files” from the “save as file type” dropdown. In the “filename” box, remove .txt if it is present and add “.bat” to the end of the file name and save it in your server folder.
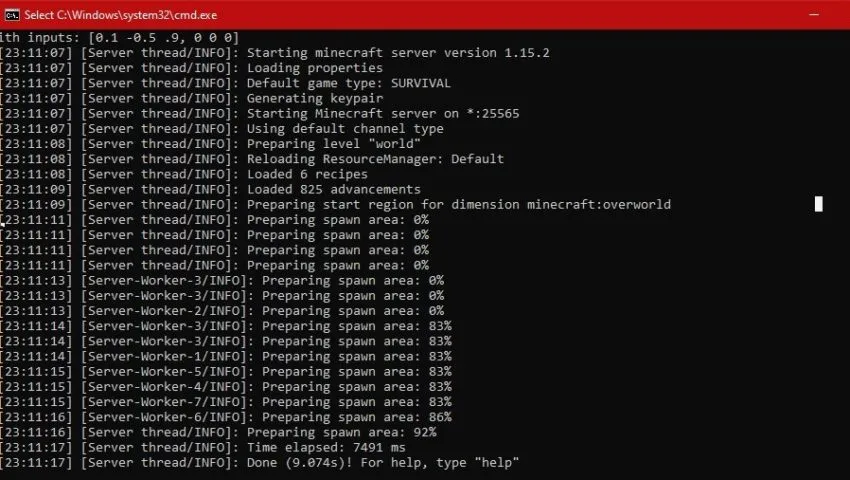
What this does is create an executable file that will start and run your server without the GUI that normally opens when you start using server.jar and give you some more control over how your server runs. You can change this file at any time by right-clicking and opening it with any text editor. You need to be aware of a few very important things before you can use this .bat file. First, note the text “-Xmx1024M -Xms1024M”. The numbers “1024” is what the server will use to determine the minimum and maximum amounts of RAM in megabytes to use. Xmx is the maximum Xms is the minimum. The default amount is 1024 megabytes or one gigabyte of RAM. You can change this number to any amount you wish but both values must be the same for the server to start correctly. Consult your device’s specs or use a tool like Speccy to find out how much RAM you have to work with. The “-jar server.jar” indicates which .jar to use to start the server. If you download a different .jar like Paper or Spigot, you will need to change “server.jar” to the full name and file extension of the one you want. Finally, the “nogui” text just tells the server to launch using a command prompt or terminal instead of the interface pictured above. Most server owners prefer the standard console via the command prompt rather than the other interface.
With all of this in mind, you can double click on the new .bat file to start the server. A new command prompt window will pop up, and your server will be online. You can connect to it through Minecraft by going to “Multiplayer” then clicking on either “add server” or “direct connect” and using “localhost” all one word as the address. You can set up a separate IP via services like NoIP later.
To allow other people to join your new server, you will need to give them your IP address or any DNS you may have created via NoIP. Finding your IP address will vary depending on your operating system. It will generally involve opening your PC settings, navigating to your network settings, and opening your connection or network properties. Look for the line “IPv4 address”. You will see a set of numbers, such as 123.456.0.12. This is the address you will need to give to other people to connect to your server. If there is a slash followed by other numbers, do not include it or the extra numbers as it will not allow you to connect.
Do not under any circumstances give this IP address away on a public space. Only use your computers IP address if you are planning on playing friends or family members you would be willing to give your home address to. If you want this to be a public server, you will need to set up a subdomain via hosts like GoDaddy or Google.
Once all of this is completed, you need to build your server to your liking and start playing.
Choosing your server.jar
The server.jar will determine what kind of features your server will have. The standard .jar file provided by Mojang allows you to create a vanilla Minecraft experience like you would find in a singleplayer or through LAN games. You can also download other .jars for running mods, modpacks, and plugins. Whichever one you choose, be sure that the .jar is in the root folder of your server and that your .bat file points to it so the server can use it properly.
Mod Installation
As a self-hosted server admin, you don’t have the option of just picking a modpack from a menu and letting a server host install it for you. Installing mods on a self-hosted server requires a bit more work. You will need a mod loader API like Forge to be able to run the mods you are wanting, and you will need to let your players know which mods they will need to download and install. Forge is the most popular loader, so we will assume you are using it going forward.
First, you will need to download the version of Forge for the modpack or Minecraft version you want to run. Choose the installer to make things a little bit easier and download it somewhere you can find it easily. You will probably be redirected to an ad page. Don’t click on anything and just wait for the red “skip” button to become available in the top corner. When “skip” is available, click on it to start the download. The file should be named something similar to “forge.jar” with some numbers indicating which version you have downloaded.
Double click on the .jar file to run the installer. If you get an error, you probably don’t have the latest version of Java installed and need to update it. Once the installer opens, you should see a small window with the word “FORGE” in big orange letters and three radial buttons followed by a box with the path to your default Minecraft directory. Choose the radial that says “install client” if it already isn’t highlighted then run the installer. Everything should go fine unless you haven’t played the version of Minecraft you are trying to install Forge for. If that is the case, just open the MC launcher, create an installation for the version you want, start the game using it, and then quit. The Forge installer should run fine after this.
After the client installation is completed, you need to install the Forge server files. First, create a new folder for Forge to install the necessary files. Then double click on the Forge.jar again, and this time choose the “Install server” radial. Notice that the directory box has probably turned red. Click on the button with the three dots next to it and navigate to the new folder you just created and run the installer. The installer will probably take a few minutes to get all of the files it needs for you to run forge.
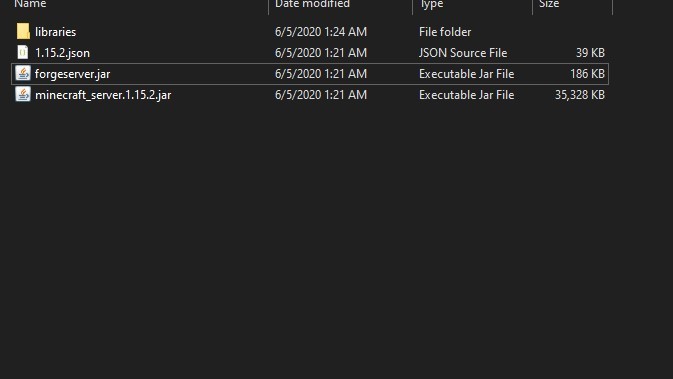
When the process is complete, you will notice that the folder now has a “libraries” folder along with two new .jar files and a .json file. The two .jar files are server .jar, just like the vanilla server.jar and paperclip or spigot. One of them is likely a copy of the original server .jar you installed to set up a vanilla server. First, choose the forge.jar in the folder and change the name to forgeserver.jar to save you some typing later. Move the forgeserver.jar, the .json file, and the “libraries” folder to your server folder and double click on forgeserver to run it. The server should start, and forge will create some new files and directories for server and mod management. The final step is to open your .bat file in a text editor and change the -jar server.jar text to -jar forgeserver.jar to so that the right .jar file is run when your server is started. Go ahead and start your server and try joining it yourself to make sure everything is running smoothly. You can join using the “localhost” without the quotes as the IP address.
Once you have finished all of this, you are now ready to start installing mods and modpacks. To do this, simply download the mods you want and drop them into the new “mods” folder found in your server folder. Be sure to follow the instructions given by the developer on the mod’s page so you can install them correctly. Don’t forget to give your players a full list of mods you are using to install the right ones to play with you.
Plugin Installation
Installing and using plugins is very simple. First, you need to install a plugin API. The most popular are Spigot and Paper. Spigot is a fork of the original plugin API Bukkit and Paper is a fork of Spigot. As a result, both of these APIs can run all of the same plugins. We recommend running Paper as it tends to cut down on lag and provide better server performance. After you download the Paper API for the version of Minecraft, you want to run, rename it to “paperclip.jar” and drop it into your server folder. You will need to open up your .bat file and change the -jar server.jar line to reflect the name of the .jar you want to run. In this case, you would change it to -jar paperclip.jar and save it. After you have made this change, double-click the .bat file to start your server. It will take a little bit longer on the first start as Paper needs to create some new files and folders that will help you manage your server and plugins.
You will notice that there is now a “plugins” folder in your server folder. All you need to do now is download any plugins you like, drop the .jar files into the “plugins” folder, and restart the server. When the server restarts the new plugins will be active and you can configure them as needed according to the developer’s description.
Server Wrappers (optional)
Server wrappers are graphical interfaces that you can use to manage your server, and there are several to choose from. Thankfully most of them let you download and try the control panels for free so you can play around with them and pick the one that suits you. If you decide you want a wrapper, we recommend AMP, Crafty Control, and Multicraft. There are free versions of all of these wrappers, but AMP and Multicraft have limitations on how many servers and players you can have without paying. Multicraft is the most popular control panel available. It has limited one-time purchase options as well as an unlimited subscription option. CubeCoders Limited, the owners of AMP, acquired the popular MCMyAdmin wrapper and integrated it into their services. AMP provides wrappers for a lot of different game servers and makes it easy to switch between them. The unlimited version of the software is available for a one time purchase, but you should definitely try out the free download for a while before you decide to pay for it. Crafty is completely free and opensource with a community of developers working to improve it and help you use it. It is the most lightweight of all the options we have mentioned does not require payment for unlimited service. You can also help improve it if you have some programming or technical knowledge and join the official Discord server.
All three of these options have simple, user-friendly interfaces, and they allow you to manage your server remotely. If you are out and about and want to check on your server or need to do some basic maintenance while you are away from the physical device it is running on, all of these services allow you to connect to the panel remotely and make any changes you need to. The Minecraft wiki has a larger list of available wrappers, but ultimately you should shop around and use the one you like best if you choose to use one at all.
Setting up a paid server
Choosing your server provider
There are a lot of server providers available to choose from. There really is no “best” provider as the vast majority of them offer similar services. Ultimately the best way to choose your provider is to browse around and choose whichever best fits your needs within your budget. Almost all server hosting services have subscription plans that vary from two weeks to two years per payment. Many providers focus on Minecraft, but there are several that also provide servers for other services and games, and many allow you to easily backup and convert your server to other games with relative ease.
Four great options that we recommend are Apex Hosting, ElixirNode, CubedHost, and Shockbyte. Apex and CubedHost only host Minecraft servers while ElixrNode and Shockbyte also provide other services for gaming and business servers. Apex, Shockbyte, and ElixirNode all use variations of the popular Multicraft server control panel while CubedHost uses Crafty Control, more on server wrappers can be found in the section below. These hosts are about average in cost, and all provide good customer service, support services, and excellent server security features, including DDOS protection and automated server backups. While these are good options to choose from for your host, it is still a good idea to do your research on other hosts and pick the one that fits you best.
Server Wrappers
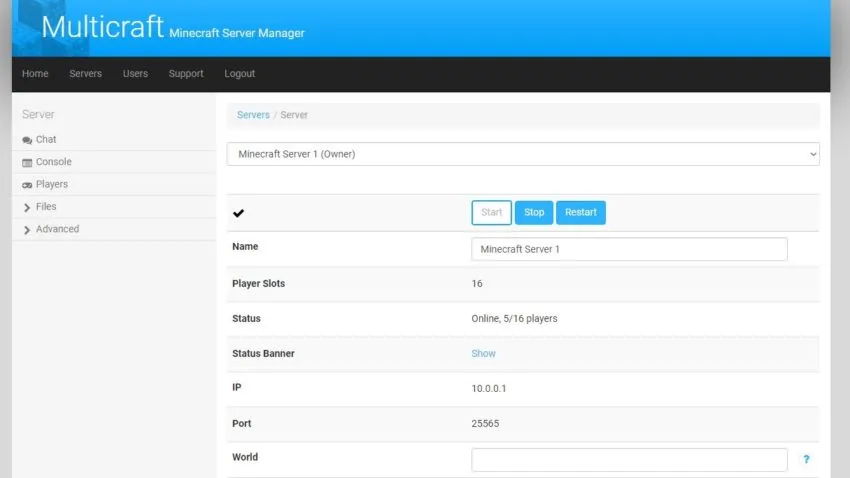
Most online server hosts will give you access to your server through a server wrapper. A server wrapper is just a (typically) user-friendly control panel where you can interact with your server and make any changes you need. The most popular server wrappers for Minecraft are Multicraft, AMP, and Crafty Control though there are many others out there that may be used. Most server providers provide a database on how to interact and manage your server with the wrapper, but you can also go directly to the wrapper’s website and forums for more information. Luckily most wrappers are very user friendly and pretty self-explanatory. Multicraft is probably the most commonly used overall, so we will assume that this is the control panel that you will be using going forward in this guide, all of the information provided will be fairly similar for other wrappers. If you need any help with your server or navigating your server wrapper, contact the server host for more information or check the wiki or database they provide on their sites and forums.
Choosing your server.jar installation
Usually, in the initial sign-up progress or on the home page for your new server, you will have the option to choose what kind of server.jar you want to run. These .jar files will determine what version of the game the server runs and whether or not it can use plugins or a modpack. If your host uses Multicraft, there will be a dropdown menu on your server home page, which will let you choose between different .jar files and modpacks. These are very convenient as they will automatically install the files for you and configure the server to whichever you have selected without you having to do any extra work.
Most control panels like Multicraft will let you access the server files so you can change them as needed. You can also drop your own .jar into the server files and point the server to it either by editing the configuration files (not recommended) or by typing the full name of the file into the “custom .jar” option available on your server’s home page.
There are several options for you to choose from for your server.jar, and all of them will change gameplay in some way. It is simple to just choose the one you want based on the needs of your server. Spigot and Paper are the most common installations available for using Plugins. Modded servers require mod loaders like Forge or Fabric. You can install these yourself, but for modded servers, it is often better and easier to just let the control panel do it for you. Once you have chosen the version of Minecraft, you would like to run just choose the appropriate server installation from the dropdown menu in Multicraft or from the download page of the installation you want. Once you have the .jar installed, you will need to restart your server for any changes to take effect. Server hosts install the latest version of the vanilla server.jar by default, so if that is what you want, you don’t need to worry about choosing or installing a new one.
Mod Installation
Mod installation on a pre-paid server is typically very simple. The first thing to do is select a mod loader or modpack from your server control panel the same way you would choose a game version. After you select a mod loader or modpack, you need to navigate to your servers’ root directory through your control panel or FTP software like Filezilla. From there, just drop the mod into the “Mods” folder and install it according to the mod developer’s instructions. If there is no “mods” folder, then you need to either create one or you are not running a server with a mod loader API like Forge and need to install one. Be sure to update your server description and make an announcement so that players can install the mod if needed.
Plugin Installation
Setting up plugins on a paid server is just as easy as setting them up on a self-hosted server. Using the interface your host has provided, navigate to your server files. In the base directory where you find your server.jar, there should be a folder called “Plugins.” If the folder isn’t their either you need to create one, or you have not configured your server to run Spigot or Paper. Just download the plugins you like and drop the .jar files into your “plugins” folder and restart the server. From there, you will need to follow the instructions provided by the plugin developer to configure and use it properly. Be sure to check that the plugin is installed and running by using the /plugins command in-game or in the console to get a full list of all installed plugins.
Security
Server Backups
Backing up your server periodically is just a good rule of thumb both for server security and maintenance. If someone griefs your server to the point that it would be irreparable or just way too time-consuming to get everything back to normal, it is probably better to just go back to a previous version of the world. The same can be said if you are doing some kind of major server maintenance and make some kind of mistake, having a backup on hand can be the ultimate undo button. Most paid servers will already come pre-configured to backup your worlds periodically. You can configure these backups to control how often they occur and how many backups are kept before old ones start being deleted. Configuring automatic backups can usually be done from a side menu in your server control panel. You can also restore your server and worlds from a previous backup in the same menu. Even with automatic backups available on paid servers, both paid and self-hosted server owners should perform regular manual backups and keep copies of the files on a drive or another machine they can access in case there has been a serious accident. By keeping a separate copy, you will not need to start completely over should you lose any or all of your server files.
Self-hosting owners just need to copy the world folders, server properties, and configuration files, and plugin or mod configuration files to another folder on their device or a separate drive for safekeeping. Mods, plugins, and server jars can be re-downloaded and installed later, so you don’t have to copy them. Backing up the configuration files will make it a lot easier to get back up and running like normal if there is an accident. If you run a lot of plugins or mods, they will also take a very long time to copy over due to the size and number of the .jars while most configuration files are just a set of text or .yaml files that are much smaller and quicker to copy. Paid server owners can initiate an automated backup from the menu option in Multicraft. Some server hosts will allow you to name your backup. Then just navigate to the server root folder and download the manual backup you created and place it somewhere you won’t forget it until you are ready to make another.
Rules
Creating a set of rules for your server and making sure players are aware of those rules from the very beginning can go a long way for maintaining server integrity. Most servers will have a small wall with signs listing their rules near the spawn area. They should also be posted in the server description wherever you decide to share it and discord if you have one. However, these rules are useless if you do not consistently enforce them without bias.
Moderators
The larger your server gets, the harder it will be to manage it. Moderators are essential for any server once it gets past the first dozen or so regular players. Moderator or Mods are players that you grant a certain level of administrative power over the server. Typically you want mods to have the power to kick, mute, and ban players that break the rules of your server or are just a general nuisance. Mods also tend to have the ability to fly and/or access the creative menu to quickly move around the server and fix any problems that griefers may have caused. How you pick your mods is up to you. Some servers create applications via Google forms for interested players to fill out. Regardless of the method, you use to pick a mod, take great care to choose someone you can trust with your server and your players.
Whitelisting
Whitelisting allows you to create a list of who is allowed to join the server. All you need is their Minecraft account name. This is the name that appears when they first logon in-game. To activate the whitelist type /whitelist on in the console. While the whitelist is active, only those on the list can join. To see who is on the list type /whitelist list. If you want to add someone to the list, use /whitelist add player-name-here. If you get into an argument with someone and decide they are no longer part of your friend group, remove them from the list using /whitelist remove player-name. Finally, you can turn the whitelist off and make the server available to anyone with the address by using /whitelist off. If you run these commands through the console, you do not need to include the / before each command line. If you are running a public server, whitelisting is very useful if you and your staff need to get on for a little while to do maintenance without any other players being around.
Security Plugins/Mods
Aside from security provided by your host or any measures you take as an admin, Plugins, and Mods designed for server security will be your best friend. Do your research into which ones will be most useful to you and easiest to use. For plugins: WorldGuard, Core Protect, and Grief Prevention, as we mentioned above, are all extremely useful. They allow you to implement basic anti-griefing restrictions, create protected regions on your server, and roll back any changes made in the world by griefers or simple mishaps. EssentialsX also comes with basic security features like allowing you to view commands and private messages of anyone you believe may cause trouble (we do not condone spying on or stalking your players). Mods like OpGuard and CommandViewer also provide a lot of the same useful preventative and protective functions.
Command Blocks
Command blocks are unique blocks typically only available through console commands. They act as redstone devices that can be used to run console commands on your server. These commands can be very simple or so complex that they completely change the entire world your server is running. Some of the most unique adventure worlds currently available make use of command blocks to create unique experiences. Unless you are running a whitelisted or technical server, it is generally a good idea to disable command blocks altogether. If a griefer logs on and manages to get hold of a command block, they can do a huge amount of damage to your server. You can disable command blocks from your server properties file in the root folder. Command blocks can only be spawned and placed in Creative mode by players with Operator permissions, this reinforces the need to only pick mods you trust if you find it necessary to enable command blocks.
Host Security
When choosing a paid server host, be sure to check their security features. Almost all hosts feature DDOS protection as well as other security features such as automatic backups and whitelisting. As a rule of thumb, if a host doesn’t mention security features somewhere on their main page or during sign up, pick a different one. If you have any questions about server security, most hosting services will be happy to answer and direct you to more information upon your request.


Published: Jun 5, 2020 11:37 pm