Savage raiding in Final Fantasy XIV can be a little intimidating, and anyone diving into Pandemonium for the first time will likely start with the PS1 boss Erichthonios. This fight can seem extremely crazy at first, but when broken down, it becomes quite forgiving and easy to master.
The biggest hurdle of the fight stems from the ability “Intemperance,” which separates the room into nine tiles and gives each player in the group the responsibility to solve the puzzle in the tile assigned to them. What sounds like a daunting task is actually straightforward for all but the north and northwest tile players, and even they can get it done without breaking a sweat.
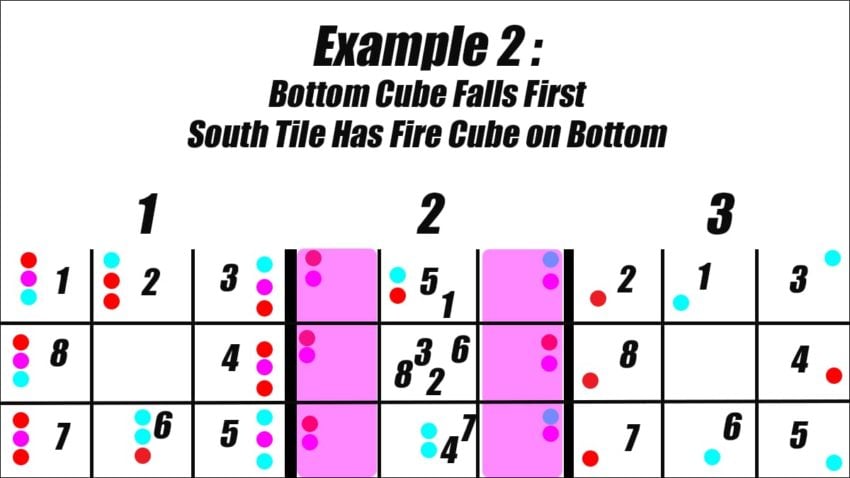
Every tile will receive a set of 3 stacked cubes of different colors. The middle tile, however, will not have any cubes. All eight players will be assigned to their own individual tile while the middle one is left open.
Each of these cubes will have a color associated with them and will fall one by one over the course of the mechanic. Red indicates fire while blue indicates ice, and each color needs to be soaked, or the raid will get a damage-down debuff and take massive damage. These colors will fall first and last in each tile. Every tile along the east and west sides will have a purple cube as the second drop that will basically kill the player outright if they are standing in the tile when it falls, meaning purple is the only color not soaked by players. The south and north tiles will not have a purple cube at all and are used by everyone to resolve the mechanic during the second cube drops along with the center tile. The south tile will always have a blue cube as its second drop, and the north one will always have a red for its second drop.
The goal of the puzzle is to stand in an assigned tile and be hit by the first element. The boss can cause the top cube or the bottom cube to fall first, and he will indicate which one based on either his raised or lowered hand lighting up. This is largely irrelevant for the mechanic, however. Each player must stand in their tile and look at the top and bottom cube colors for it. If they are different element colors, the player will be struck by the first color and then head to the center tile where there are no cubes for the second drop when the purple one goes off in their tile.
Alternatively, if the cubes are the same element color, the player will respond by soaking their first cube drop and then moving to the southern tile for the second drop if the element they just soaked was fire. If the element was ice, they will move to the north tile for the second drop. Between each drop, the boss will cast an AOE called Warden’s Wrath, which gives them time to reposition for the second cube drop spot and then back to their tile in time.
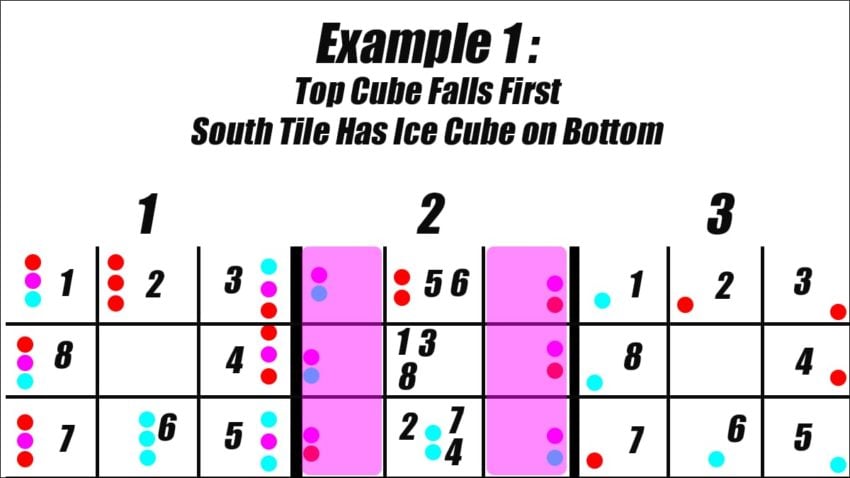
The players assigned to the North and Northwest tiles just have one extra step to watch out for when dealing with their cubes. If the south tile has 3 ice cubes, the two players will deal with their own tiles the same as everyone else in the group. However, if the south tile has a fire cube at the bottom, the two players will swap tiles for the third cube drop. The northwest player will soak the north tile for the third drop, and the north player will soak the Northwest drop.
There is an additional mechanic to watch out for when the boss does Intemperance for the second time, but it doesn’t change the puzzle very much at all save for where the player must stand right after the second cube falls. The boss will cast a Gaoler’s Flail ability, which throws out a spiked ball or chakram and follows it up with the opposite. If the spiked ball comes out first, the players need to make sure that they are out of the boss’s hitbox just after the second cube falls, and then immediately head as close to the boss as possible without leaving their current tile. Once the ability goes off, they must immediately move back to their assigned tile for the final cube drop. If the chakram comes out first, then the player must do the opposite and be as close as possible in their current tile just after the second cube drop and then leave the boss’s hitbox before returning to their assigned tile to resolve the final cube drop.
This might seem like a lot of information, but the best way to master it is to try it out in real-time. It is way harder to read and explain it than to grasp it while actually doing the fight. Much like in real life, the choreography comes through practice.


Published: Feb 10, 2022 10:39 pm