The Swarm Disaster ‘roguelike’ mode of the Simulated Universe in Honkai: Star Rail was part of the Version 1.3 update and was a gigantic piece of new content that’s going to take a while for you to clear in its entirety. As if clearing each difficulty level of each Simulated Universe World wasn’t enough, the Swarm Disaster mode takes even longer.
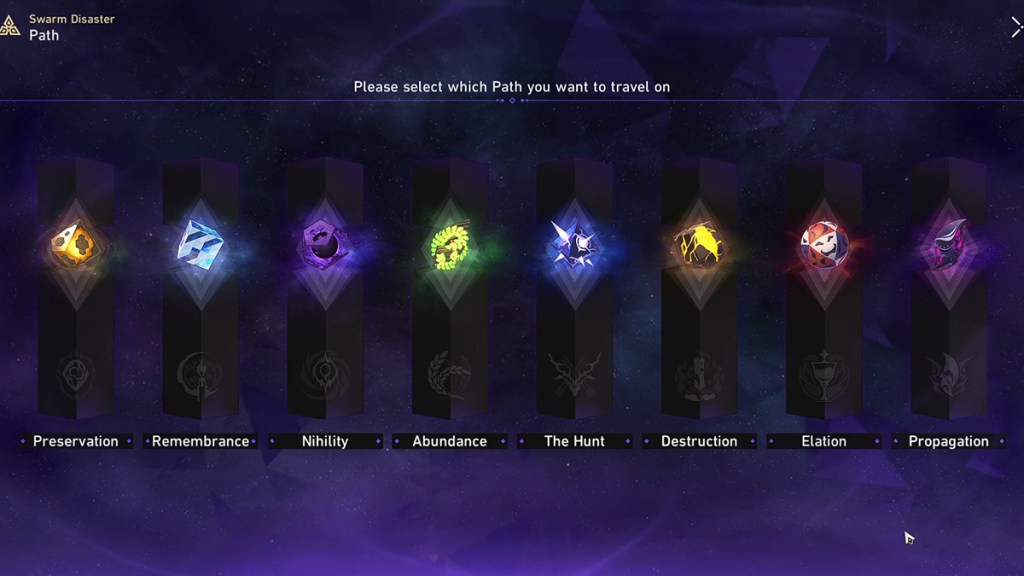
You’ll have eight different configurations to choose from when starting a Swarm Disaster run in Honkai Star Rail, with those being the Aeon Paths of Preservation, Remembrance, Abundance, The Hunt, Destruction, Elation, Propagation, and Nihility. Nihility, in particular, might not seem like the most optimal path to pick for the hardest difficulty, Difficulty V, considering it’s built entirely around damage-over-time (DoT) ticks. But, with the right team and setup, it’s actually sort of a breeze to get through.
Related: Honkai Star Rail Aetherium Wars Guide – Aether Spirits, Victory Zones & Rewards
Swarm Disaster Difficulty 5 Overview & Build Concept
Difficulty V (aka Difficulty 5) of the Swarm Disaster challenge in the Simulated Universe is not like the four levels of difficulty preceding it. The term ‘Tortuous Difficulty’ is pretty apt, because if you haven’t made a significant amount of progress in your Pathstrider’s Trail permanent upgrades in Honkai Star Rail, you’re likely not ready to clear this punishing roguelike challenge. However, for those of you who do feel confident, here’s the general overview and concept of the Nihility build.
The optimal Nihility build for Swarm Disaster V is centered almost entirely around Kafka as its core. When set up properly, this build allows Kafka to continuously use both her Skill and Ultimate to trigger the DoT damage on the entire group of enemies multiple times per turn. In a perfect world, she’ll also have Sampo right there by her side to continuously keep the Wind Shear DoTs maxed out while also using his Ultimate to buff DoT damage even more. However, to make sure that’s possible, you’ll need to equal parts damage output and equal parts survivability in the Honkai Star Rail build.
The Optimal Nihility Build

Here’s the general ‘optimal’ Nihility build that most players seem to be using to clear Difficulty 5:
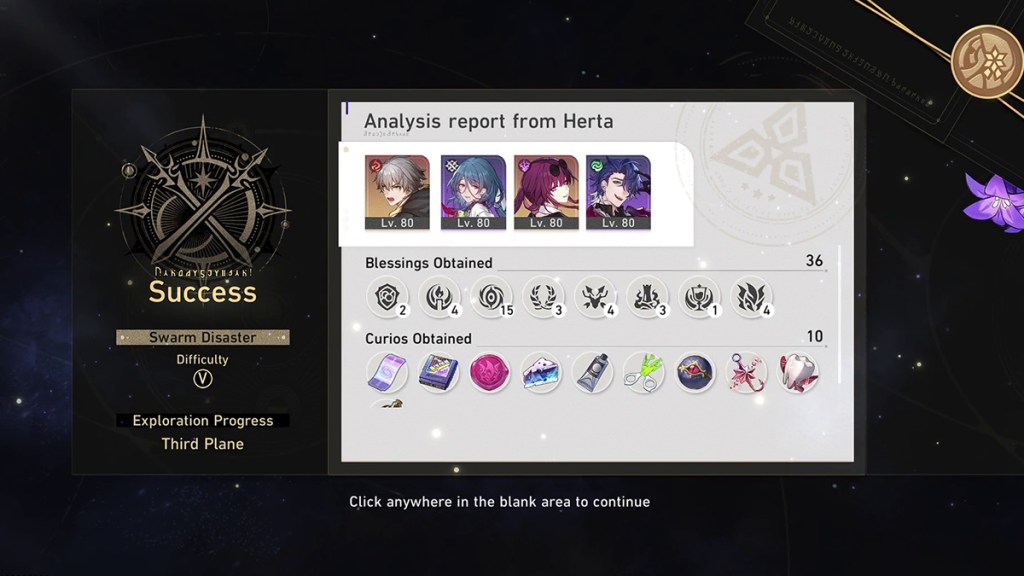
- Characters: Fu Xuan, Luocha, Sampo, Kafka (in Team Setup placement order)
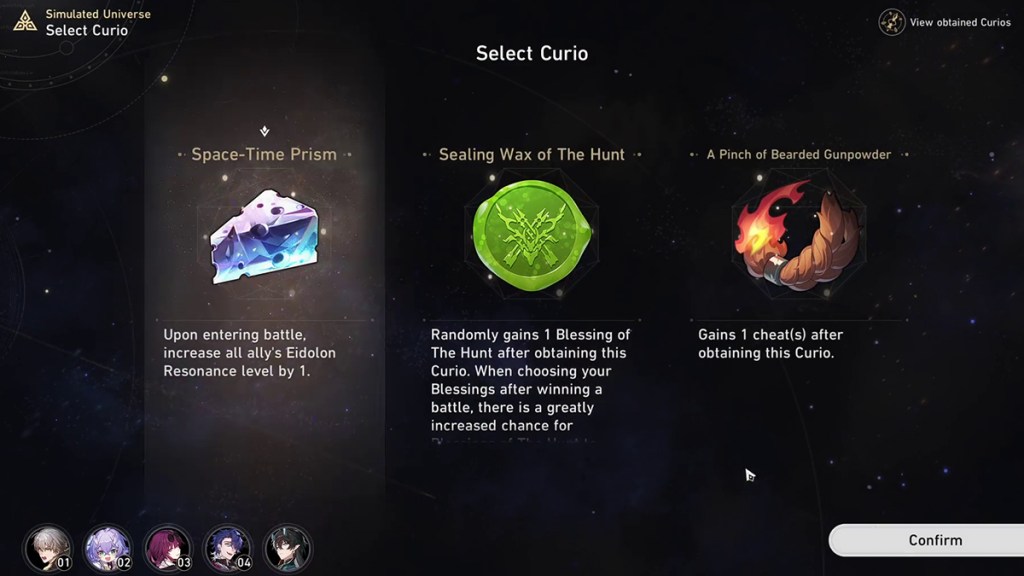
- Curios: Warping Eye Compound, Record from Beyond the Sky, Sealing Wax of Nihility, Punklorde Mentality, Illusory Automaton, Man-Made Meteorite, The Pinkest Collision
- Blessings: 15+ Nihility Blessings (Before Sunrise & Offerings of Deception), Divine Construct: Macrosegregation, Interstellar Construct: Sanctuary, Construct: Rotation, Excitatory Gland, Auspicious Star, and Celestial Annihilation
- Path Resonance Interplays: Both The Hunt & Propagation Interplays obtained
- First Plane Boss Effect: True Sting (Complete) in the third plane’s Boss: Swarm domain, it will be inflicted with Lightning Weakness.
- Second Plane Boss Effect: While battling Swarm: While battling Swarm: True Sting (Complete) in the third plane’s Boss: Swarm domain, enemies’ action will be delayed by an additional 50% when they become Weakness Broken.
In a perfect run with the best RNG possible in Honkai Star Rail, this setup should easily get you past Swarm Disaster’s hardest difficulty. For this team, the general gameplay loop involves using Sampo’s, Fu Xuan’s, & Luocha’s Techniques and then using Kafka’s to actually ‘start’ the battle. Once it starts, you’ll just need to keep a couple of key rules in mind and you’ll be set:
- Always save a Skill Point for Fu Xuan’s Matrix of Prescience Skill, as the team will quickly die without it.
- Try and save another Skill Point for Kafka’s Caressing Moonlight Skill, as it’ll be the one dealing most of the non-Ultimate damage.
- Always use Sampo’s Suprise Present Ultimate before Kafka’s Twilight Trill Ultimate, since Sampo’s gives the DoT damage buff.
- Try to keep Luocha’s Cycle of Life Talent up as often as possible, when combined with the HP Regain Nihility Blessings and Fu Xuan, it makes Sampo and Kafka essentially unkillable.
Character Recommendations

While Kafka is crucial to the ‘core’ Nihility Path build in Honkai Star Rail, more so than other characters like Dan Heng: Imbibitor Lunae is for a Destruction build, that doesn’t mean you’re out of luck if you don’t have her. You may be a Free-2-Play player, and you might not have been lucky enough to pull Kefka, but you can still clear Nihility on the gruelingly difficult fifth Swarm Disaster Difficulty.
That said, if you don’t have Kafka built or Sampo built, it might be better to wait until either of them is built to run a Nihility playthrough. Even in that circumstance, there are still options to replace them. In general, the characters to keep in mind for a Nihility Build are
| Name | Type | Path | Role |
|---|---|---|---|
| Kafka | Lightning | Nihility | DPS |
| Silver Wolf | Quantum | Nihility | DPS/Debuffer |
| Sampo | Wind | Nihility | DPS/Debuffer |
| Welt | Imaginary | Nihility | Debuffer |
| Pela | Ice | Nihility | Debuffer |
| Gepard | Ice | Preservation | Tank |
| Fu Xuan | Quantum | Preservation | Tank |
| Trailblazer | Fire | Preservation | Tank |
| March 7th | Ice | Preservation | Support Tank |
| Luocha | Imaginary | Abundance | Support/Debuffer |
| Bailu | Lightning | Abundance | Support |
| Lynx | Quantum | Abundance | Support |
| Natasha | Physical | Abundance | Support |
| Tingyun | Lightning | Harmony | Buffer Support |
| Dan Heng: Imbibitor Lunae | Imaginary | Destruction | Secondary DPS |
| Seele | Quantum | The Hunt | Secondary DPS |
Blessing Recommendations
The Blessing prioritization for a Nihility run is also a bit unique. Instead of gunning for those 3-Star Nihility Blessings as fast as possible, it’s much more beneficial to get as many 1-Star to 2-Star Nihility Blessings as possible, keeping an eye out for two specific 1-Star Blessings especially.
Additionally, a Nihility Build in Honkai Star Rail uses a decent amount of Blessings from other Paths, with Preservation being first, The Hunt being second, and Propagation being third. In general, here are the Blessings to try and aim for, if possible, in each Path:
The table below is ordered, top to bottom, from highest to lowest priority Blessings to grab.
| Path | Name | Rarity | Description |
|---|---|---|---|
| Nihility | Before Sunrise | 1-Star | Every time an enemy receives a DoT, 2 Energy is regenerated for a random ally. |
| Nihility | Offerings of Deception | 1-Star | Every time an enemy takes Damage from a DoT, all allies restore HP equal to 1% of their respective Max HP. |
| Nihility | Tragic Lecture | 1-Star | Increases DoT taken by enemies by 10%. |
| Nihility | Night Before Pyre | 2-Star | Increases Weakness Break Efficiency by 30% |
| Rememberance | Perfect Experience: Reticence | 3-Star | After an enemy is attacked 6 times, they have a 120% base chance to become Frozen for 1 turn. |
| The Hunt | Auspicious Star | 2-Star | When a character defeats an enemy, regenerates Energy equal to 60% of the character’s Max Energy. |
| The Hunt | Celestial Annihilation | 3-Star | When a character Breaks an enemy’s Weakness, their action Advances Forward by 100% and increases the Damage dealt by their next attack by 50%. |
| Rememberance | Ultimate Experience: Indelibility | 2-Star | When a character deals Damage to an enemy, there’s a 2% base chance to Freeze the hit enemy for 1 turn. |
| Nihility | All Things Are Possible | 2-Star | If an enemy is attacked while under any DoT statuses, a random DoT will be triggered, dealing Damage equal to 100% of the DoT. |
| Nihility | Call of the Wilderness | 2-Star | For every stack of Suspicion the enemies have, reduce their attack by 0.3%, up to a max of 30%. |
| Nihility | The Man in the Cover | 3-Star | Every time an enemy is afflicted with a DoT, apply 3 stacks of Suspicion. |
| Nihility | Funeral of Sensory Pursuivant | 3-Star | Every time an enemy receives DoT, apply 1 stack of Suspicion. Suspicion stacks will not be reduced. |
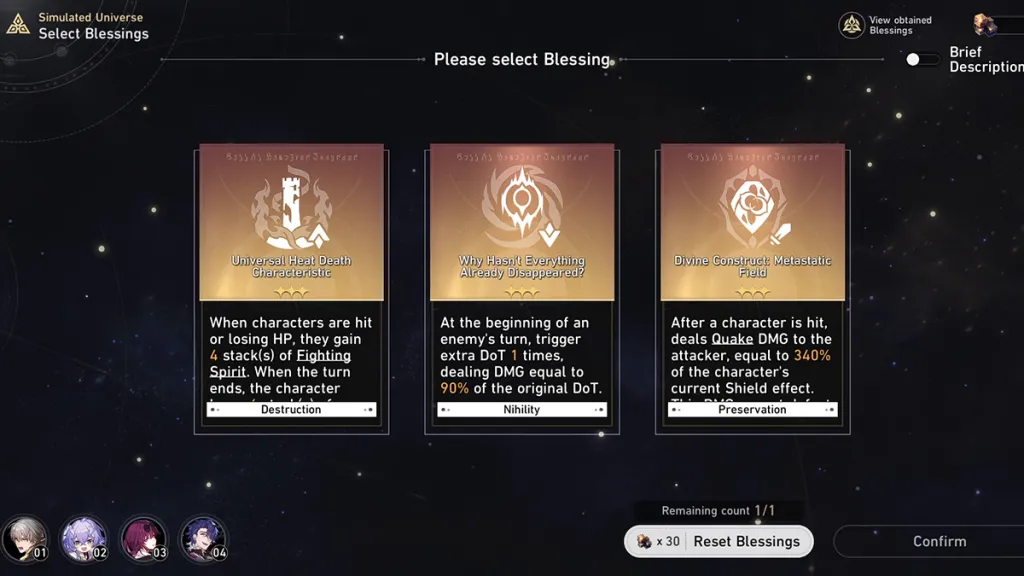
| Nihility | Why Hasn’t Everything Already Disappeared? | 3-Star | At the beginning of an enemy’s turn, trigger extra DoT 1 times, dealing Damage equal to 135% of the original DoT. |
| Preservation | Divine Construct: Macrosegregation | 3-Star | At the start of the battle, characters gain a special Shield that can absorb Damage equal to 1% of their Max HP. Whenever another Shield is gained, this special Shield will also strengthen in equal value. For every 2 turn, this will be removed, and then this special Shield can be regained. |
| Preservation | Interstellar Construct: Sanctuary | 2-Star | At the end of the turn, there is 80% fixed chance for characters to gain a Shield equal to 12% of their Max HP, lasting for 1 turn. |
| Destruction | Reflection | 1-Star | When struck with a killing blow, instead of becoming downed, characters immediately restore HP by 1% of their Max HP. The allied team can only trigger this effect 1 time per battle. |
| Preservation | Construct: Rotation | 1-Star | When a character gains a Shield, there is a 20% fixed chance to dispel 1 debuff that is currently placed on the character. |
| Preservation | Interstellar Construct: Quadrangular Pyramid | 2-Star | Increase the max Damage that can be absorbed by Shields created by characters by 30%. |
| Destruction | Hazardous Lucent Residue | 2-Star | After a character uses their Ultimate, they gain a Shield that can absorb Damage equal to 25% of the HP difference between their Max HP and current HP, lasting for 2 turns. |
| Propagation | Conjunctiva | 1-Star | After characters use Basic Attacks, their Defense increases by 40% for 1 turn. |
| Preservation | Construct: Compensation | 1-Star | After applying Weakness Break on an enemy, characters gain a Shield that can absorb Damage equal to 14.0% of their Max HP, lasting for 2 turns. |
| Propagation | Vesicle | 1-Star | For each Skill Point a character consumes, the character restores HP equal to 10% of their Max HP. |
| Abundance | Seal | 1-Star | When a character Breaks an enemy’s Weakness, restores HP to the character equal to 16% of their Max HP. |
| Preservation | Construct: Sentinel | 1-Star | Upon entering battle, characters gain a Shield equal to 16% of their Max HP, lasting for 2 turns. |
| Abundance | Clear Lucite Body | 2-Star | When a character’s HP is full, reduces their Damage taken by 36% |
| The Hunt | Vaulting Ambition | 1-Star | At the beginning of a character’s turn, they regenerate 4 Energy. |
| The Hunt | Thundering Chariot | 1-Star | When a character Breaks the enemy’s Weakness, delays the enemy’s action by 20%. |
| Destruction | Disciplinary Flicker | 2-Star | If a character’s HP is lower than 35% when being attacked or losing HP, restores their HP by 12% of their Max HP. |
| Propagation | Excitatory Gland | 2-Star | If the team has 0 Skill Point when an ally uses their Basic Attack, additionally recovers 1 Skill Point. |
| Destruction | Instability Strip | 1-Star | When characters are hit or losing HP, regenerates 4 Energy. |
There’s also the Elation Path that you should ignore unless you happen to get its 3-Star Blessing Champion’s Dinner: Cat’s Cradle. If you get Cat’s Cradle in Honkai Star Rail, each character’s Ultimate now counts as a follow-up attack, and the Nihility build is built around using the character’s Ultimates as often as possible. So, almost all of the Elation Blessings are worth grabbing after this point, especially the ones that give more Defense, Energy Regeneration, or Speed.
It’s also worth mentioning that these aren’t the only Blessings to get or to look out for, these are just the ones that are the most crucial to a Nihility build. In general, you should try and get any Blessing that mentions buffing Defense, giving a Shield, or any other factor that helps keep their Nihility characters alive.
Blessing Order Explanation
To go a bit more into why exactly we recommend the Honkai Star Rail Blessings above in that specific order, it’s about balancing survivability with pure DoT damage as much as possible. The only Blessings that we’d say are worth searching for, even if the Planar Disarray level will get to 3+ as a result, are Before Sunrise and Offerings of Deception. These two Nihility Blessings are crucial for keeping characters alive and for starting the loop of using an Ultimate, then the Resonance, then an Ultimate, then the Resonance, and so on.
For defense, as mentioned above, grab Blessings that offer actual Defense or Shields. The only Preservation Blessings that are a ‘must have’ include Divine Construct: Macrosegregation, Interstellar Construct: Sanctuary, and Construct: Rotation. The first two make sure the Nihility characters have Shields up as often as they possibly can, while Rotation can be a run saver when that Lesser Sting enemy manages to go off during the Final Boss fight and inflict Outrage on half of the team.
Lastly, for utility, Propagation’s Excitatory Gland, Hunt’s Auspicious Star, and Hunt’s Celestial Annihilation are the key factors. Excitatory Gland in Honkai Star Rail isn’t all that mandatory, but if you ever see Auspicious Star or especially Celestial Annihilation, grab it. These two Blessings make keeping that loop of Ultimate into Path Resonance so much easier.
Curio Recommendations
Blessings are the main bread-and-butter of any Simulated Universe build in Honkai Star Rail, but Curios are also important. They’re not important enough to choose over a Blessing (most of the time), but some specific Curios can have a massive impact on a run. Let’s look at some of the most impactful Curios for Nihility. We won’t go into quite as much detail it’s not necessary for Curios:
| Name | Description |
|---|---|
Illusory Automaton | At the start of a character’s turn, they restore HP equal to 20% of their Max HP. |
| Warping Compound Eye | When choosing a Blessing after winning a battle, level up all 1-star Blessings that appear. |
| Chaos Trametes | When choosing your Blessings after winning a battle, increase the number of free Blessing resets by 1. |
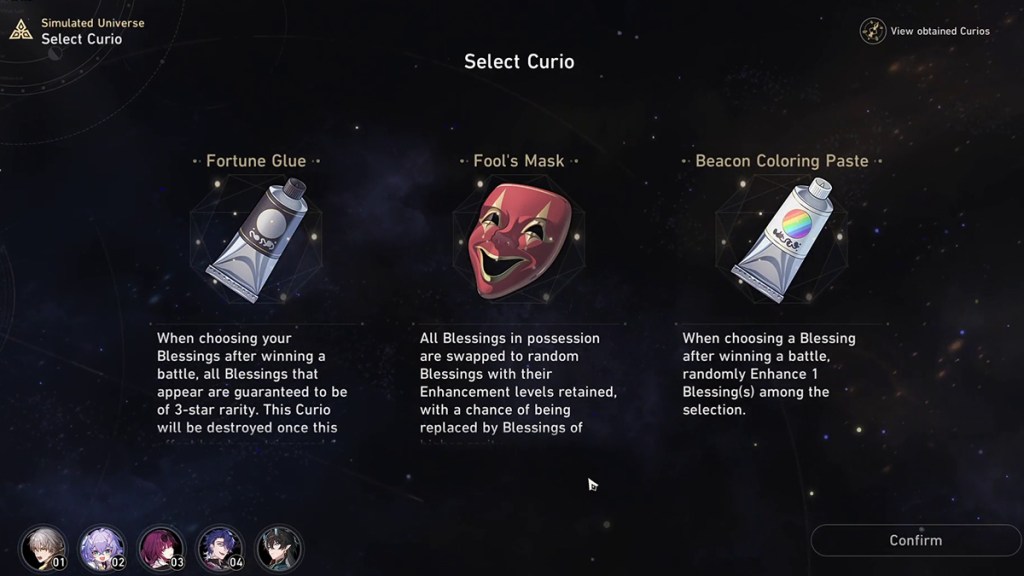
| Fortune Glue | When choosing your Blessings after winning a battle, all Blessings that appear are guaranteed to be of 3-star rarity. This Curio will be destroyed once this effect has been triggered 1 time. |
| Entropic Die | Randomly levels up 2 Blessings after obtaining this Curio. |
| Sealing Wax of Nihility | Randomly gain 1 Blessing of Nihility after obtaining this Curio. When choosing your Blessings after winning a battle, there is a greatly increased chance for Blessings of Nihility to appear. |
| Beacon Coloring Paste | When choosing a Blessing after winning a battle, randomly level up 1 Blessing among the selection. |
| Medal of the Gloryblood Era | Immediately gain 1 random 3-star Blessing. The next time you enter an Occurrence domain, no occurrence will be triggered. This Curio will be destroyed after the effect is triggered 1 time. |
| Punklorde Mentality | Upon entering battle, there is a 100% fixed chance to add to all enemies 1 Weakness of the same Type as allies currently on the field. These Weaknesses last for 3 turns. |
| Triangular Drum-roll Device | When choosing Paths for the first and second planes, you can additionally select 1 already Enhanced Blessing for the corresponding Paths. |
| Man-Made Meteorite | Gains 1 to 3 random Blessings for the current Path after obtaining this Curio. |
| Record from Beyond the Sky | Upon entering battle, all allies will nullify all Damage received except for DoT until after they are attacked, and cannot be debuffed for 3 turns. |
| Shattered Star Bait | Increases Movement Speed by 20% when in map. During combat, characters' actions are Advanced Forward by 10% after they take action. |
| Spirit of the Knights of Beauty | Gains 4 dice rerolls after obtaining this Curio. |
Curio Order Explanation
For the most part, Curios don’t make the ‘biggest’ difference in a Nihility Build for Honkai Star Rail. You’ll still want to grab all the freebie Curios such as Fortune Glue or Entropic Die, but you’ll also want to grab some less commonly used Curios such as Punklorde Mentality or Record from Beyond the Sky.
The most important Curio, at least in our opinion, is the Illusory Automaton. Because Nihility characters will often be taking multiple turns in a row (especially with Celestial Annihilation), this Curio can keep them alive during Phase 3 of the final boss, True Sting (Complete) where it feels like your Healer or Tank Unit’s turn is never coming.
Bosses Of Each Plane & Their Domain Effects
For the First Plane, you’ll end up going against a (Bug) version of an Elite Enemy spanning the entire Index, from Automaton Direwolfs to Disciples of Sanctus Medicus. A lot of other Paths don’t care about avoiding specific Elite Enemies in the First Plane, but Nihility does.
The Second Plane involves fighting a Story Boss spanning the entire Boss Index and also has you balancing the Boss itself vs their beneficial effect much more. However, the Second Plane effects work well with a Nihility build, so always choose to safer option when possible.
Bosses To Avoid
This Honkai Star Rail build takes a while to get going, and usually, your team won’t be all that strong by the end of the First Plane. So, from our experiences, these specific enemies aren’t worth fighting at all:
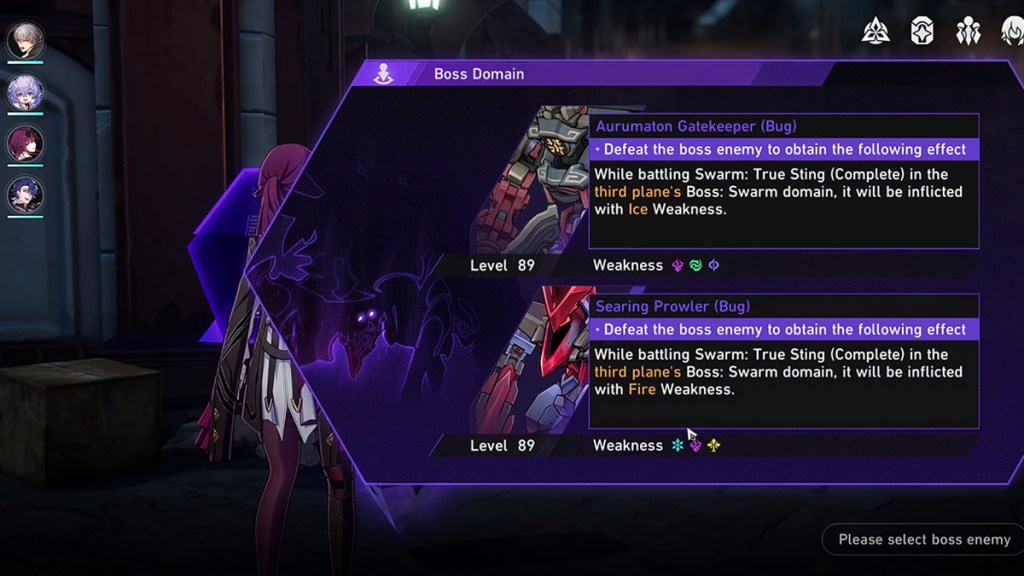
- Aurumaton Gatekeeper (Bug): Very easy to have one of your Nihility characters instantly KO’d when the Sanction Rate reaches 100% and the Aurumaton uses Enchainment.
- Disciples of Sanctus Medicus – Shape Shifter (Bug): Avoid at all costs unless you have a character like Pela, Luocha, or Luka who can remove the Draining Hit buff from the Shape Shifter. Otherwise, you’ll end up caught in an endless loop.
- Silvermane Lieutenant (Bug): Not the worst choice, but just relatively risky as some unlucky targeting on the Lieutenant’s part can be deadly.
- The Ascended (Bug): Sort of opposite from the Shape Shifter, avoid this Elite at all costs unless you have a character that can remove debuffs like Lynx, March 7th, Natasha, or one of the Blessings that can remove them.
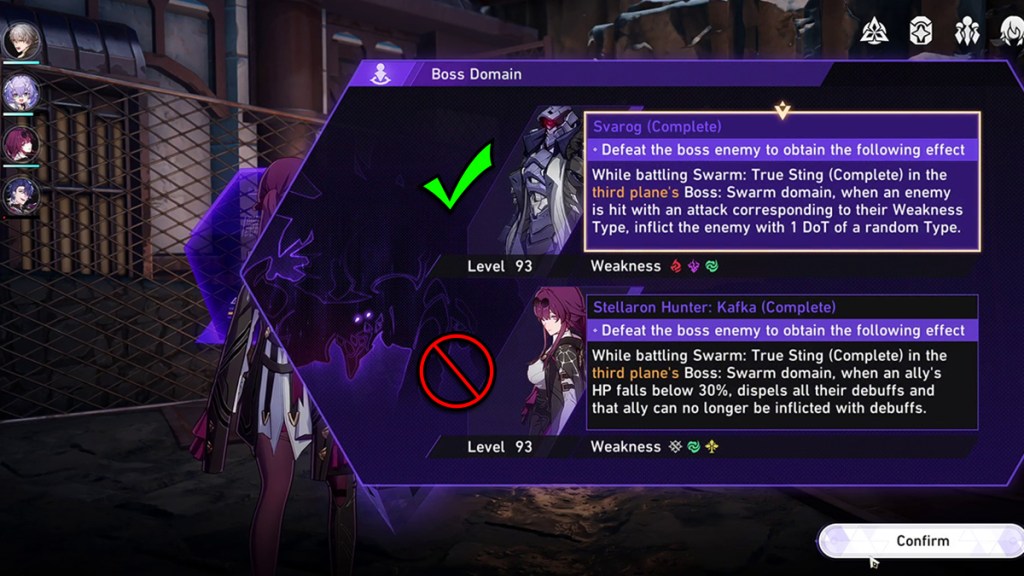
For the Second Plane in Honkai Star Rail, if you’re running the Kafka and Sampo team comp, always fight Svarog if they pop up. Otherwise, most of the other options also work except for Gepard (Complete) and maybe Stellaron Hunter: Kafka.
Gepard isn’t worth fighting as the DoT damage just takes too long to burn through him, and he’ll usually buff his Frigid Waterfall attack too high and wipe the team. Stellaron Hunter: Kafka is a bit more doable, but only if you have a character (or Blessing) that can remove Debuffs.
Boss Domain Effects To Look Out For

For the last little bit of info regarding the Plane Bosses in Honkai Star Rail, let’s go over which benefits are worth keeping an eye out for. The First Plane’s effects are almost always centered around giving the True Sting (Complete) a specific Elemental Weakness, so those should be picked based on your team comp.
The Second Plane’s final boss has effects that are a bit more unique, and some of them synergize well with a Nihility build. In particular, try and fight the Boss that’ll grant any of these effects:
- Delay enemies’ action by an additional 50% when they become Weakness Broken.
- Reduce all enemies’ Speed by 12%.
- Reduce all enemies’ damage by 10% and cause them to prioritize attacking the ally with the highest Shield
- Increase all damage received by enemies when a True Sting receives a killing blow.
- When an enemy is hit with an attack element they’re weak against, inflict the enemy with 1 DoT of a random type.
- When an ally’s HP falls below 30%, dispels all debuffs and the ally can no longer be inflicted with debuffs.
What Domains Should You Prioritize?

Obviously, given the way that the Nihility Dice work, Blank Domains are the best to go for most of the time. However, it’s not always worth going out of the way to get Blank Spaces in Honkai Star Rail, especially if the Planar Disarray is getting close. In general, Nihility builds should follow this list of Domains to prioritize, in order of importance:
- Blank
- Adventure
- Reward
- Transaction
- Occurrence & Swarm: Occurrence
- Respite
- Combat & Swarm: Combat
- Elite
Final Boss Domain Breakdown: True Sting (Complete)
| Name | Damage Type | Weakness | Faction |
|---|---|---|---|
| True Sting (Complete) | Wind | Quantum & Imaginary | Cosmos (Tazzyronth) |
| Juvenile Sting | Wind | Quantum & Imaginary | Cosmos (Tazzyronth) |
| Lesser Sting | Wind | Physical, Fire, & Imaginary | Cosmos (Tazzyronth) |
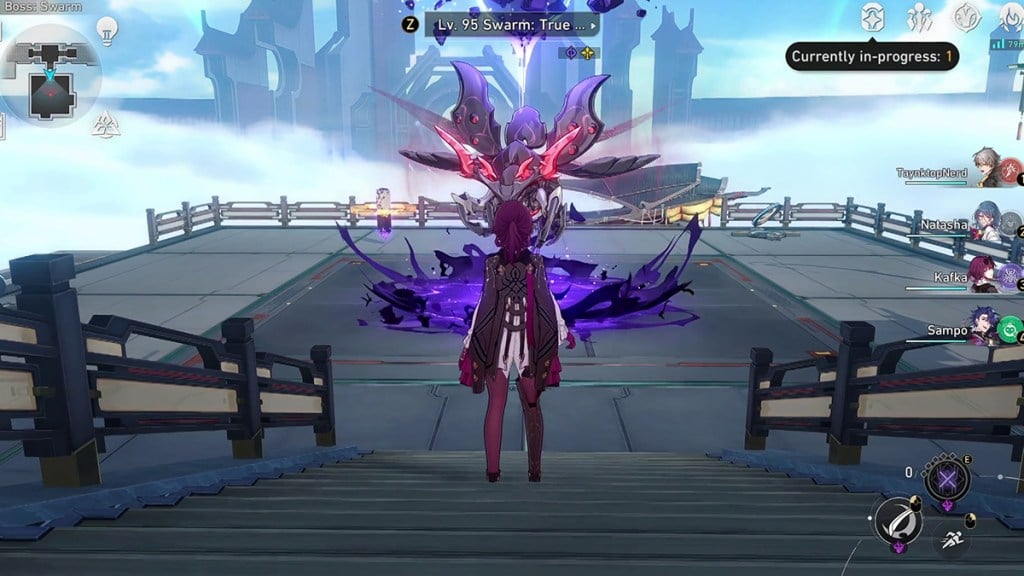
The Final Boss of any Swarm Disaster in Honkai Star Rail run will always be the same, it’s Swarm: True Sting (Complete), the big bad flying beetle of Tazzyronth that will determine if the last 40-50 minutes of your life was a waste of time or not. This boss fight is a three phases, with each phase requiring different tactics for a Nihility Build especially.
True Sting (Complete): Phase 1
Phase 1 of Swarm: True Sting is relatively simple. The True Sting (Complete) in Honkai Star Rail will use attacks like Time to Battle, War Gear, and the occasional Cyclonic Swarm to attack your team while also using Propagation to spawn Juvenile Stings every few turns.
The only real ‘tactic’ to keep in mind for this first phase is to focus Skills on the Juvenile Stings instead of the (Complete) one. The reasoning for this is simple, the Juvenile Stings blow up when they’re killed, damaging every other enemy on the field and doing a decent amount of damage to the True Sting (Complete).
So, if you, for some reason, turned on Auto-Battle in Honkai Star Rail and it targeted the True Sting (Complete) instead of the Juvenile Stings, you would end up taking a lot of unnecessary damage from the healthy smaller True Strings and accrue a lot of Wind Shear as a result.
True Sting (Complete): Phase 2

Phase 2 is the make-it-or-break-it point for most Nihility runs, and it usually comes down to one specific enemy, the Lesser Stings. These slightly different coloration Stings have one move that can throw a run in the trash called Bursting Detonation. They take a turn to set up using Prepare to Fight to enter their Charge state, and on their next turn, they’ll fly at a target, explode themselves, and deal damage to them and any adjacent allies with a very high chance of also inflicting Outrage on those Honkai Star Rail allies for two turns.
This move is exactly why you’ll want a Debuff-removing character (or Debuff-based Blessing) on their team. Outrage makes allies temporarily uncontrollable, usually having them use a basic attack against a random enemy on their turn. However, if this infects either the Honkai Star Rail tank character or the healer, it’s a very deadly debuff.
The standard Nihility builds are already heavily dependent on Gepard or Fu Xuan keeping their gimmick going at all times, so interrupting that for two turns while 4+ enemies take turns dealing high amounts of single-target damage can be fatal.
However, as long as you focus on taking out or disrupting the Lesser Stings, it’s no problem. If the Lesser Sting in Honkai Star Rail has their Weakness Broken, they’ll reset to using Prepare to Fight against once they’re back up, and you can keep this loop going until they’re dead. Otherwise, the tactic is mostly the same as in Phase 1, outside of just making sure as many Juvenile Stings are dead as possible before Swarm Onslaught goes off.
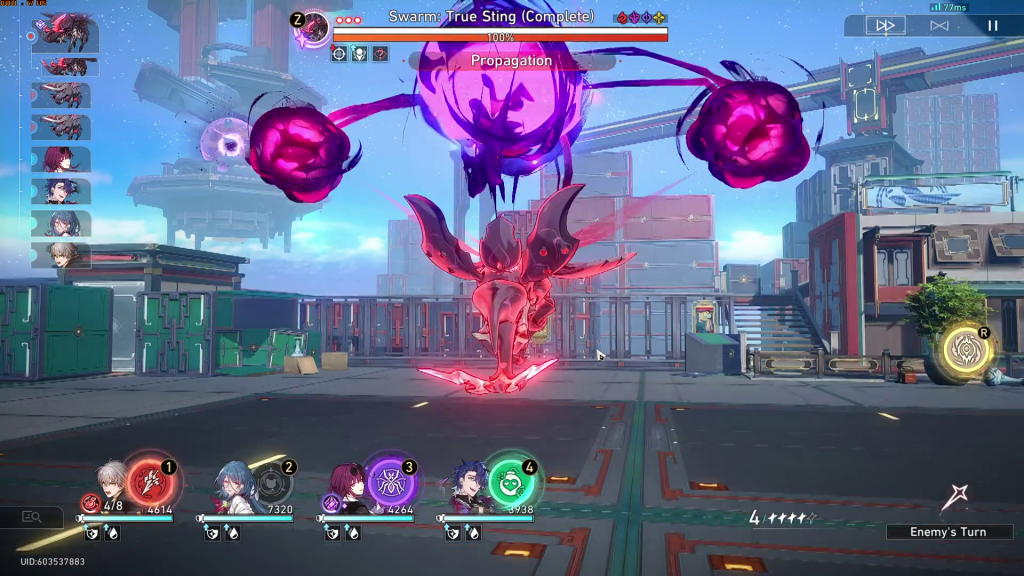
True Sting’s (Complete): Phase 3
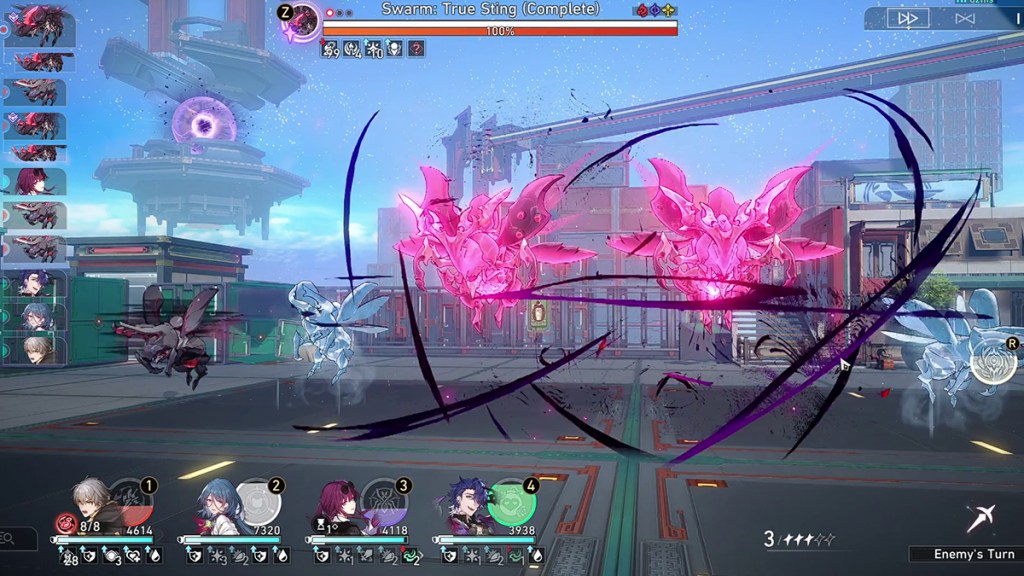
Phase 3 is just like Phase 2, only now the True Sting has managed to duplicate itself, meaning you’ll now have two Swarm Onslaughts to worry about if they’re not careful. This Phase has most of the same challenges as Phase 2. However, if you can’t finish things up by the time both True Stings use Ready Order, they’ll need to heavily brace to survive two Swarm Onslaughts in a row.
If you make it through this, you’re mostly in the clear. Focus on taking out the Juvenile Stings as well as the cloned True Sting (the one that doesn’t affect the HP bar at the top), and staying alive, and you should make it through. And, if you’re especially confident in your damage, you can try to focus down the main True String in Honkai Star Rail instead for this Phase, turning it into a DPS race, but that’s a very high-risk high-reward strategy.


Published: Oct 24, 2023 06:12 pm