
The Iron Throne is a central, heavily guarded prison that you can attempt to infiltrate in Baldur’s Gate 3. You’ll be visiting this location for several quests in the game, but it can be a rather tricky encounter, especially if you’re trying to escape with every prisoner.
There are a few ways you can go about the Iron Throne, but I’ve found some specific things you’ll want to bring with you before you dive in and a strategy you’ll want to follow. Here’s what you need to know about how to escape the Iron Throne and save all prisoners in Baldur’s Gate 3.
How to Prepare for The Iron Throne Prison Escape in Baldur’s Gate 3
The Iron Throne escape involves the Save the Gondians, Saving Wyll’s Father, and Avenge the Drowned quest in Baldur’s Gate 3. Primarily, your party will likely be visiting Iron Throne because of the Gondians, or because you learned from Mizora that Wyll’s father is down here, especially if you did not break Wyll’s pact with Mizora.

Before venturing down to the Iron Throne, my best recommendation is to ensure you have a variety of helpful potions given to every member of your party, and they have certain spells ready. The potions I found most beneficial were Speed Exilirs, which unlock a second action and increase the movement speed of the one who used it. However, after the potion wore off, they would be forced to skip a turn, which is the one downside to them in Baldur’s Gate 3.
However, it’s also critical to make sure that every party member has some teleportation spell or a way to zip around the map. My main character, for example, was a Shadow Monk, and so long as they were in partially shadowed light, they could teleport. Some specific ones that I found most useful were Dimension Door and Misty Step. Dimension Door is extremely helpful on a spellcaster, especially one that needs to carry someone to safety.
Scrolls are ultimately your saving grace for this mission. Any type of scroll, such as Misty Step, Dimension Door, or a way to increase their speed, is a critical asset for your Baldur’s Gate 3. Thanks to my companions’ equipment and overall spell slots, these were not required, but if I had a less magic-based party, I think having any type of scroll to help out would be extremely essential.
After you have those figured out with your Baldur’s Gate 3 party, it’s time to take on the Iron Throne. Before entering the prison, create a quick save, and then have one inside the facility before making your first turn. Both are helpful because you can immediately restart the encounter if things go south or restart to grab additional supplies if you need more before entering it.
How to Get to the Iron Throne in BG3
To get to the Iron Throne, you’ll need to go through the hidden basement in Flymm Cargo. Flymm Cargo can be reached south in the Lower City beside the Counting House, closest to the Grey Harbor Docks waypoint. You can enter the building by lockpicking one of its side doors.
Inside Flymm Cargo, you’ll have to contend with a handful of Wargs. Once they’re dispatched, you’ll want to look for a hidden Basement hatch on the floor covered up by several small crates. The Basement hatch is located in the northwest corner of the building (X:-163, Y:-143), immediately left when entering from Flymm Cargo’s western entrance.
Once inside the basement, head forward to find a submersible and a friendly dwarf named Redhammer the Deviser guarding it. If you’re tactful, you can convince Redhammer to pilot you down to the Iron Throne. Or, if things just aren’t going your way, you can kill Rehammer and use the Submersible Hatch to take control of the submersible yourself.
When piloting the submersible to the Iron Throne, you’ll be immediately contacted by Gortash in a cutscene. No matter what you say here, Gortash will set off explosives, quickly flooding the Iron Throne. This gives you a very limited amount of time grab the Gondians and any other prisoners and make your escape.
Note that if Gortash is already dead before you complete the Iron Throne, the Iron Throne will be inaccessible, already blown up and all prisoners dead. So make sure you complete this section before dealing with Gortash.
The Best Way to Escape Iron Throne Prison in Baldur’s Gate 3
When you begin the Iron Throne encounter, you and your Baldur’s Gate 3 party have six turns to grab everyone you can. However, this will change based on your difficulty. If you’re playing on the easier difficulty, you have eight turns. If you’re playing on the toughest difficulty, Tactical, you only have four turns.
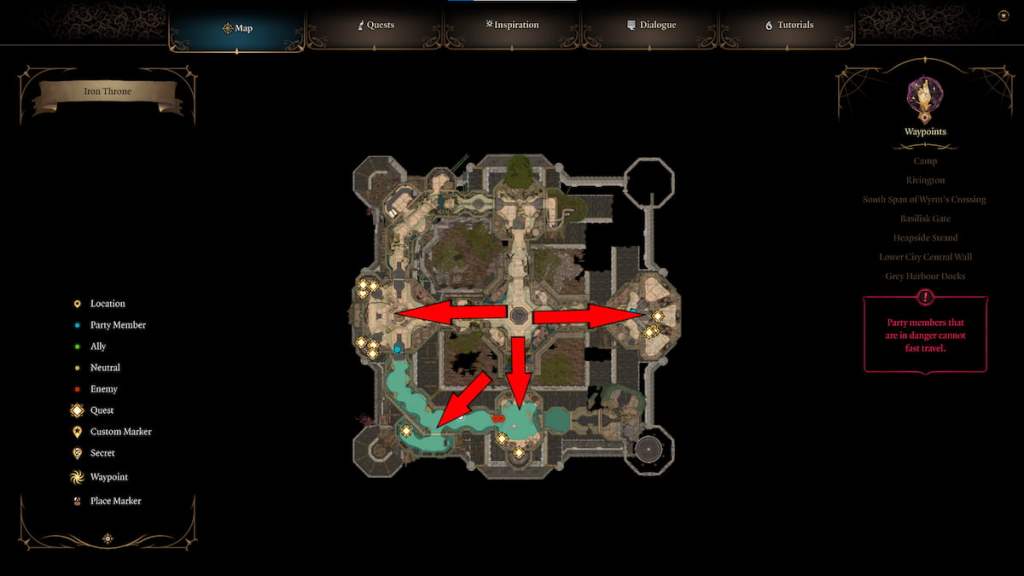
There are eight cells in the Iron Throne that you’ll need to open. Six of these cells contain Gondians, one at the end of the eastern hall contains Duke Ravengard, and one at the southwest corner contains the friendly Mind Flayer, Omeluum. There are no prisoners in the Iron Throne’s northern section. You can open these cells by using the small lever on the side of each cell door.
Whenever you open a door for a prisoner, those characters enter the Initiative order. Nearly every person in Iron Throne will be using Dash to escape, but they have extremely low health, which might make it challenging to keep them alive, especially with the Sahuagin enemies down there, who each have two attacks, and one of those attacks could be a Net.
First Turn in the Iron Throne
For the first round, split up your Baldur’s Gate 3 party. They each need to go in different directions to cover as much ground as possible. While it is tempting to grab the first few prisoner doors at the entrance, I think it’s better to save those for the final rounds and focus on the ones on the far sides of the facility. Send one character to the left, one to the right, and then two down to the south side of the prison. Make sure one of the characters going to the south will veer to the left and enter the back corner, where they can find Omeluum, who has a very helpful ability.
The first round will likely consist of each character running down to the Iron Throne’s cell doors and attempting to get them open. If you can get a handful of prisoners out of their cages, the NPCs inside them will enter the turn order. Again, they only want to use the Dash ability to rush toward the exit. The only goal for you, Baldur’s Gate 3 crew, should be to protect them and get the doors open.
You can find a map of the Iron Throne below, showing the locations of all prisoners and their cells.

Second Turn in the Iron Throne
Now, for the second round, it’ll be much of the same thing, or starting to make your way to creating a protective path for these prisoners. This mission’s overall theme is to ensure your characters were fast enough to reach every door within the facility and then run back with the Gondians.
Thankfully, the character that went to save Omeluum will be immediately teleported back to the submarine, as Omeluum has an ability that lets him and another person teleport back. I then left my character and Omeluum close to the submarine exit so he could get close to any survivors and teleport them back if they weren’t going to make it.
Third Turn in the Iron Throne
The third and fourth rounds should be spent trying to get everyone back to the center. The character you had with Omeluum should make their way down to the center area and protect as many people as possible with a ranged or melee weapon. They should also be the ones to open all of the doors in the inner area, releasing those prisoners.
Any Baldur’s Gate 3 character who took a Speed Exilir on round one will likely have the effects go away on round four, and they will be stunned for a single round. This gives the enemies one free round, so you must be mindful before leaving.
Final Turn in the Iron Throne
After this, the final rounds should involve getting everyone on the submarine. I found it extremely helpful for Omeluum to be close to the exit to grab anyone falling behind with his teleport and immediately bring them to the submarine. So long as a character or a Baldur’s Gate 3 party member is on the second floor, leading out of the prison, they will make it toward the submarine and survive the mission.
The first two rounds in the Iron Throne are the most critical. If things fall apart here, reloading and trying it again is important. Also, Wyll might get help or fight Mizora’s minions during the final part. If you pick for Wyll to remain in his pact, Mizora will help Wyll’s father escape. If he leaves the pact, Mizora will use explosive spiders to attempt to kill Wyll’s father. This is where Dimension Door comes into play, and it is critical to use it on the right side of the prison, where you can find Wyll’s Father.
Iron Throne Tips
Getting everyone out of the Iron Throne alive in BG3 is no easy task, so here are a few things you may want to keep in mind as you run through the flooding prison:
- Sahuagin will increasingly spawn each turn; don’t aim to defeat them. Ignore them when you can, but you’ll also want to make sure they’re held at bay enough to create a safe passage for prisoners to escape. You can use a tank character to draw their attention if they’re proving especially nasty.
- Make good use of Elixirs and movement-increasing spells like Haste, Misty Step, and Dimension Door.
- If a party member dies, leave them. They can be revived by Withers later back at a camp.
- There’s some decent loot in the Iron Throne, including a tadpole specimen near Omeluum, an Infernal Iron below the submersible, and a Counting House Vault 6 Key in a northwestern room. You may consider leaving a party character behind to grab all the loot left behind.
- You don’t actually need to save all the Gondians to advance the “Save the Gondians” quest; only Obelia Toobin needs to survive to progress the quest. If all Gondians or Obelia dies, you can still disable the Steel Watch Foundry by using Speak to the Dead on Zanner or reading the book found on his corpse.


Published: Jan 12, 2024 02:37 pm